NSX-T 2.1 Installation using ovftool (GA ver)
Update on 23 Dec 2017
NSX-T 2.1 was GA. I was using a pre-GA version before. Since Im going to reinstall using the GA version, I thought might as well I take the screenshots again.
You might be wondering why would I want to use ovftool to install NSX-T appliances. This is because my management host is not being managed by a vCenter and it failed when using the vSphere Client.
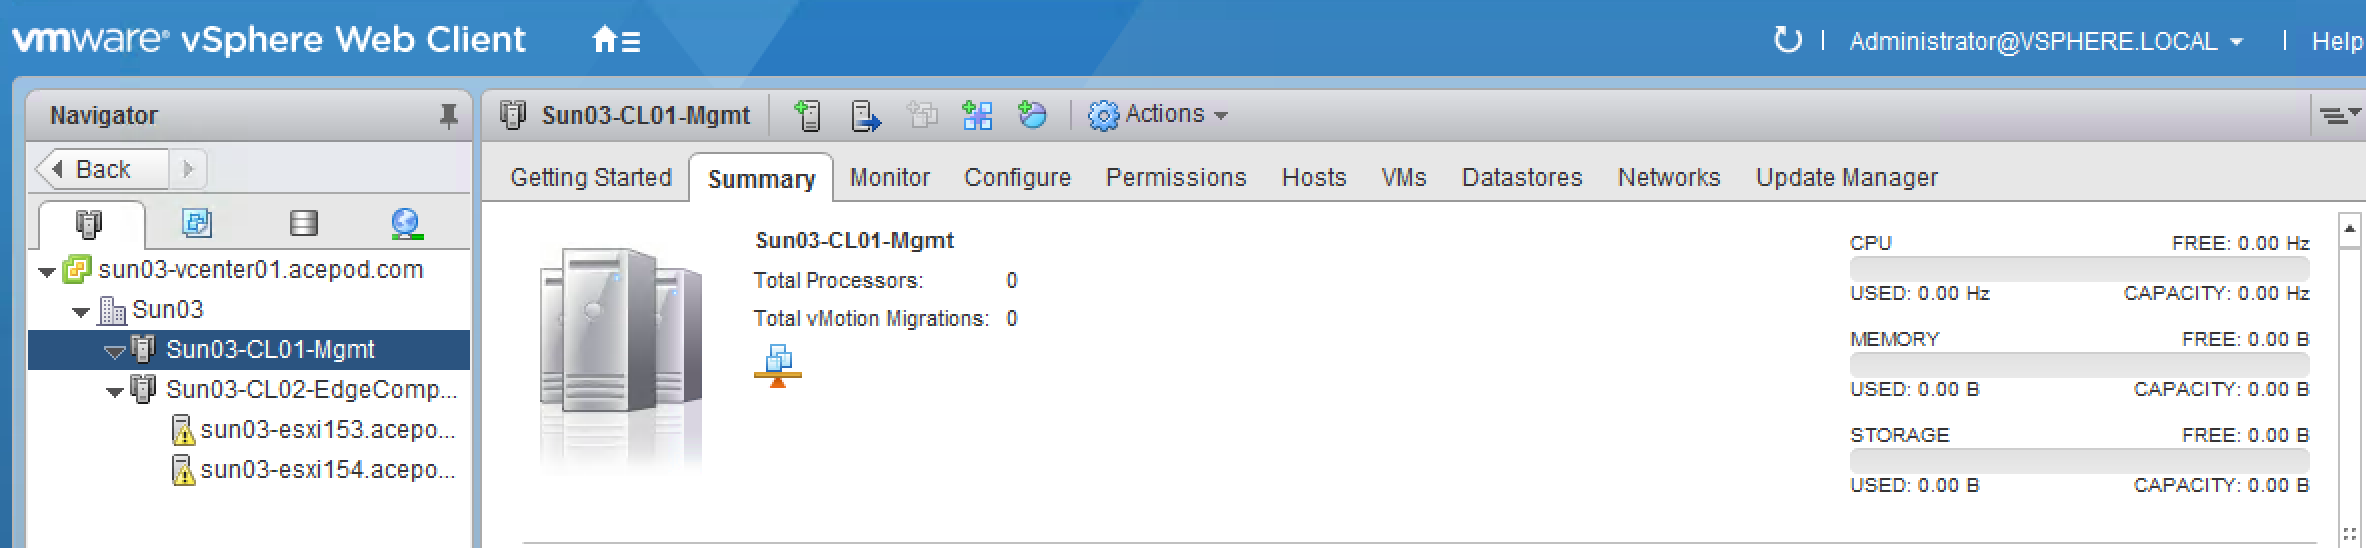
You can see from the screenshot above, I only have hosts for the EdgeComp Cluster. As I do not have additional hosts for the management cluster, I will be using an existing management host that is standalone.
While reading the NSX-T Installation Guide documentation, realize they did mention of using an alternative method ie using the OVF Tool to install the NSX Manager. I reckon, this would be useful for automated install and the other reason, is that NSX-T architecture is to move away from the dependency of vCenter. NSX-T could be deployed in a 100% non-vSphere environment, like for example KVM.
Preparing for Installation
These are the files I will be using for the NSX-T Installation.
1) NSX Manager – nsx-unified-appliance-2.1.0.0.0.7395503.ova
2) NSX Controllers – nsx-controller-2.1.0.0.0.7395493.ova
3) NSX Edges – nsx-edge-2.1.0.0.0.7395503.ova
Installing NSX-T Manager using ovftool
Following the guide, and had to modify the ovftool command. So this is the command I used and I put into a batch file. Maybe later I will incorporate it into the powershell script I used to deploy the vSphere part.
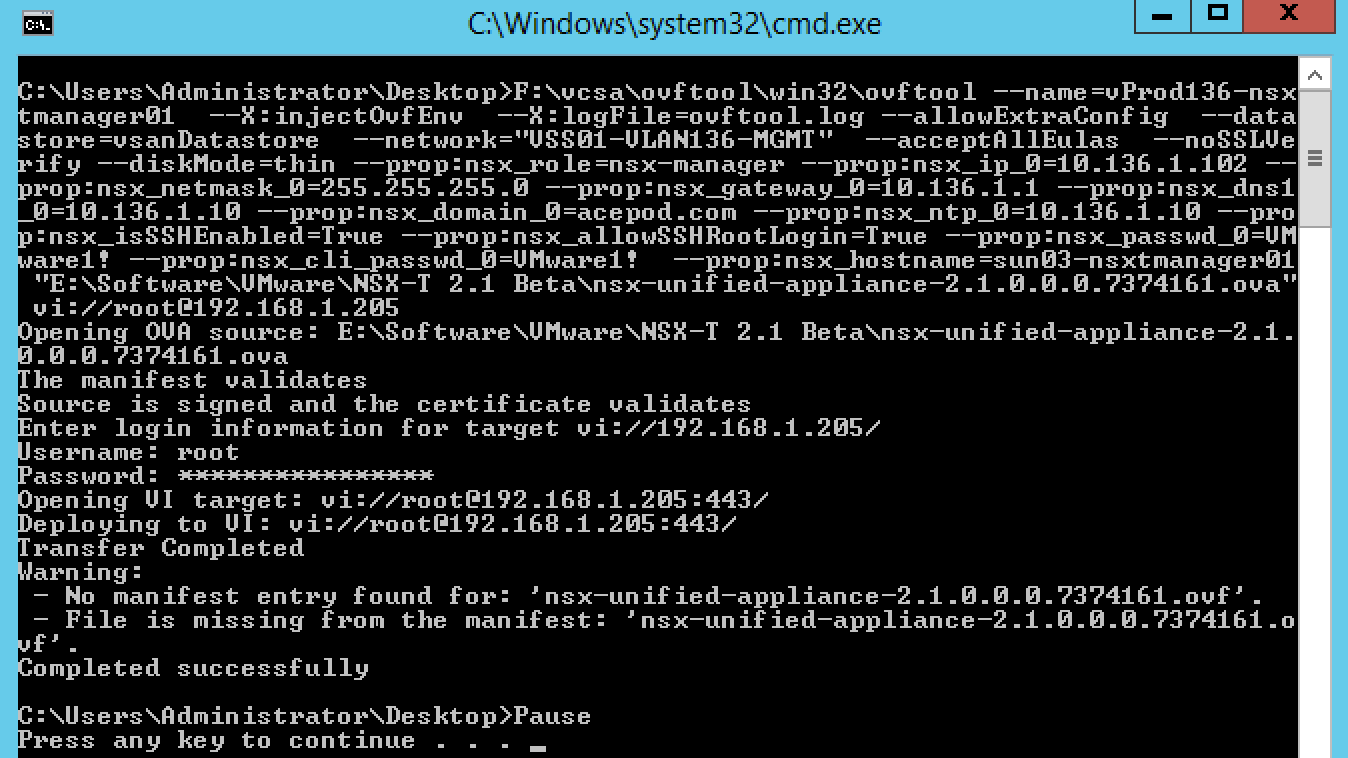
You can find the batch script here.
The ESXi host Im using is 6.0U2 and it does not takes in the OVF properties. So I had no choice, but to deploy to the vcenter instead and to the EdgeComp hosts.

Finally able to login to the NSX Manager console.

Trying to login to the web console of the NSX Manager

Awesome! Able to login and dashboard is up!

The dashboard. Nothing to report at the moment.

Alright. so next will be the NSX-T Controllers.

NSX-T Controllers booted up.

Configuring the Controller Cluster
Retrieve the NSX Manager API thumbprint
- Log onto the NSX Manager via SSH using the admin credentials.
Use “get certificate api thumbprint” to retrieve the SSL certificate thumbprint. Copy the output to use in commands later


Join the NSX Controllers to the NSX Manager
- Log onto each of the NSX Controllers via SSH using the admin credentials.
Use “__join management-plane
username admin thumbprint 

__ 3. Enter the admin password when prompted 4. Validate the controller has joined the Manager with “_get managers_” – you should see a status of “Connected”
> join management-plane 10.136.1.102 username admin thumbprint 77d62c521b6c1477f709b67425f5e6e84bf6f1117bdca0439233db7921b67a28
>
> [<img class="alignnone size-large wp-image-496" src="http://acepod.com/wp-content/uploads/2017/12/Screen-Shot-2017-12-24-at-11.45.57-PM-1024x301.png" alt="Screen Shot 2017-12-24 at 11.45.57 PM" width="625" height="184" />][14]
Repeat this procedure for all three controllers. *For my lab, I will deploy only one controller.


Initialise the Controller Cluster
To configure the Controller cluster we need to log onto any of the Controllers and initialise the cluster. This can be any one of the Controllers, but it will make the controller the master node in the cluster. Initialising the cluster requires a shared secret to be used on each node.
- Log onto the Controller node via SSH using the admin credentials.
- Use “_set control-cluster security-model shared-secret_” to configure the shared secret
- When the secret is configured, use “initialize control-cluster” to promote this node:

Validate the status of the node using the “get control-cluster status verbose” command. You can also check the status in the NSX Manager web interface. The command shows that the Controller is the master, in majority and can connect to the Zookeeper Server (a distributed configuration service)

Notice in the web interface that the node has a Cluster Status of “Up”

Preparing ESXi Hosts
With ESXi hosts you can prepare them for NSX by using the “Compute Manager” construct to add a vCenter server, and then prepare the hosts automatically, or you can manually add the hosts. You can refer to Sam’s blog posts as he prepare the hosts manually for his learning exercise. Since my purpose is to quickly get the deployment up for PKS/PCF, Im going to use the automatic method using the “Compute Manager”
Login to NSX-T Manager.
Select Compute Managers.
Click on Add.

- Put in the details for the vcenter.

Success!

Go into Nodes under Fabric.
Change the Managed by from Standalone to the name of the compute manager you just specified.

7. If you notice above, there are multiple IP addresses listed and this will pose problems to the installation. Click on each host and remove all the IP addresses except the management IP address of the hosts.
- Select the hosts you would like to Install NSX.

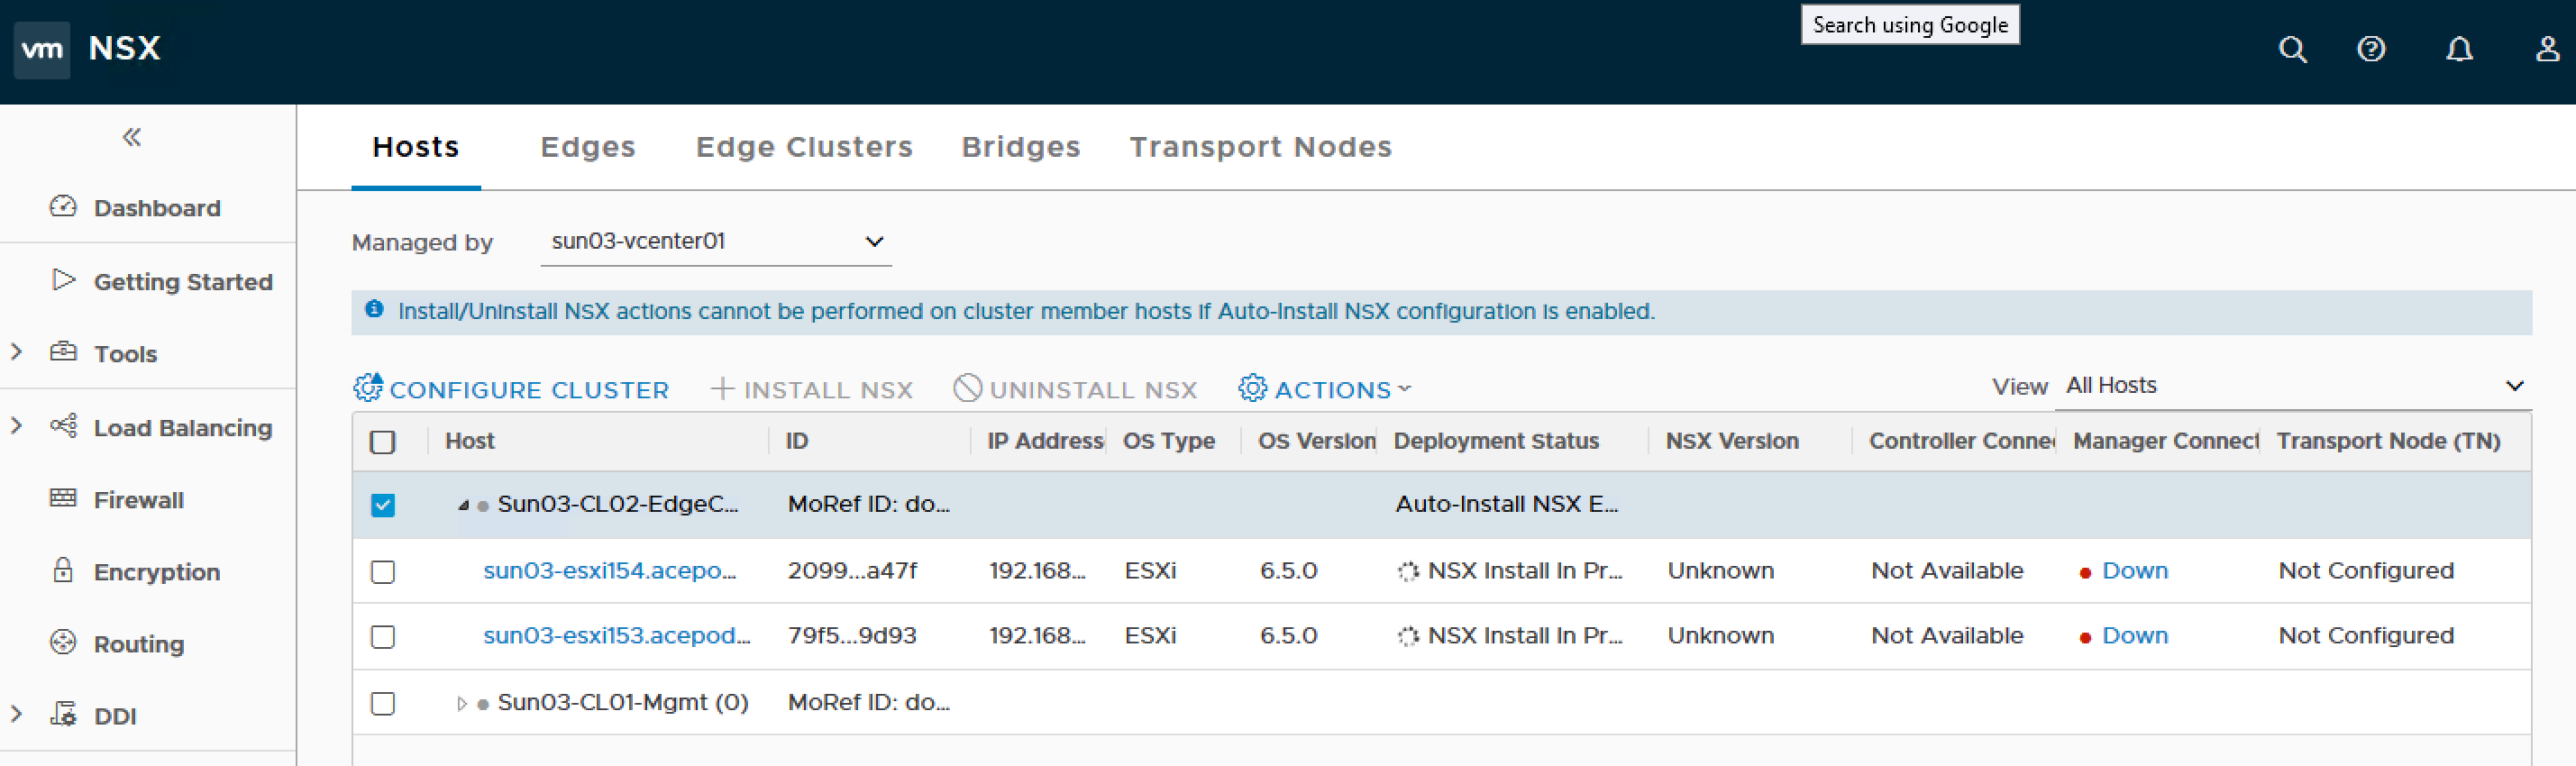
- Select the Cluster and click on Configure Cluster. Enabled “Automatically Install NSX” and leave “Automatically Create Transport Node” as Disabled as I have not create the Transport Zone.
You will see NSX Install In Progress
Error! Host certificate not updated.

After some troubleshooting, I realize the host has multiple IP addresses, So what I did was to remove all of them except for the management IP address and the host preparation went on smoothly.


Yeah! Host preparation is successful
Deploying a VM Edge Node
Following the instructions from [Install NSX Edge on ESXi Using the Command-Line OVF Tool][31], we can deploy NSX Edges using ovftool.

Once the OVF deployment has completed, power on the VM Edge Node.
Join NSX Edges with the management plane
If you enabled SSH (as I did) you can connect with the newly deployed Edge on it’s management IP address. If not you should be able to use the console to configure it. Once on the console/SSH, authenticate as the admin user with the password you specified during deploy time.

Validate the management IP address using “get interface eth0”

Retrieve the Manager API thumbprint using “get certificate api thumbprint” from the NSX Manager console/SSH, or using the web interface

Join the VM Edge Node to the management plane using the following command:
join management-plane
join management-plane 10.136.1.102 username admin thumbprint 77d62c521b6c1477f709b67425f5e6e84bf6f1117bdca0439233db7921b67a28
You will be prompted for the password of the NSX admin user and the node will be registered

You can validate the Edge has joined the Management plane using the command “get managers”.

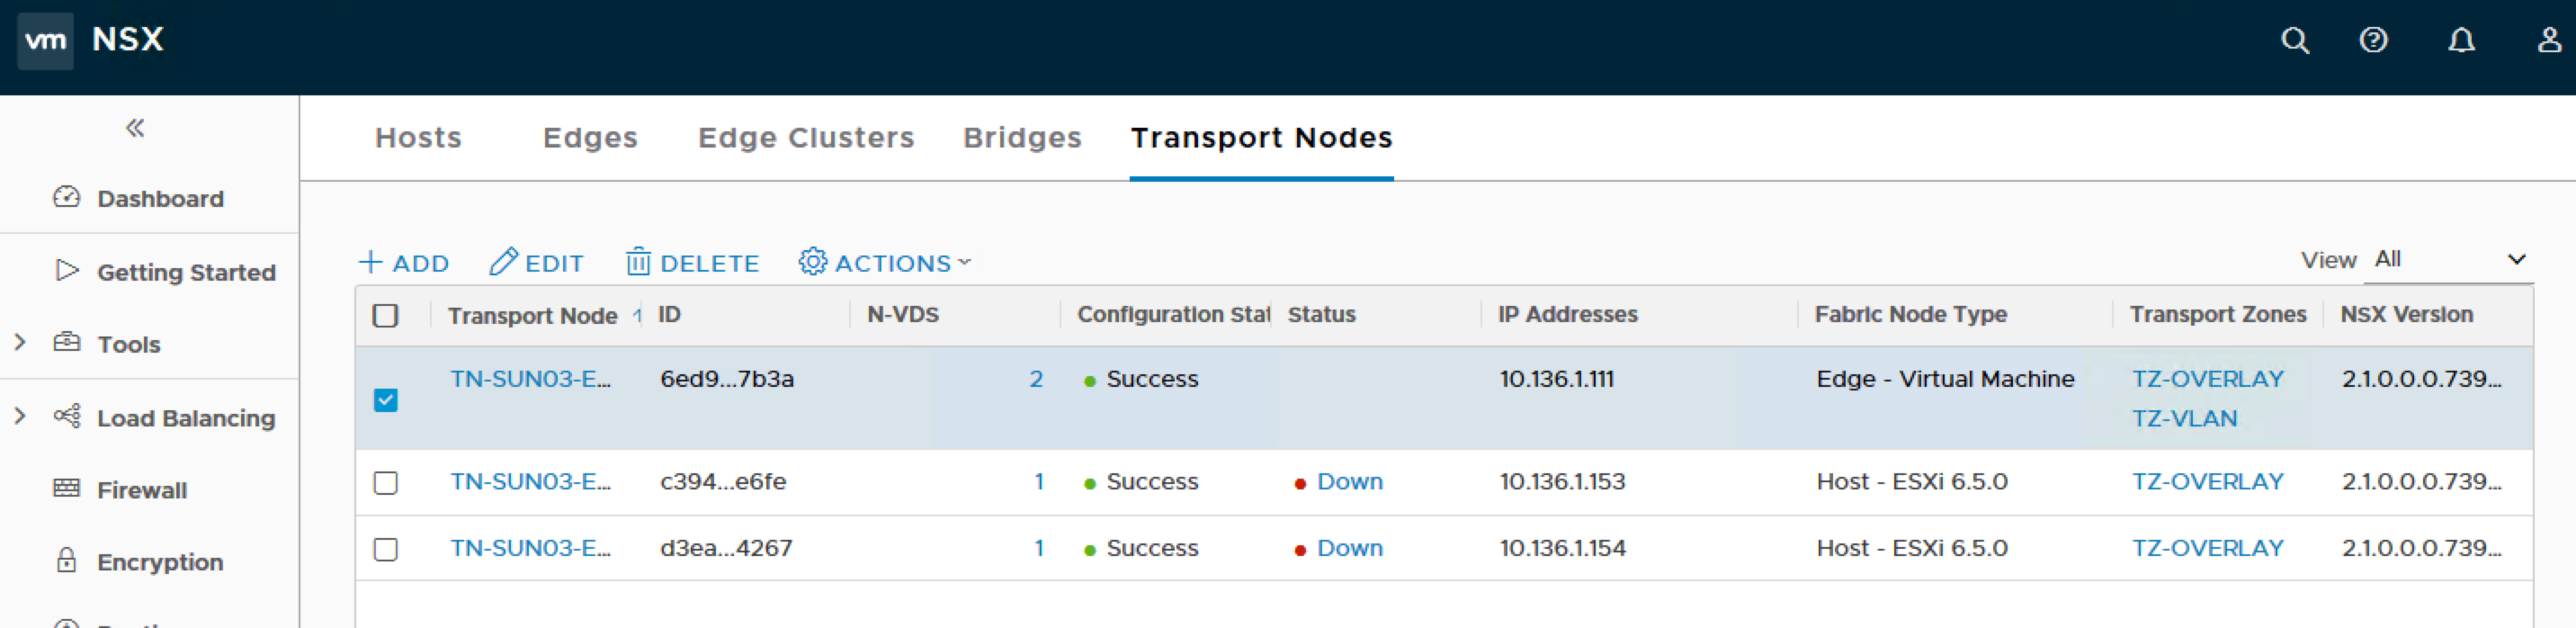
Below you can see that in the NSX Manager console under Fabric > Nodes > Edges I have added two Edge VMs, the deployment is up and connected to the manager, but the Transport Node is not configured yet – that will be the next post!

Create Transport Zones & Transport Nodes
Create an IP Pool for the Tunnel Endpoints (TEPs)
Both the hosts and edges will require an IP address for the GENEVE tunnel endpoints, so in order to address these I will create an IP Pool.
Click on Groups, IP Pools, Add New IP Pool.
Name: Pool-TEP
IP Ranges: 10.140.1.11 – 10.140.1.250
Gateway: 10.140.1.1
CIDR: 10.140.1.0/24
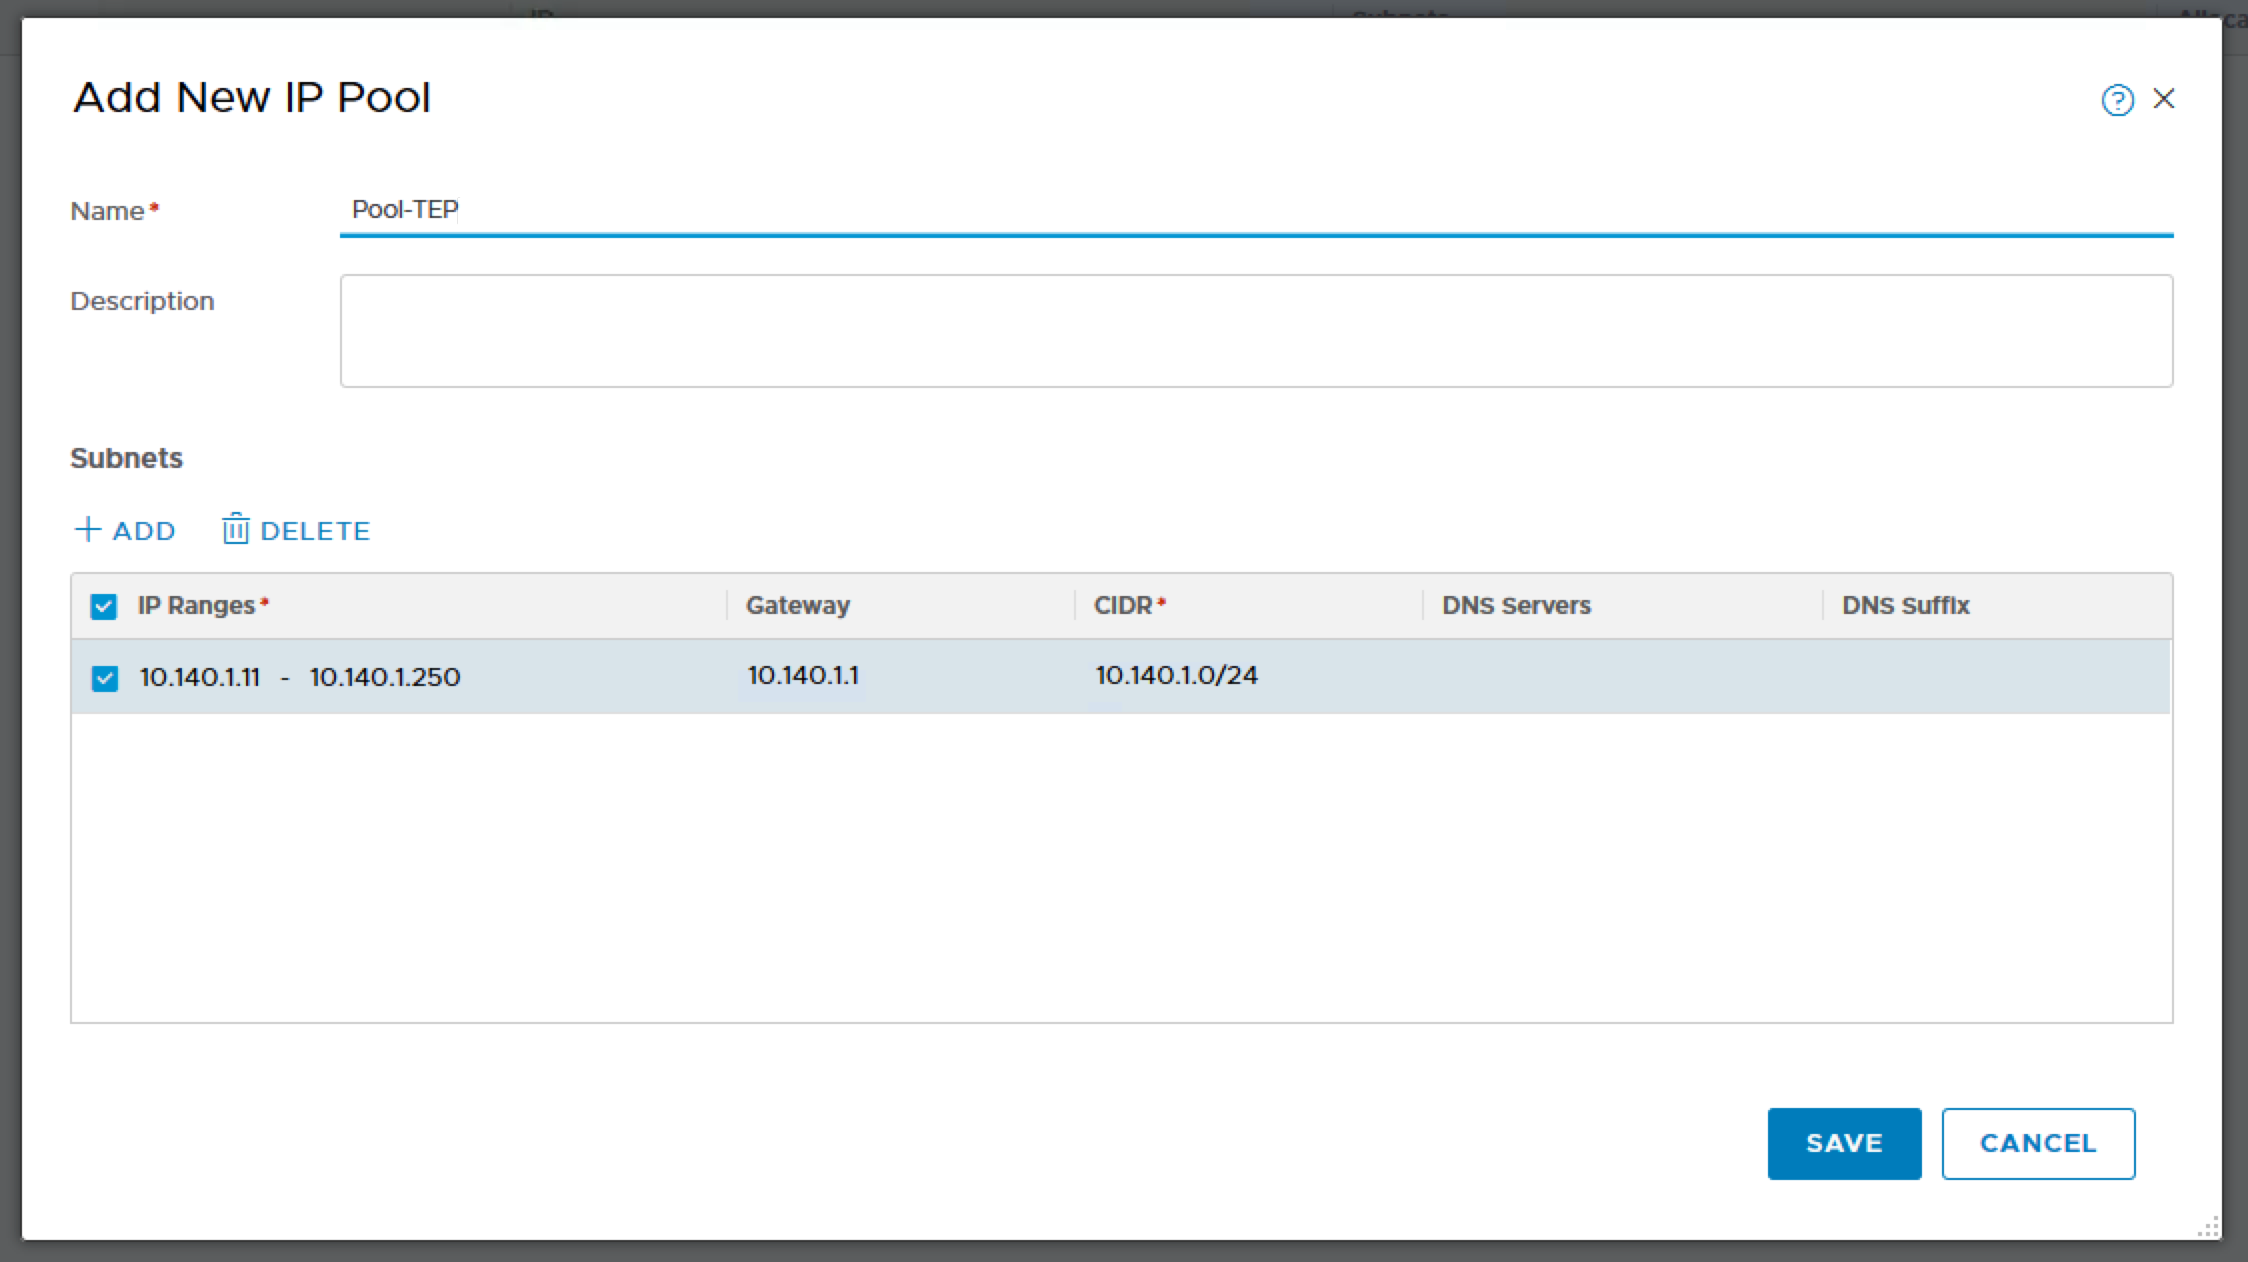
This shows that the IP Pool is added successfully.
Create an Uplink Profile for VM Edge Nodes
Click on Fabric, Profiles, Uplink Profiles and ADD.
Name: uplink-profile-nsx-edge-vm
Teaming Policy: Failover Order
Active Uplinks: uplink-1
Transport VLAN: 0 (My VDS portgroup already tag with a VLAN, therefore there is no need to tag here. If you are using a trunk portgroup, then you have specify the VLAN ID here.)
MTU: 1600 (Default)

Creating the Transport Zones
In my setup, I will be creating 2 transport zones. One for the VLAN and the second for the Overlay.
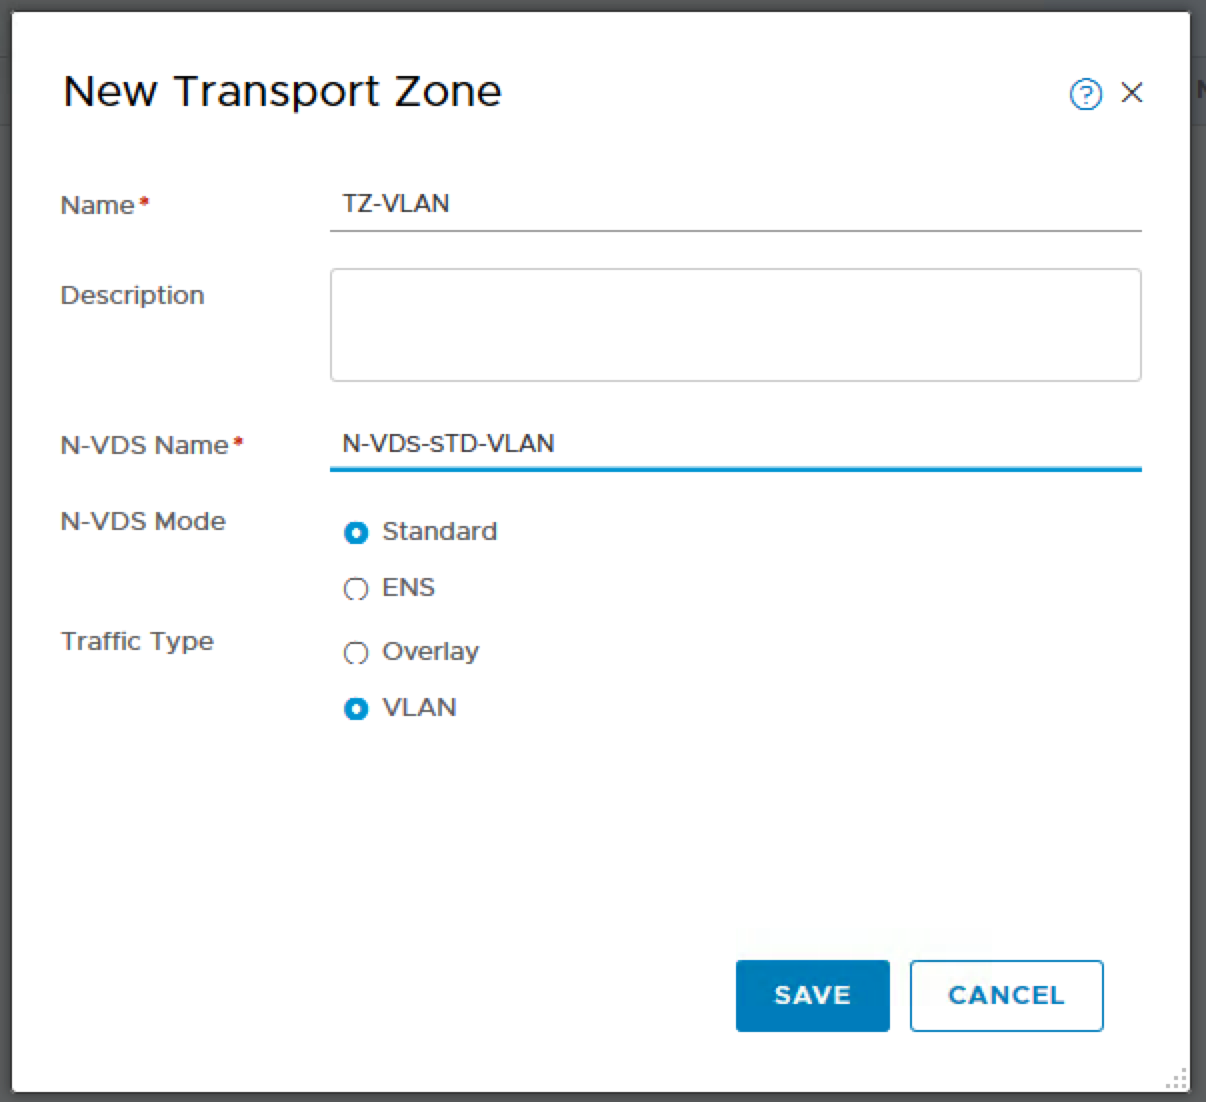
Click on Transport Zones and ADD.
Name: TZ-VLAN
N-VDS Name: N-VDS-STD-VLAN
N-VDS Mode: Standard
Traffic Type: VLAN
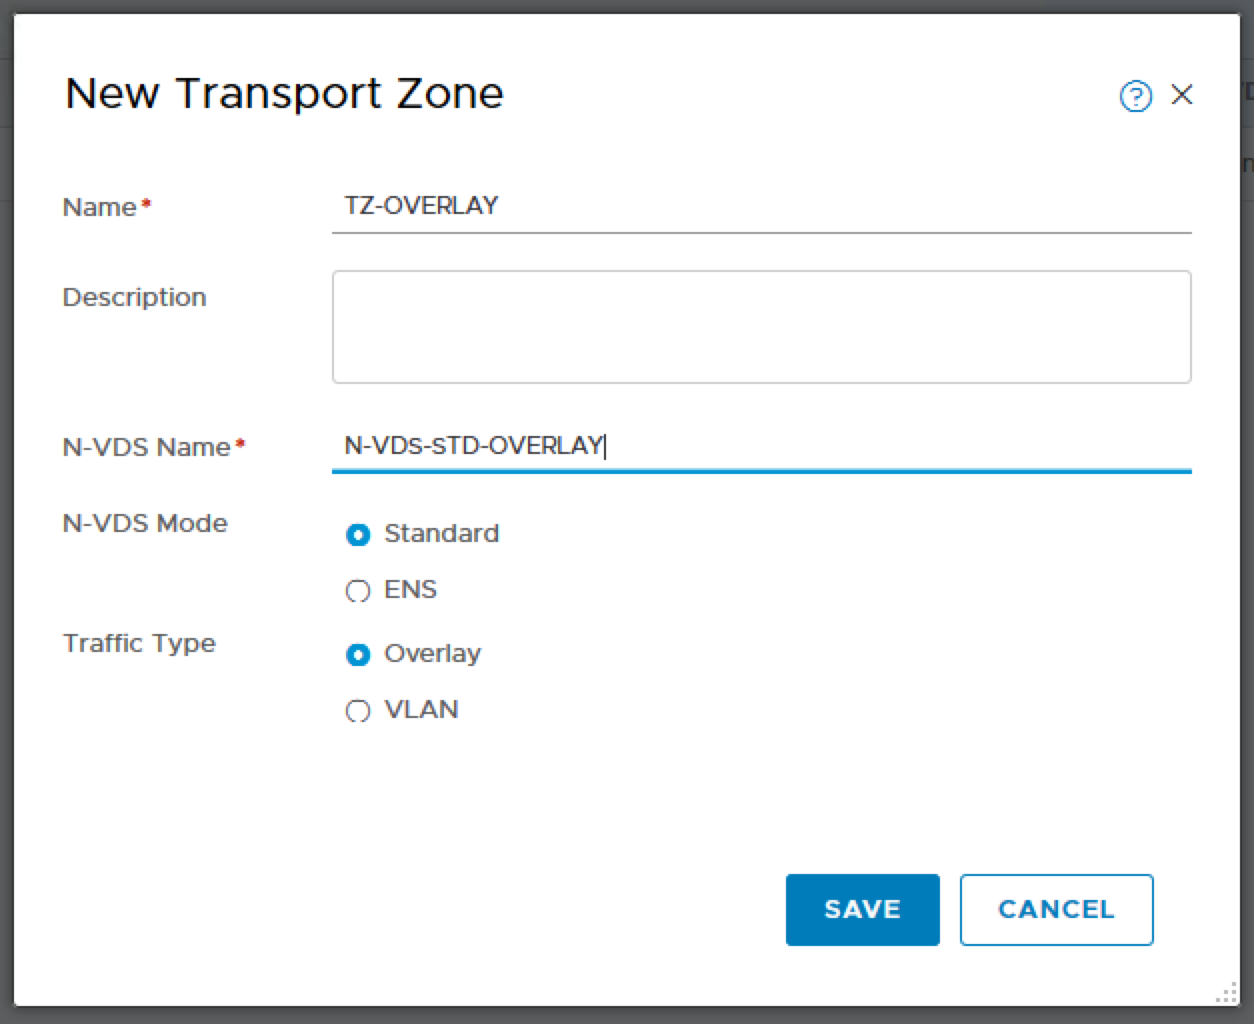
Click on Transport Zones and ADD.
Name: TZ-OVERLAY
N-VDS Name: N-VDS-STD-OVERLAY
N-VDS Mode: Standard
Traffic Type: Overlay
Once done, you should be able to see similar results as per this screenshot.

Once done, you should be able to see similar results as per this screenshot.
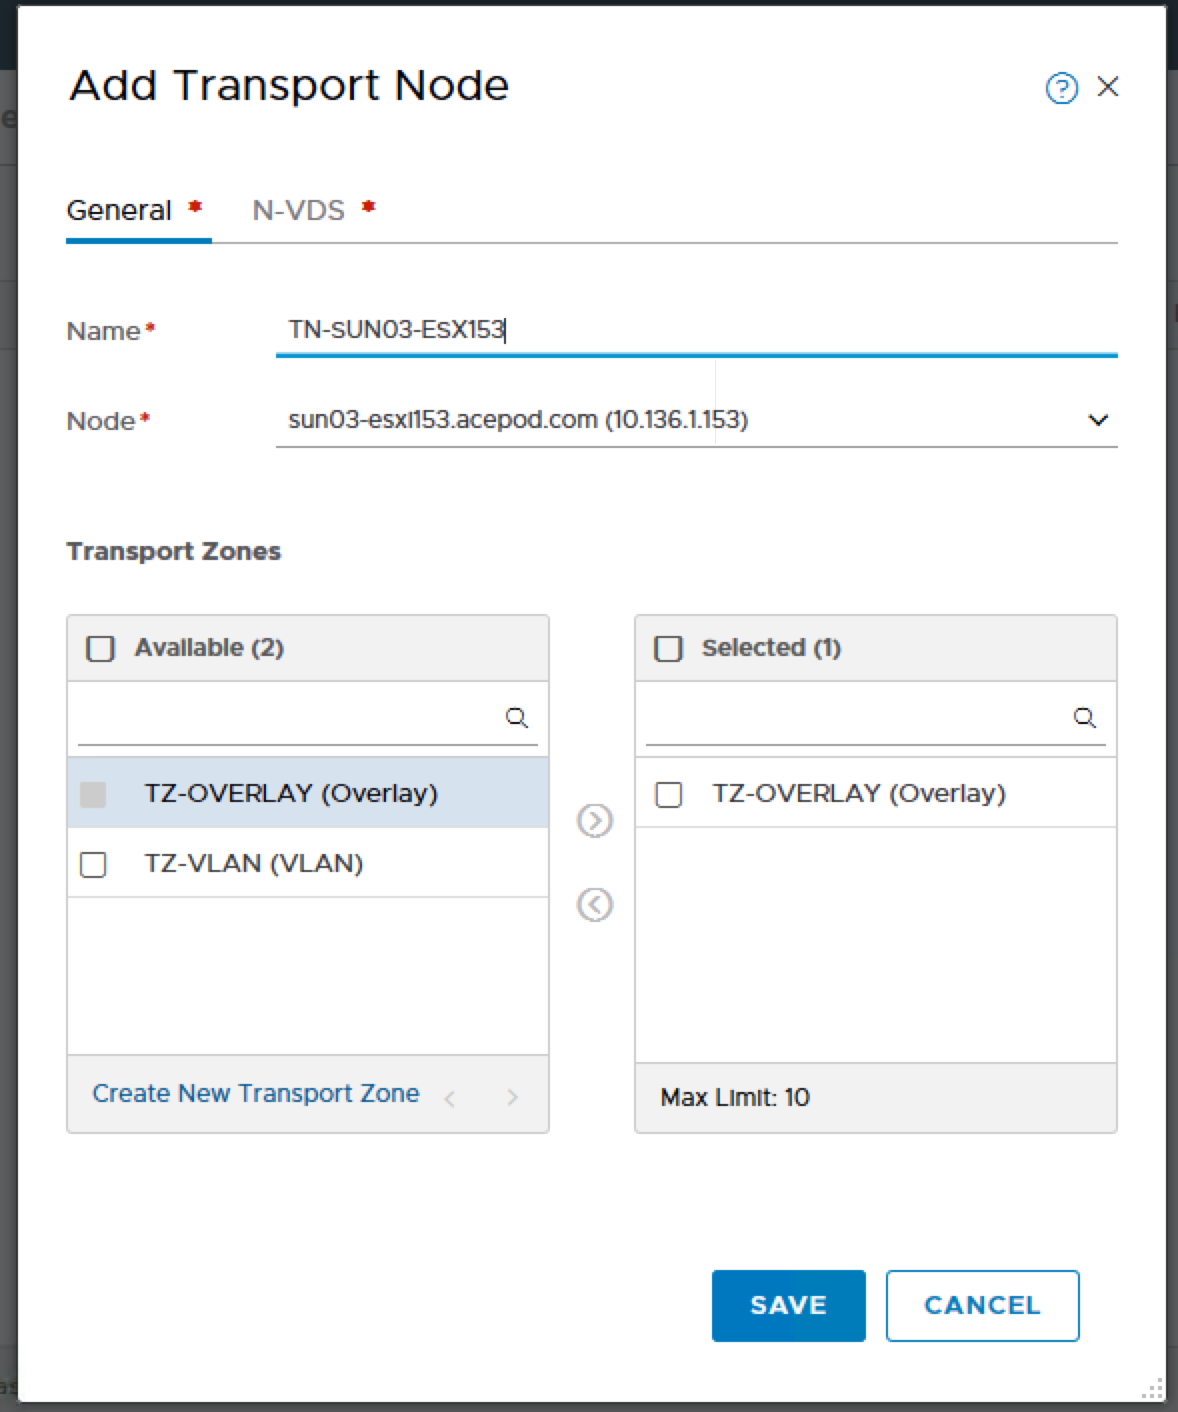
Creating Host Transport Nodes
A Transport Node participates in the GENEVE overlay network as well as the VLAN networking – however for my configuration the Host Transport Nodes will actually only participate in overlay.
Click on Fabric, Nodes, Transport Nodes and ADD.
Name: TN-SUN03-ESX153
Node: sun03-esxi153.acepod.com (10.136.1.153)
Transport Zones: TZ-OVERLAY
**
** 
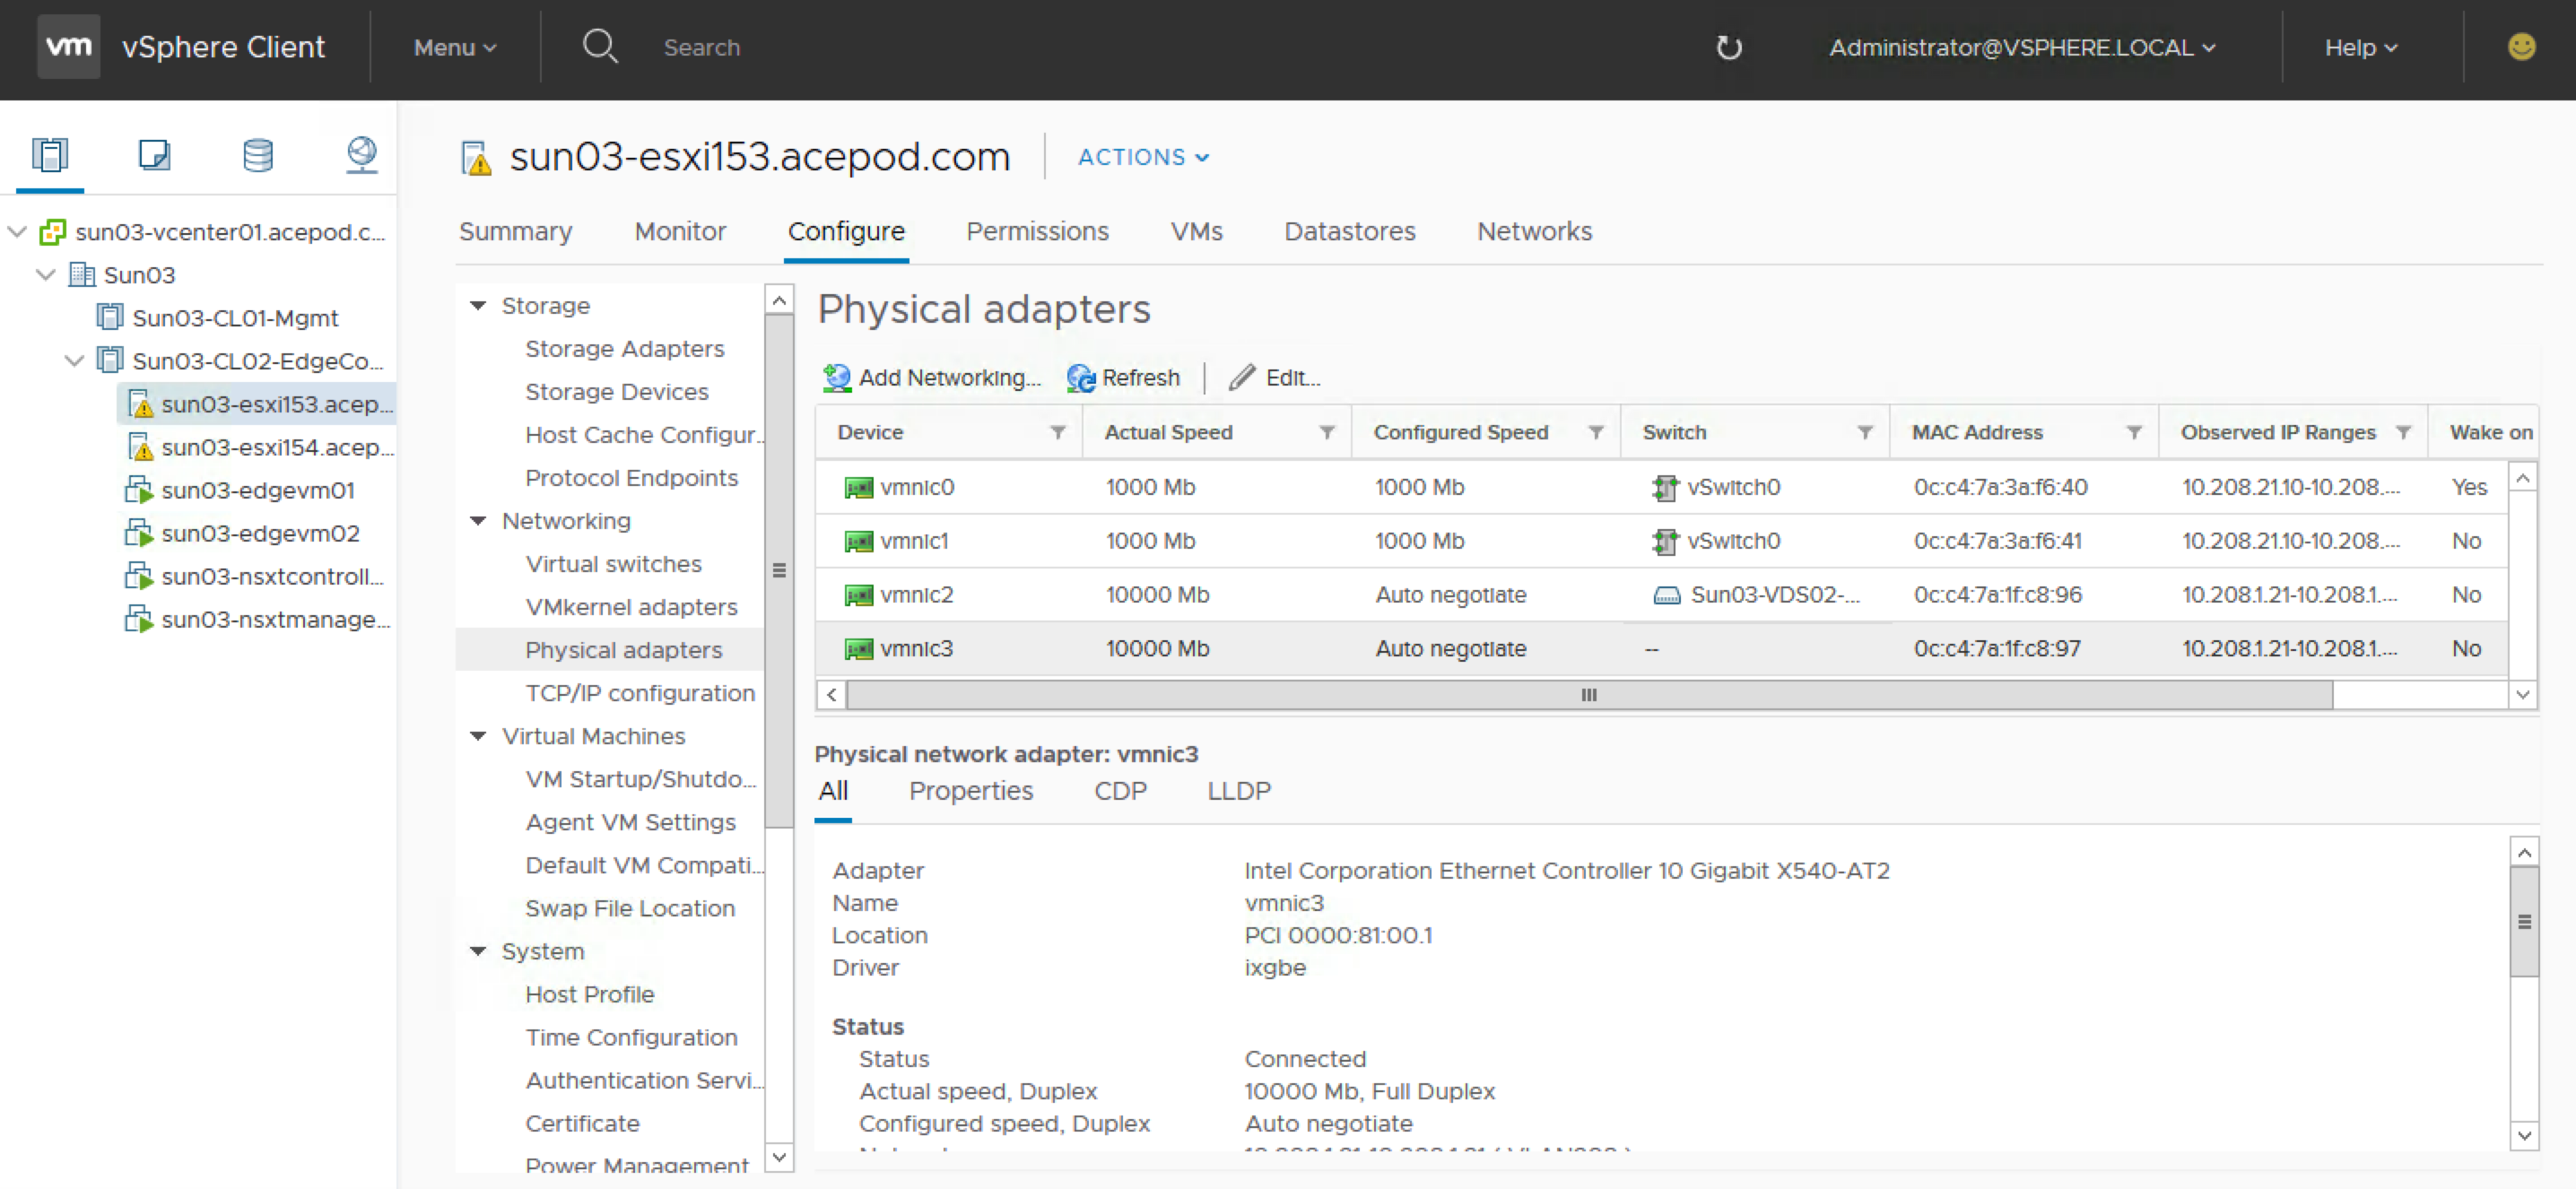
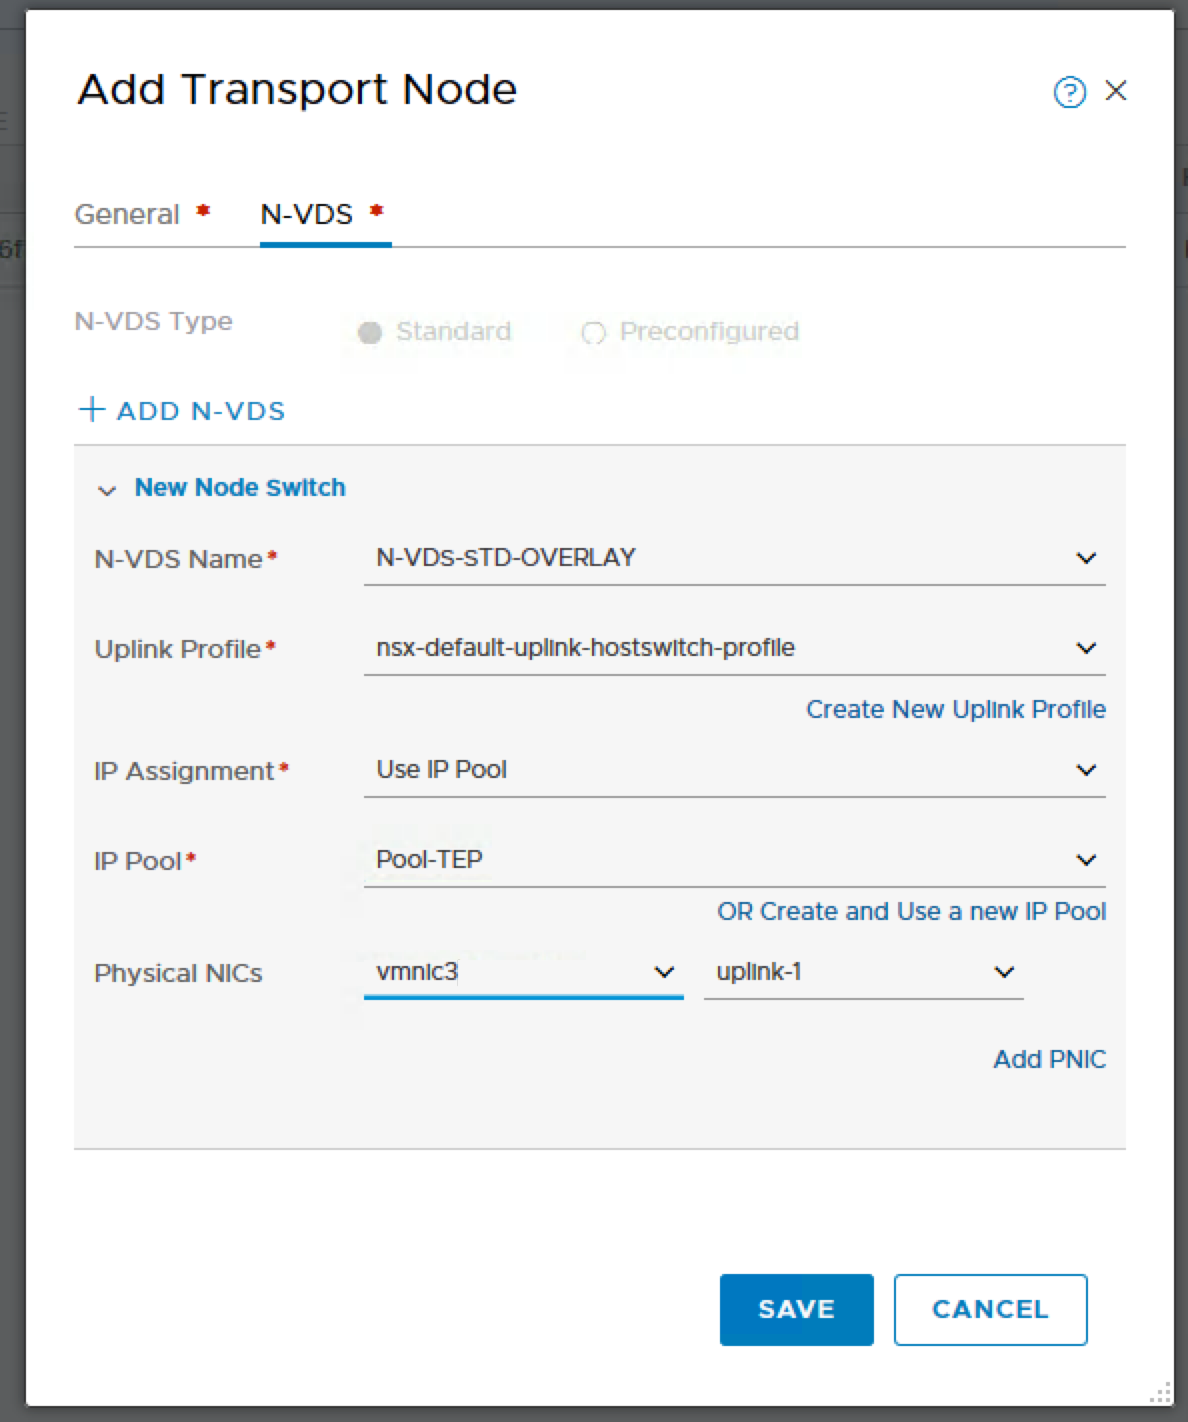
N-VDS Configuration.

You have to login to vCenter to check which is the vmnic that is available and not connected as that would be used for the host switch for overlay networking. For my setup, vmnic3 is not used by any vSwitch and therefore I will be using that for my transport node uplink.
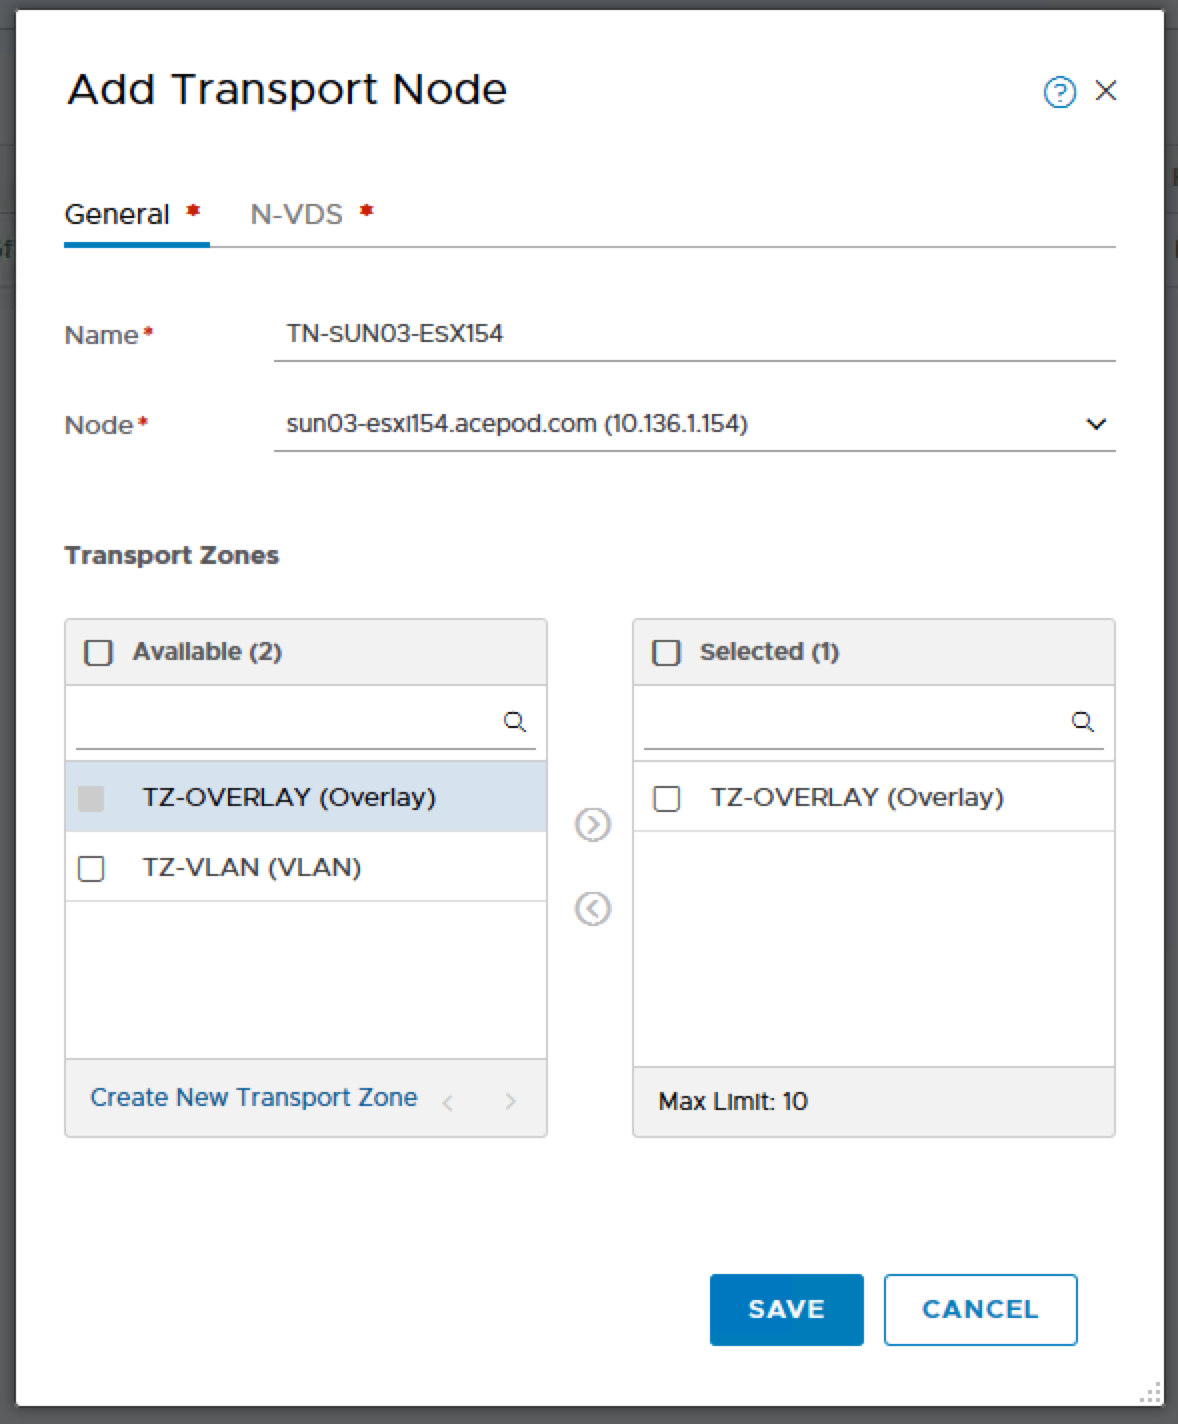
Adding the 2nd host or N host (depending on how many hosts you want to add as Transport Node)
Name: TN-SUN03-ESX154
Node: sun03-esxi154.acepod.com (10.136.1.154)
Transport Zones: TZ-OVERLAY
Adding the NSX Edge-VM as Transport Node. Edge Node will be participating in VLAN and Overlay Transport Zone.
Name: TN-SUN03-ESX154
Node: sun03-esxi154.acepod.com (10.136.1.154)
Transport Zones: TZ-OVERLAY

Creating Edge Transport Nodes
A Transport Node participates in the GENEVE overlay network as well as the VLAN uplinks and provides transport between the two. The previously configured VM Edge Nodes will be configured as Edge Transport Nodes, using the Uplink Profile and Transport Zones configured above.
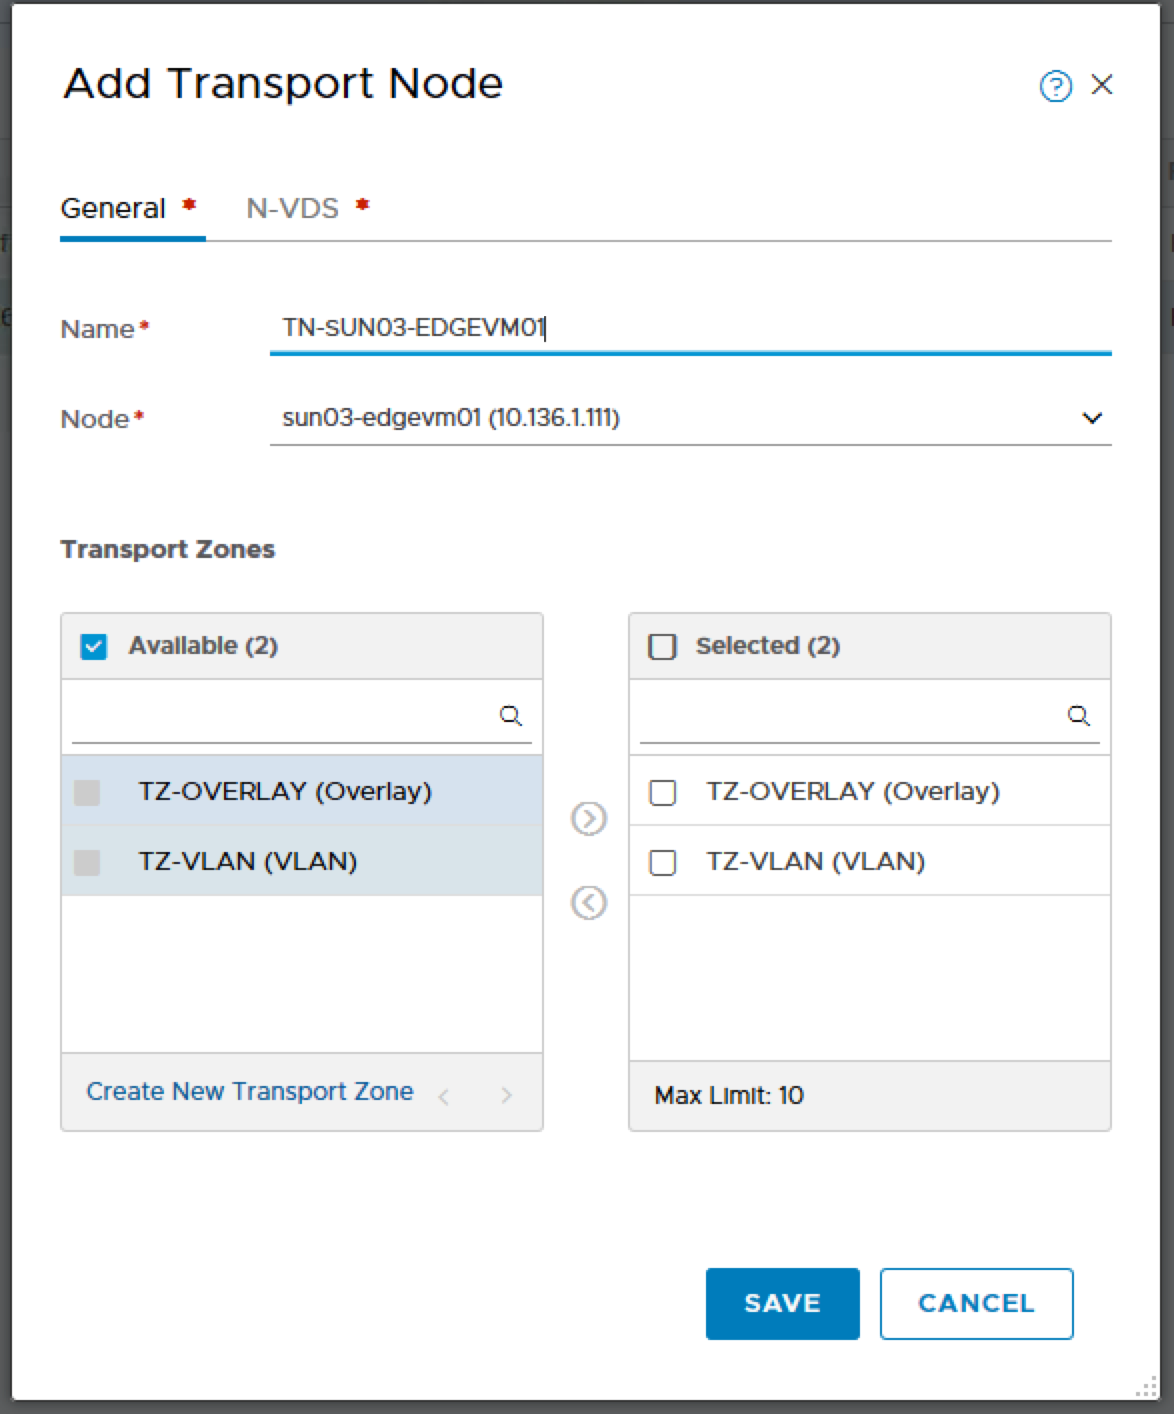
Adding the NSX Edge-VM as Transport Node. Edge Node will be participating in VLAN and Overlay Transport Zone.
Name: TN-SUN03-EDGEVM01
Node: sun03-edgevm01 (10.136.1.111)
Transport Zones: TZ-OVERLAY, TZ-VLAN
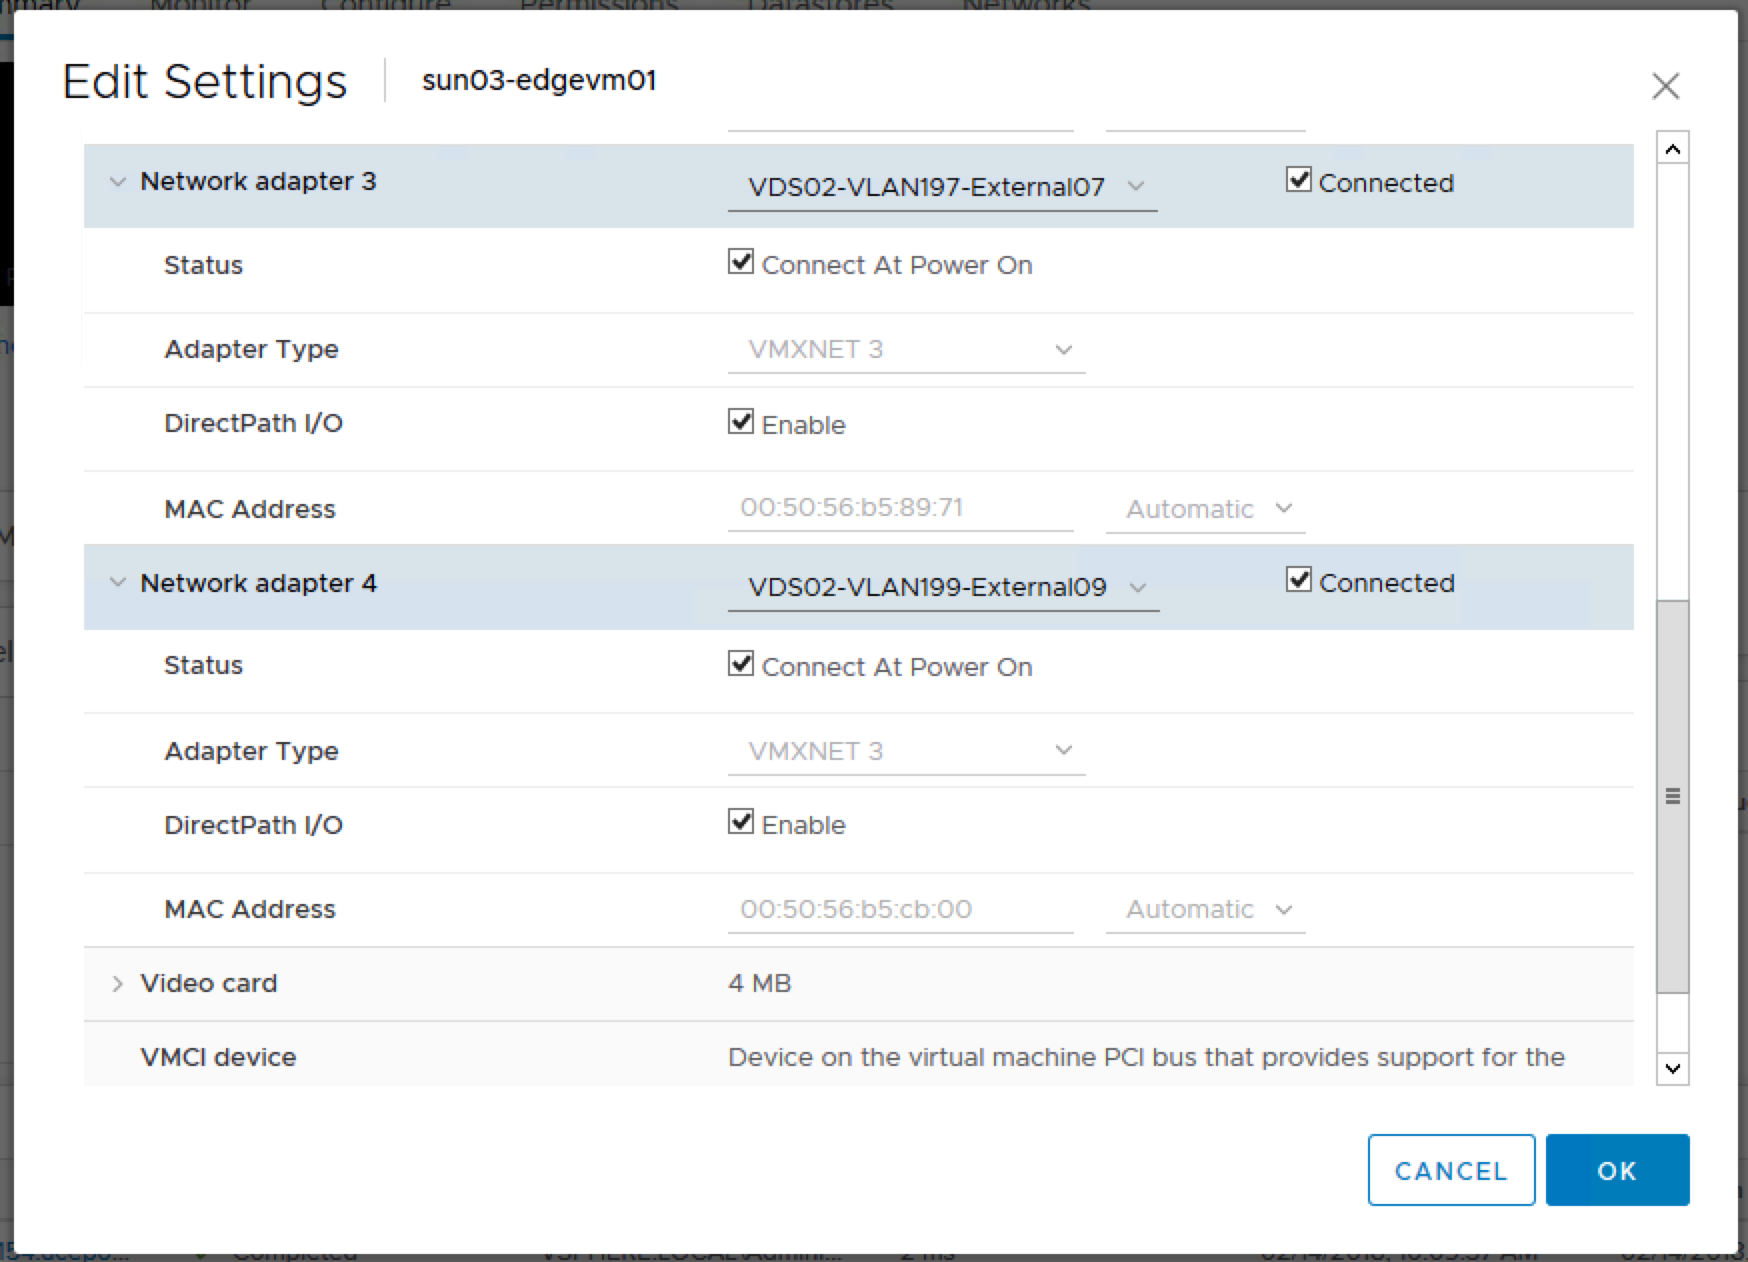
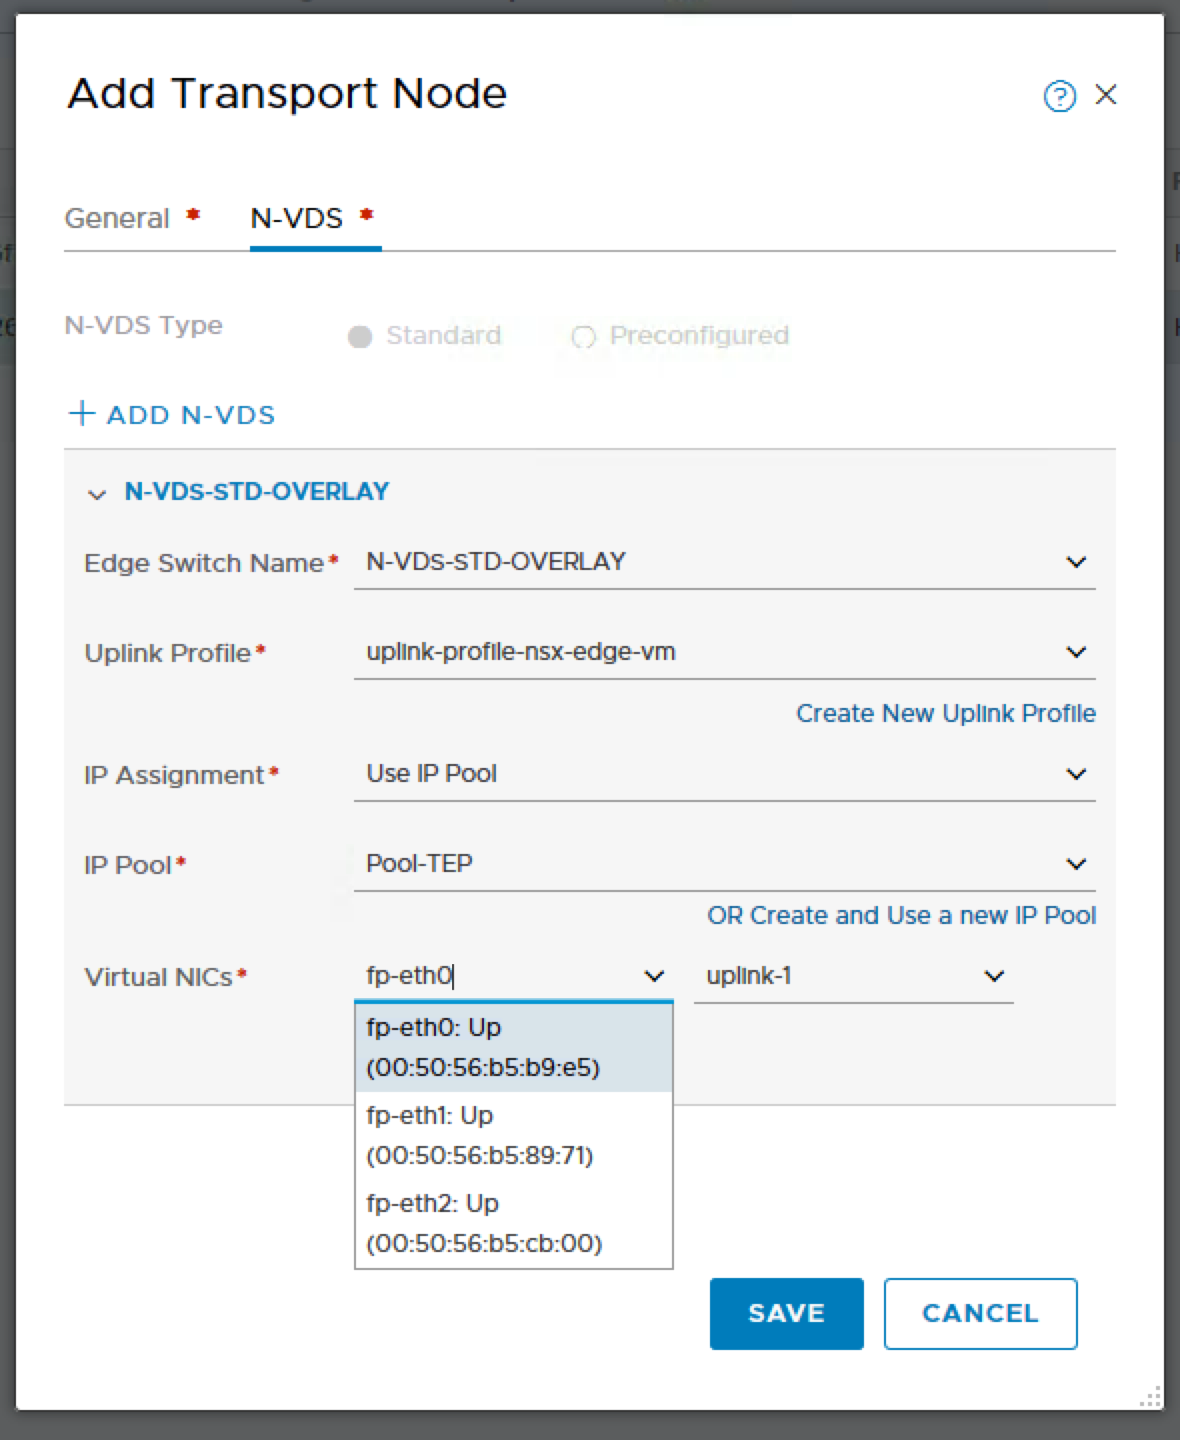
Click on ADD N-VDS

Note: I have fp-eth2 which is suppose to be another uplink, however I only added one N-VDS previously. So if you want the 2nd VLAN uplink, you will need to create another N-VDS switch.
Do the same for the 2nd Edge-VM Node.
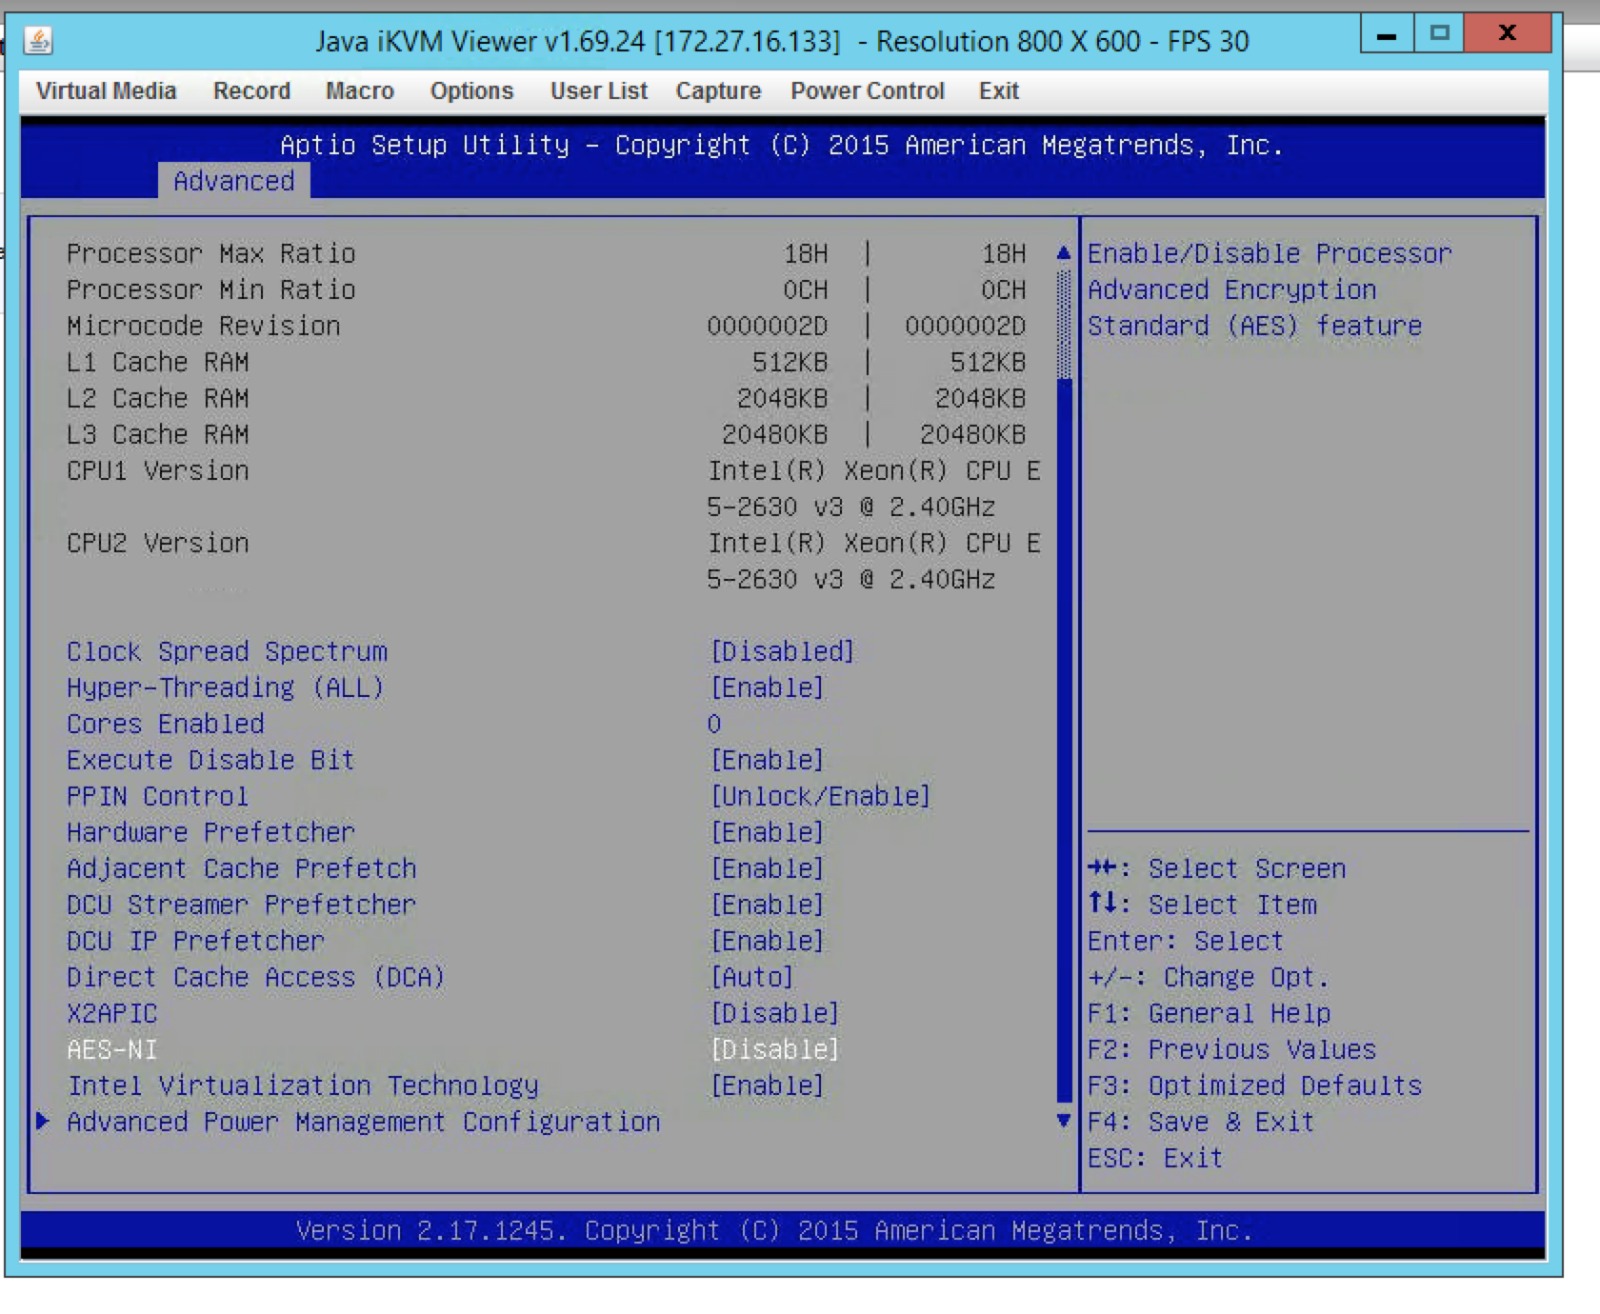
Misc: About AES-NI
[
]56
Previously I had some problems with my Edge-VMs complaining the physical host does not have AES-NI support. I have check my Intel CPU did support AES-NI but however, after checking the BIOS, the AES-NI feature was disabled. After enabling that, I did not receive this error anymore.
References
1. Sam NSX-T Installation Blog Posts
2. VMware NSX-T Installation Docs
[31]: http://Install NSX Edge on ESXi Using the Command-Line OVF Tool