How to install AMKO on TKG Multicloud (TKG-M)
-
How to install AMKO on TKG Multicloud (TKG-M)
In my previous post, I written a guide on how to install AMKO on TKG-Service. In this guide, I will share on how to get AMKO on TKG-Multi-Cloud.
There are quite a few good blogs on how to install TKG-M so I will skip that for my blog and just focusing on the installation of AMKO. At this point of writing which Jul/Aug 2021, the version of TKG-M is v1.3.
Installing Tanzu Kubernetes Grid 1.3 on vSphere with NSX Advanced Load Balancer by Chris Little https://little-stuff.com/2021/03/26/installing-tanzu-kubernetes-grid-1-3-on-vsphere-with-nsx-advanced-load-balancer/
Software Versions
| Software | Versions |
|---|---|
| AKO | 1.3 (Default from TKG-M 1.3) |
| AMKO | 1.4.2 |
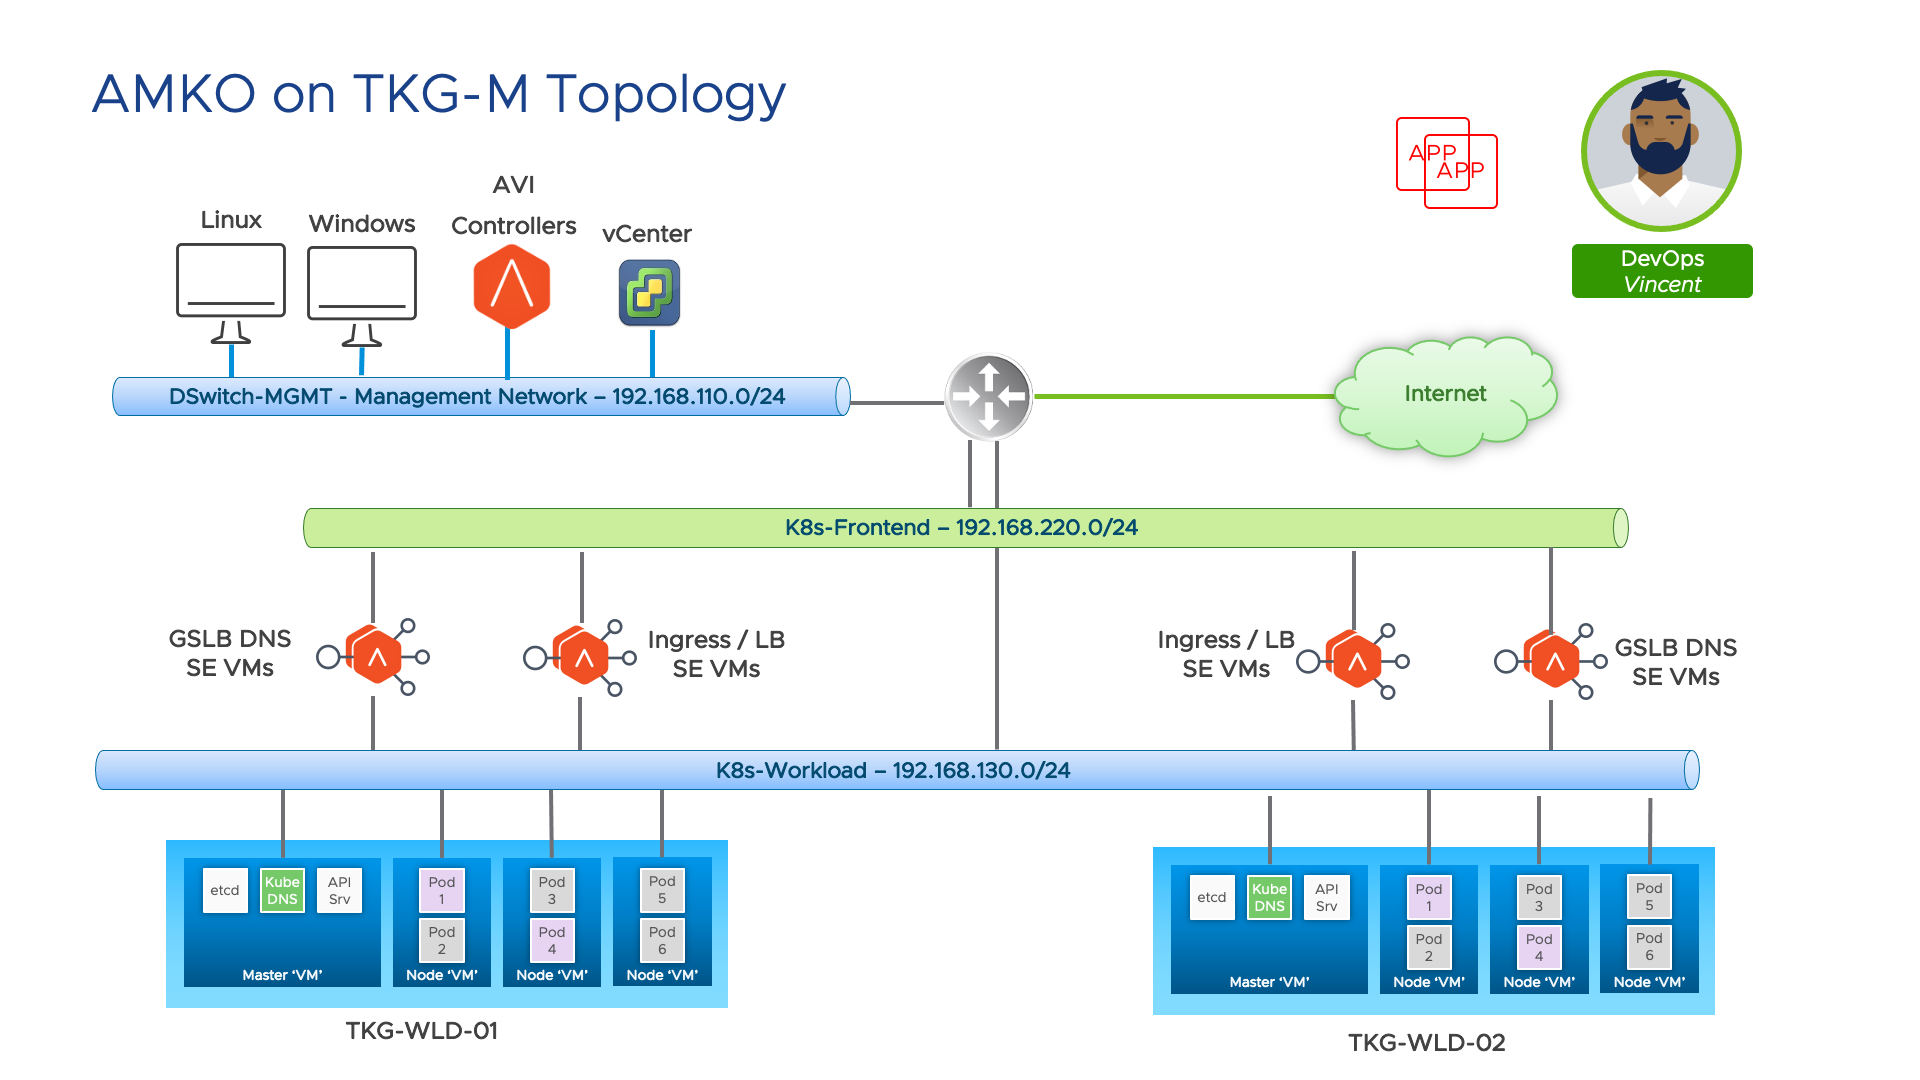
Lab Topology
Pre-req
Well, if you follow Chirs Little blog, all you need is follow through till Section 4 - Create a workload cluster will be good enough. There is an additional step you will need to do which is create another cluster. I will share my tkg cluster configs here.
ubuntu@cli-vm:~/demo-applications$ cat tkg-wld.yaml
CLUSTER_CIDR: 100.96.0.0/11
SERVICE_CIDR: 100.64.0.0/13
CLUSTER_NAME: tkg-wld
CLUSTER_PLAN: dev
NAMESPACE: default
CNI: antrea
ENABLE_MHC: "false"
MHC_UNKNOWN_STATUS_TIMEOUT: 5m
MHC_FALSE_STATUS_TIMEOUT: 5m
VSPHERE_CONTROL_PLANE_DISK_GIB: "20"
VSPHERE_CONTROL_PLANE_ENDPOINT: 192.168.130.129
VSPHERE_CONTROL_PLANE_MEM_MIB: "4096"
VSPHERE_CONTROL_PLANE_NUM_CPUS: "2"
VSPHERE_DATACENTER: /RegionA01
VSPHERE_DATASTORE: /RegionA01/datastore/map-vol
VSPHERE_FOLDER: /RegionA01/vm
VSPHERE_NETWORK: K8s-Workload
VSPHERE_PASSWORD: <encoded:Vk13YXJlMSE=>
VSPHERE_RESOURCE_POOL: /RegionA01/host/RegionA01-MGMT/Resources
VSPHERE_SERVER: vcsa-01a.corp.tanzu
VSPHERE_SSH_AUTHORIZED_KEY: ssh-rsa AAAAB3NzaC1yc2EAAAADAQABAAACAQC5KYNeWQgVHrDHaEhBCLF1vIR0OAtUIJwjKYkY4E/5HhEu8fPFvBOIHPFTPrtkX4vzSiMFKE5WheKGQIpW3HHlRbmRPc9oe6nNKlsUfFAaJ7OKF146Gjpb7lWs/C34mjdtxSb1D/YcHSyqK5mxhyHAXPeK8lrxG5MLOJ3X2A3iUvXcBo1NdhRdLRWQmyjs16fnPx6840x9n5NqeiukFYIVhDMFErq42AkeewsWcbZQuwViSLk2cIc09eykAjaXMojCmSbjrj0kC3sbYX+HD2OWbKohTqqO6/UABtjYgTjIS4PqsXWk63dFdcxF6ukuO6ZHaiY7h3xX2rTg9pv1oT8WBR44TYgvyRp0Bhe0u2/n/PUTRfp22cOWTA2wG955g7jOd7RVGhtMHi9gFXeUS2KodO6C4XEXC7Y2qp9p9ARlNvu11QoaDyH3l0h57Me9we+3XQNuteV69TYrJnlgWecMa/x+rcaEkgr7LD61dY9sTuufttLBP2ro4EIWoBY6F1Ozvcp8lcgi/55uUGxwiKDA6gQ+UA/xtrKk60s6MvYMzOxJiUQbWYr3MJ3NSz6PJVXMvlsAac6U+vX4U9eJP6/C1YDyBaiT96cb/B9TkvpLrhPwqMZdYVomVHsdY7YriJB93MRinKaDJor1aIE/HMsMpbgFCNA7mma9x5HS/57Imw==
admin@corp.local
VSPHERE_TLS_THUMBPRINT: DB:CC:DC:80:F9:17:DA:37:4F:AC:F7:65:6D:3D:AC:99:B8:A0:5A:BE
VSPHERE_USERNAME: administrator@vsphere.local
VSPHERE_WORKER_DISK_GIB: "20"
VSPHERE_WORKER_MEM_MIB: "8192"
VSPHERE_WORKER_NUM_CPUS: "8"
ENABLE_AUDIT_LOGGING: false
ENABLE_DEFAULT_STORAGE_CLASS: true
WORKER_MACHINE_COUNT: 2

cp tkg-wld.yaml tkg-wld02.yaml
vi tkg-wld02.yaml
ubuntu@cli-vm:~/demo-applications$ cat tkg-wld02.yaml
CLUSTER_CIDR: 100.96.0.0/11
SERVICE_CIDR: 100.64.0.0/13
CLUSTER_NAME: tkg-wld02
CLUSTER_PLAN: dev
NAMESPACE: default
CNI: antrea
ENABLE_MHC: "false"
MHC_UNKNOWN_STATUS_TIMEOUT: 5m
MHC_FALSE_STATUS_TIMEOUT: 5m
VSPHERE_CONTROL_PLANE_DISK_GIB: "20"
VSPHERE_CONTROL_PLANE_ENDPOINT: 192.168.130.139
VSPHERE_CONTROL_PLANE_MEM_MIB: "4096"
VSPHERE_CONTROL_PLANE_NUM_CPUS: "2"
VSPHERE_DATACENTER: /RegionA01
VSPHERE_DATASTORE: /RegionA01/datastore/map-vol
VSPHERE_FOLDER: /RegionA01/vm
VSPHERE_NETWORK: K8s-Workload
VSPHERE_PASSWORD: <encoded:Vk13YXJlMSE=>
VSPHERE_RESOURCE_POOL: /RegionA01/host/RegionA01-MGMT/Resources
VSPHERE_SERVER: vcsa-01a.corp.tanzu
VSPHERE_SSH_AUTHORIZED_KEY: ssh-rsa AAAAB3NzaC1yc2EAAAADAQABAAACAQC5KYNeWQgVHrDHaEhBCLF1vIR0OAtUIJwjKYkY4E/5HhEu8fPFvBOIHPFTPrtkX4vzSiMFKE5WheKGQIpW3HHlRbmRPc9oe6nNKlsUfFAaJ7OKF146Gjpb7lWs/C34mjdtxSb1D/YcHSyqK5mxhyHAXPeK8lrxG5MLOJ3X2A3iUvXcBo1NdhRdLRWQmyjs16fnPx6840x9n5NqeiukFYIVhDMFErq42AkeewsWcbZQuwViSLk2cIc09eykAjaXMojCmSbjrj0kC3sbYX+HD2OWbKohTqqO6/UABtjYgTjIS4PqsXWk63dFdcxF6ukuO6ZHaiY7h3xX2rTg9pv1oT8WBR44TYgvyRp0Bhe0u2/n/PUTRfp22cOWTA2wG955g7jOd7RVGhtMHi9gFXeUS2KodO6C4XEXC7Y2qp9p9ARlNvu11QoaDyH3l0h57Me9we+3XQNuteV69TYrJnlgWecMa/x+rcaEkgr7LD61dY9sTuufttLBP2ro4EIWoBY6F1Ozvcp8lcgi/55uUGxwiKDA6gQ+UA/xtrKk60s6MvYMzOxJiUQbWYr3MJ3NSz6PJVXMvlsAac6U+vX4U9eJP6/C1YDyBaiT96cb/B9TkvpLrhPwqMZdYVomVHsdY7YriJB93MRinKaDJor1aIE/HMsMpbgFCNA7mma9x5HS/57Imw==
admin@corp.local
VSPHERE_TLS_THUMBPRINT: DB:CC:DC:80:F9:17:DA:37:4F:AC:F7:65:6D:3D:AC:99:B8:A0:5A:BE
VSPHERE_USERNAME: administrator@vsphere.local
VSPHERE_WORKER_DISK_GIB: "20"
VSPHERE_WORKER_MEM_MIB: "8192"
VSPHERE_WORKER_NUM_CPUS: "8"
ENABLE_AUDIT_LOGGING: false
ENABLE_DEFAULT_STORAGE_CLASS: true
WORKER_MACHINE_COUNT: 2
ubuntu@cli-vm:~/demo-applications$
Creating 2nd TKG Cluster
kubectl config use-context tkg-mgmt-admin@tkg-mgmt
tanzu cluster create -f /tkg-wld02.yaml --tkr v1.20.4---vmware.1-tkg.1 -v 6


Creating GSLB DNS AVI SE
Since AMKO is updating the VIP of the Ingresses to the DNS, we need an AVI SE VM to have the DNS capability. The following steps show you how to create the DNS Virtual Service.
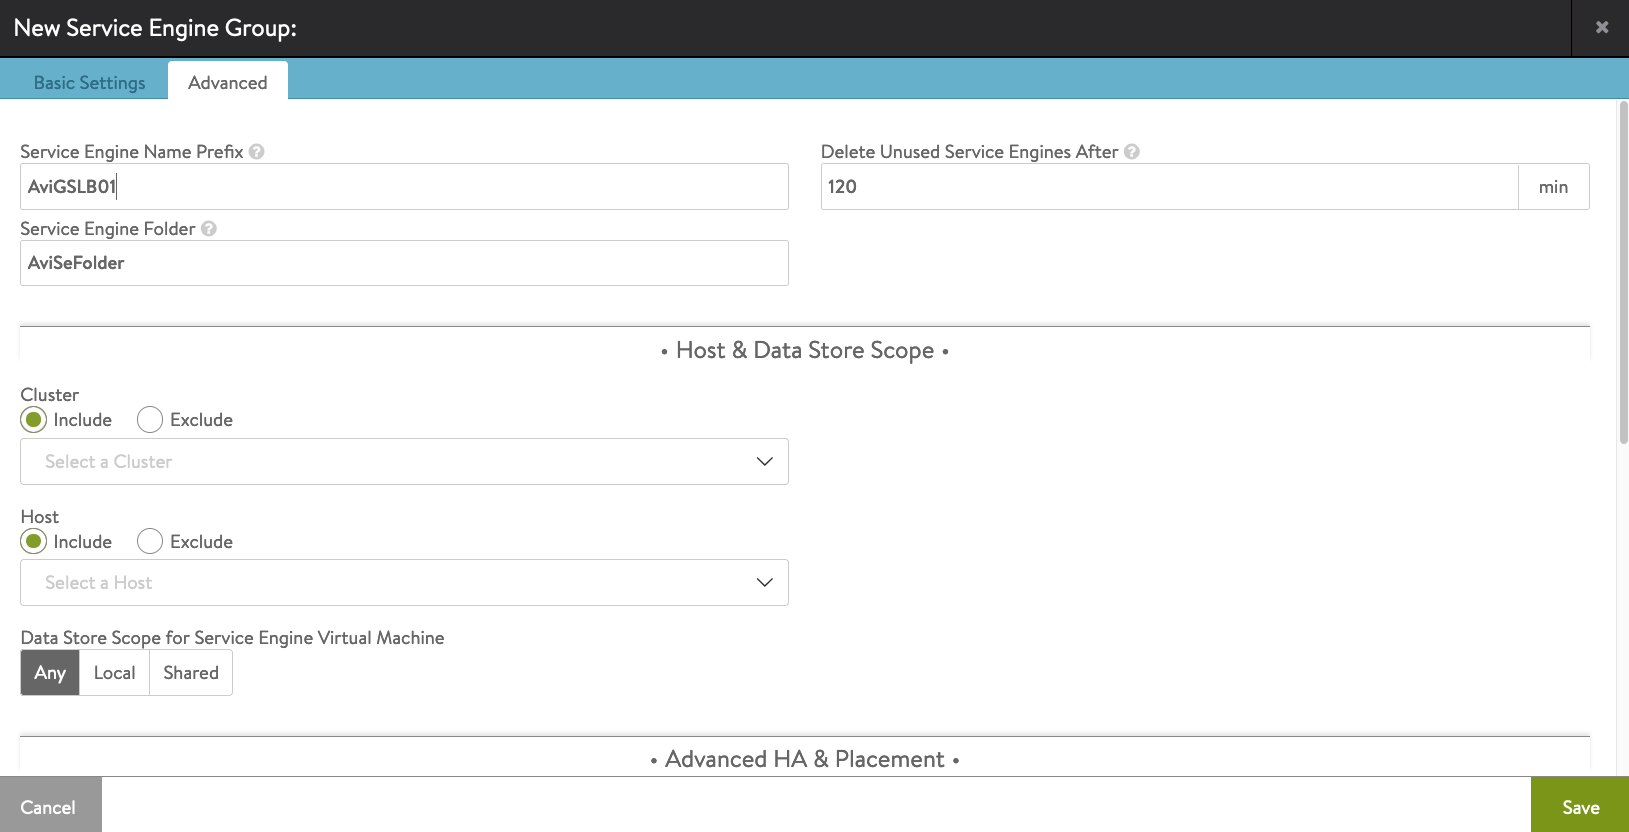
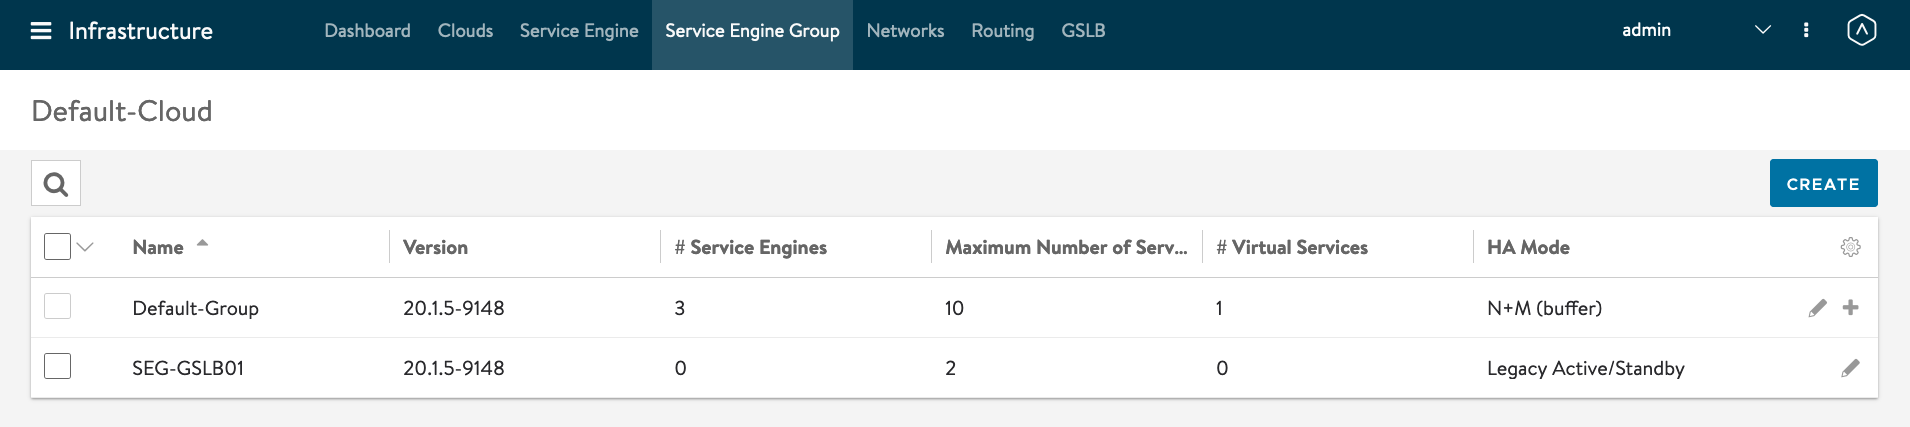
Create Service Engine Group for GSLB DNS AVI SE VM.
Click on Infrastruce -> Service Engine Group -> Create

Service Engine Group Name: SEG-GSLB01
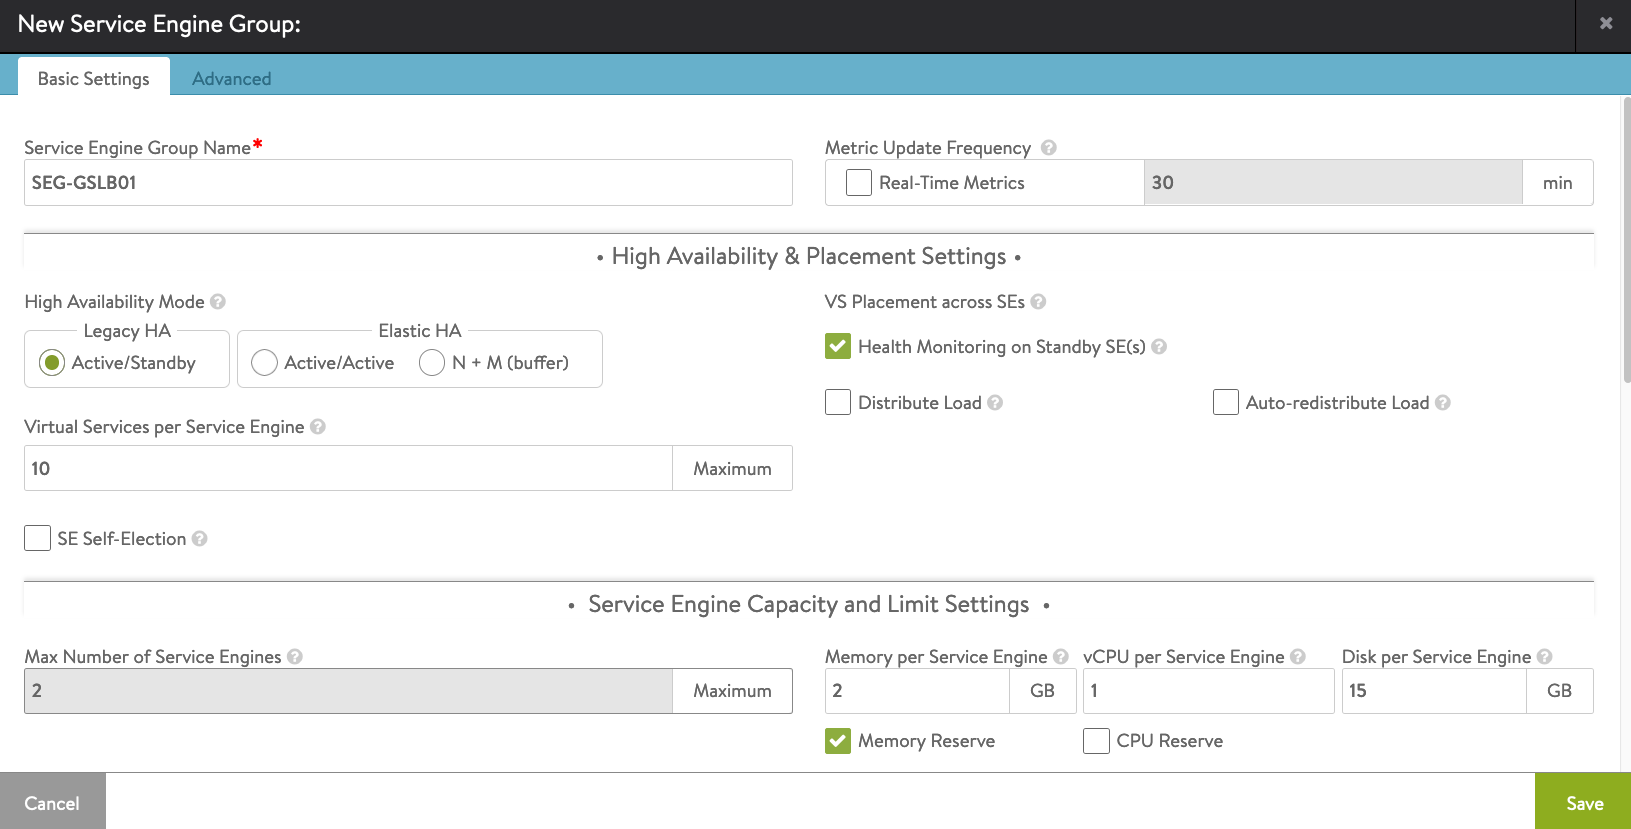
Service Engine Name Prefix: AviGSLB01
GSLB Service Engine Group created successfully.
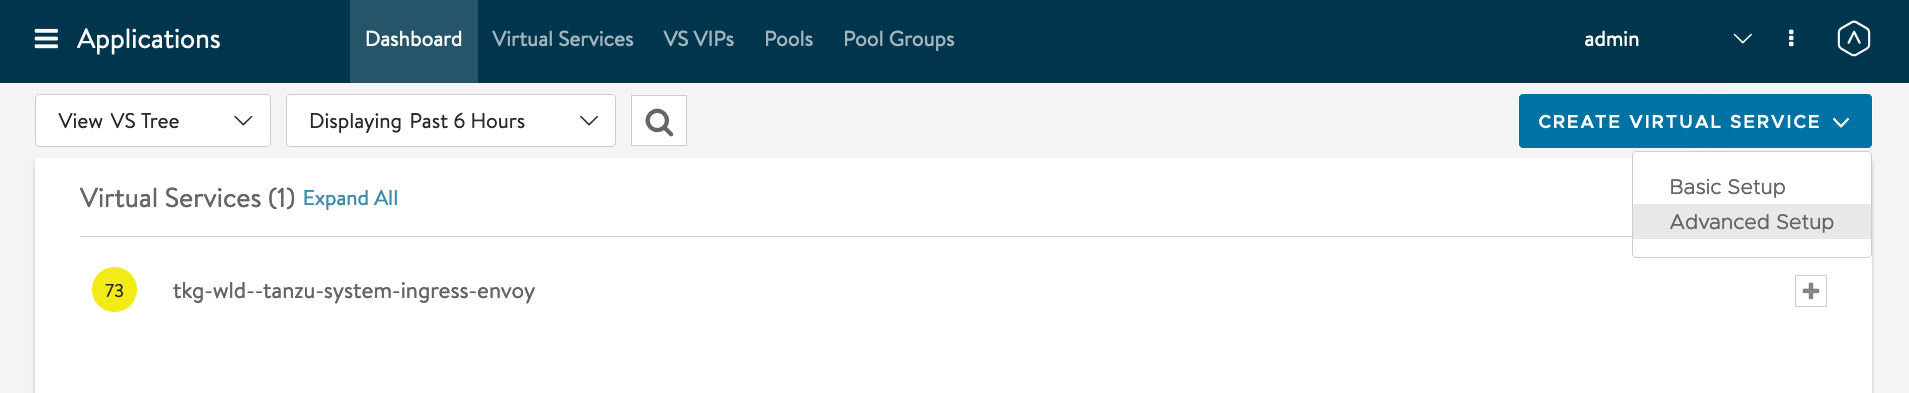
Click on Applications -> Dashboard

Click on Create Virtual Serivce -> Advanced Setup
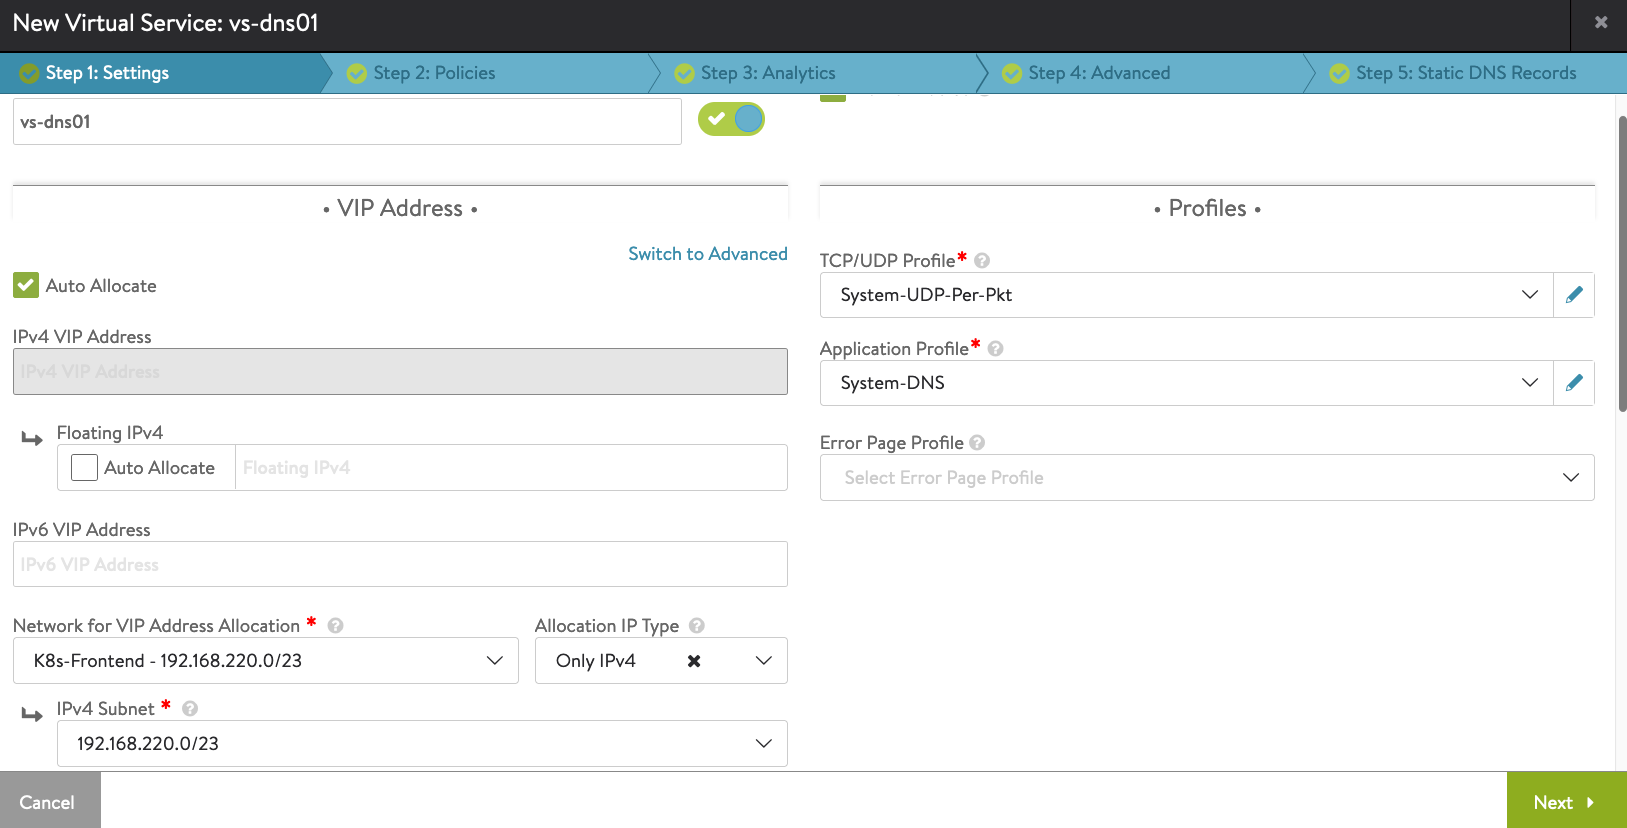
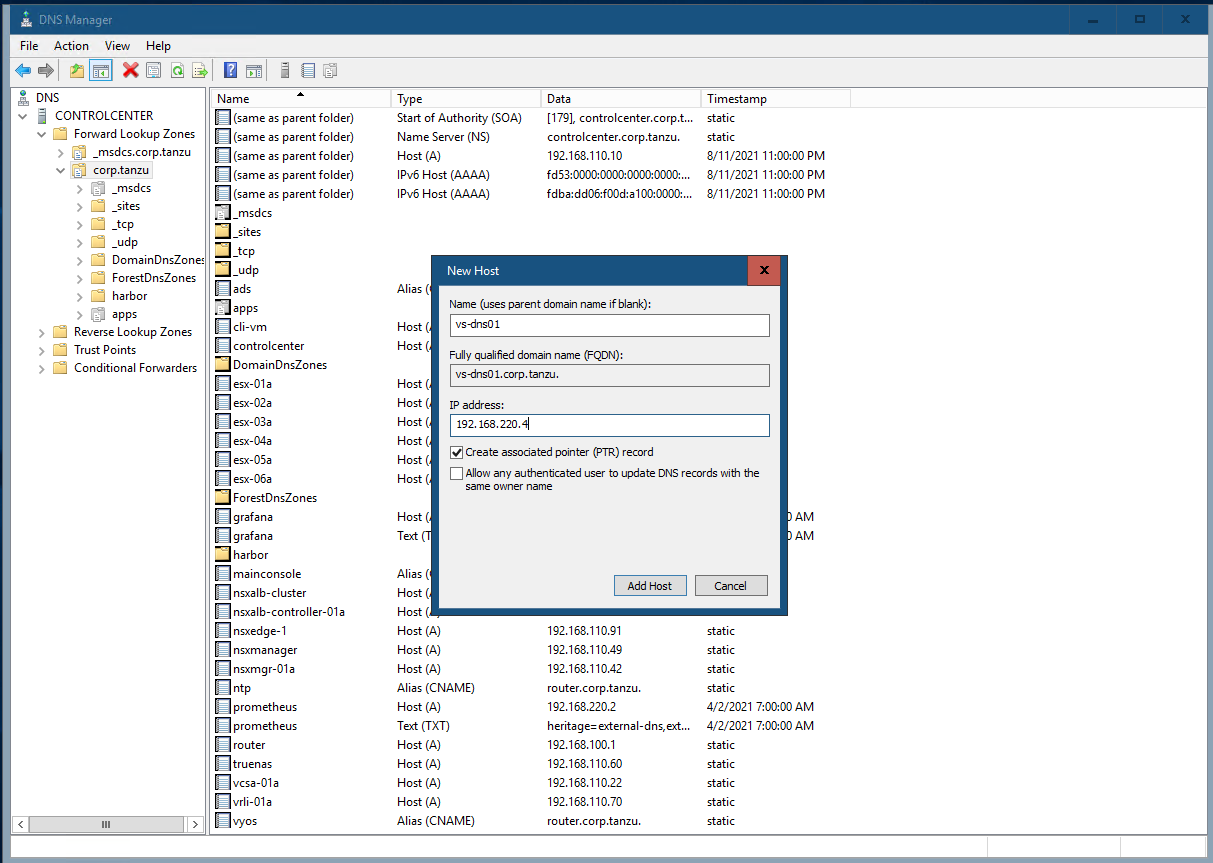
Name: vs-dns01 Application Profile: System-DNS Network for VIP Address Allocation: K8s-Frontend - 192.168.220.0/23
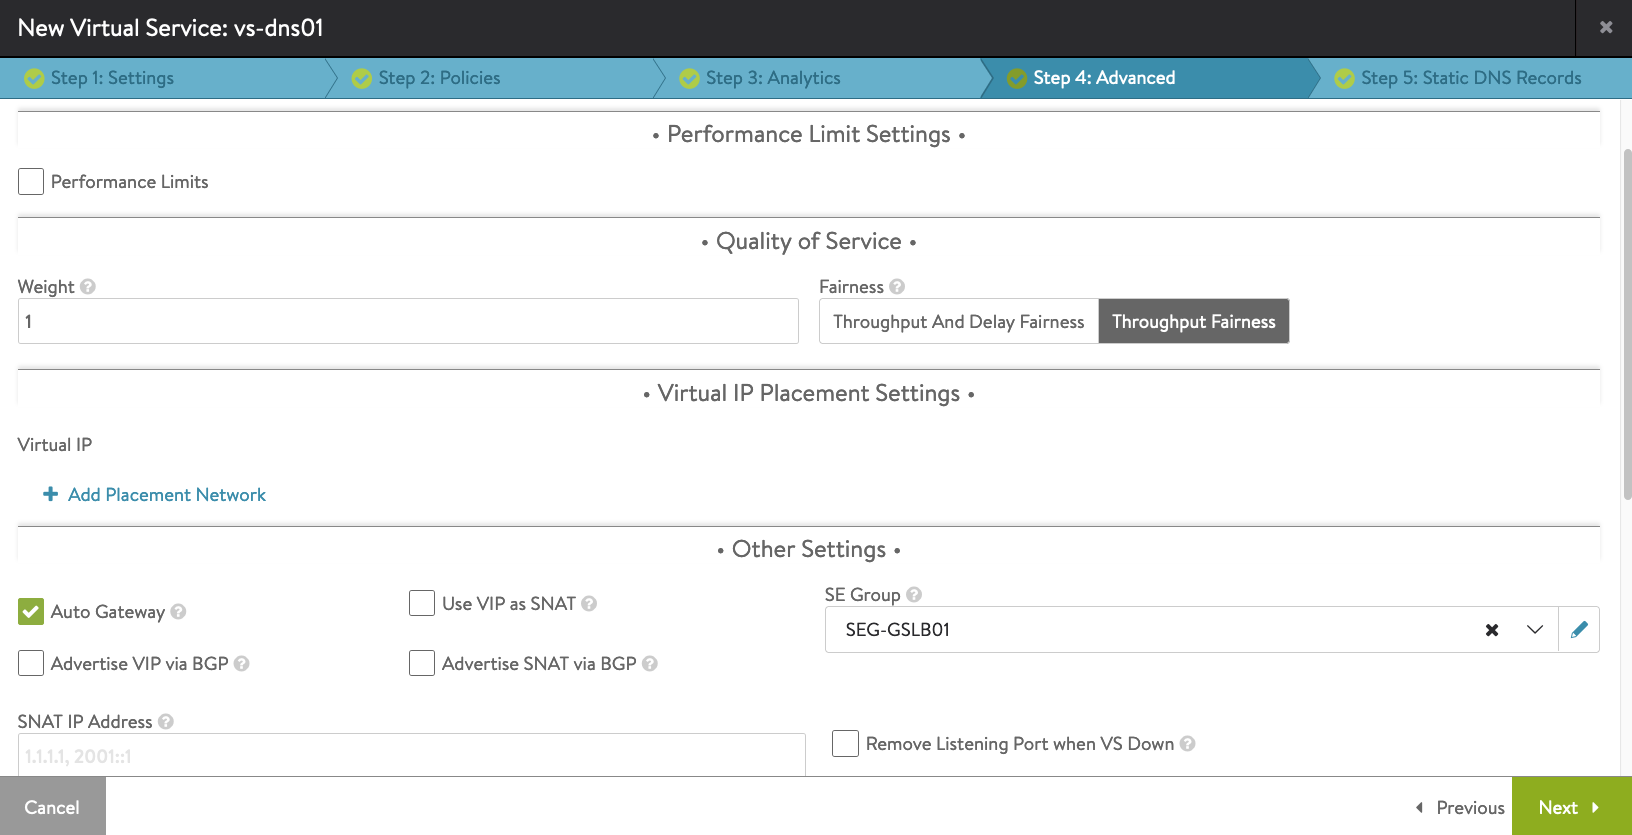
Under Step 4: Advanced tab, select the SEG-GSLB01 Service Engine Group previously you have created. Then click Next-> Save.
You will see that AVI Controller will create the GSLB DNS AVI SE VM in vCenter.
Congratulations! You have successfully created your first AVI GSLB DNS SE VM!

Delete Contour
As you can see from previous screenshots, there was an entry of envoy which was installed because of Contour. Let us delete Contour by removing the namespace.

kubectl delete ns tanzu-system-ingress
Modifying AKO to be Ingress Capable
By default, the AKO installed by AKO(Operator) - AKOO only support Layer 4 load balancer service. This is purposely done because of the AVI Essentials License that comes bundled with the Tanzu Editions.
However, the AKO installed is fully capable of handle ingress. There are a few modifications that need to be done. The following are the steps.
Modify the statefulset in the guest cluster for AKO to insert an additional environment variable:
kubectl config use-context tkg-wld-admin@tkg-wld
kubectl edit statefulset ako -n avi-system
Insert the following section under env:
- name: NODE_NETWORK_LIST
valueFrom:
configMapKeyRef:
key: nodeNetworkList
name: avi-k8s-config

Edit the configmap.
kubectl edit configmap avi-k8s-config -n avi-system
5 apiVersion: v1
6 data:
7 apiServerPort: "8080"
8 cloudName: Default-Cloud
9 clusterName: tkg-wld
10 controllerIP: nsxalb-cluster.corp.tanzu
11 defaultIngController: "true" <- Set this to true
12 deleteConfig: "false"
13 disableStaticRouteSync: "false" <- Set this to false
14 fullSyncFrequency: "1800"
15 networkName: K8s-Frontend
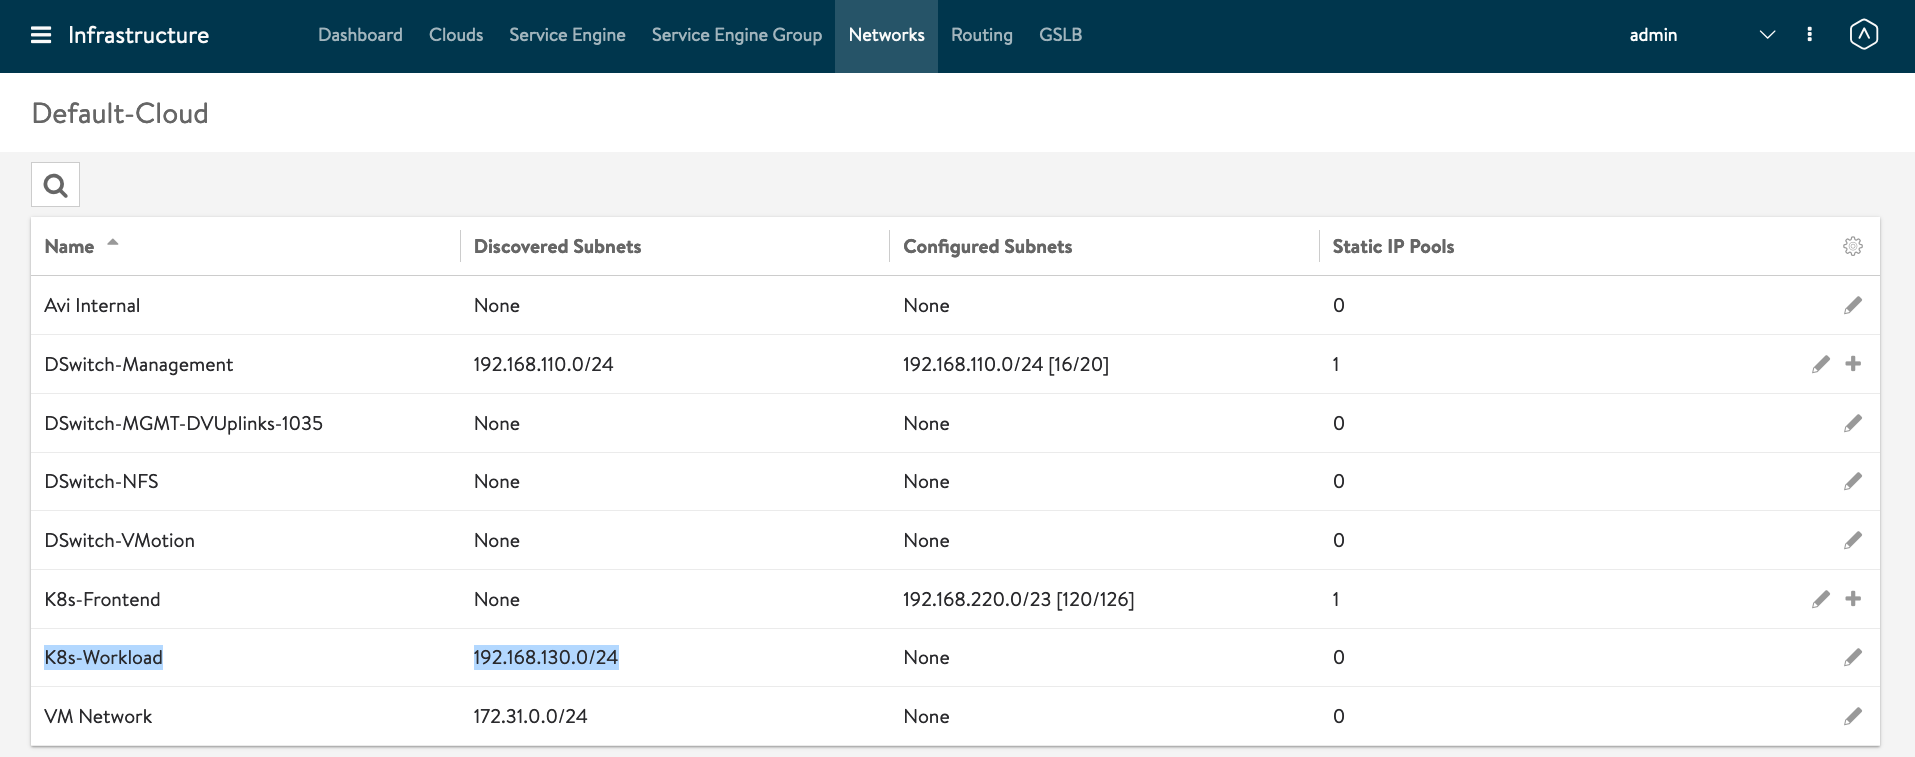
16 nodeNetworkList: '[{"cidrs":["192.168.130.0/24"],"networkName":"K8s-Workload"}]' <- This is a new line you need to add.
17 serviceEngineGroupName: Default-Group
18 serviceType: ClusterIP <- Change to ClusterIP.
19 shardVSSize: SMALL
20 subnetIP: 192.168.220.0
21 subnetPrefix: "23"
22 kind: ConfigMap
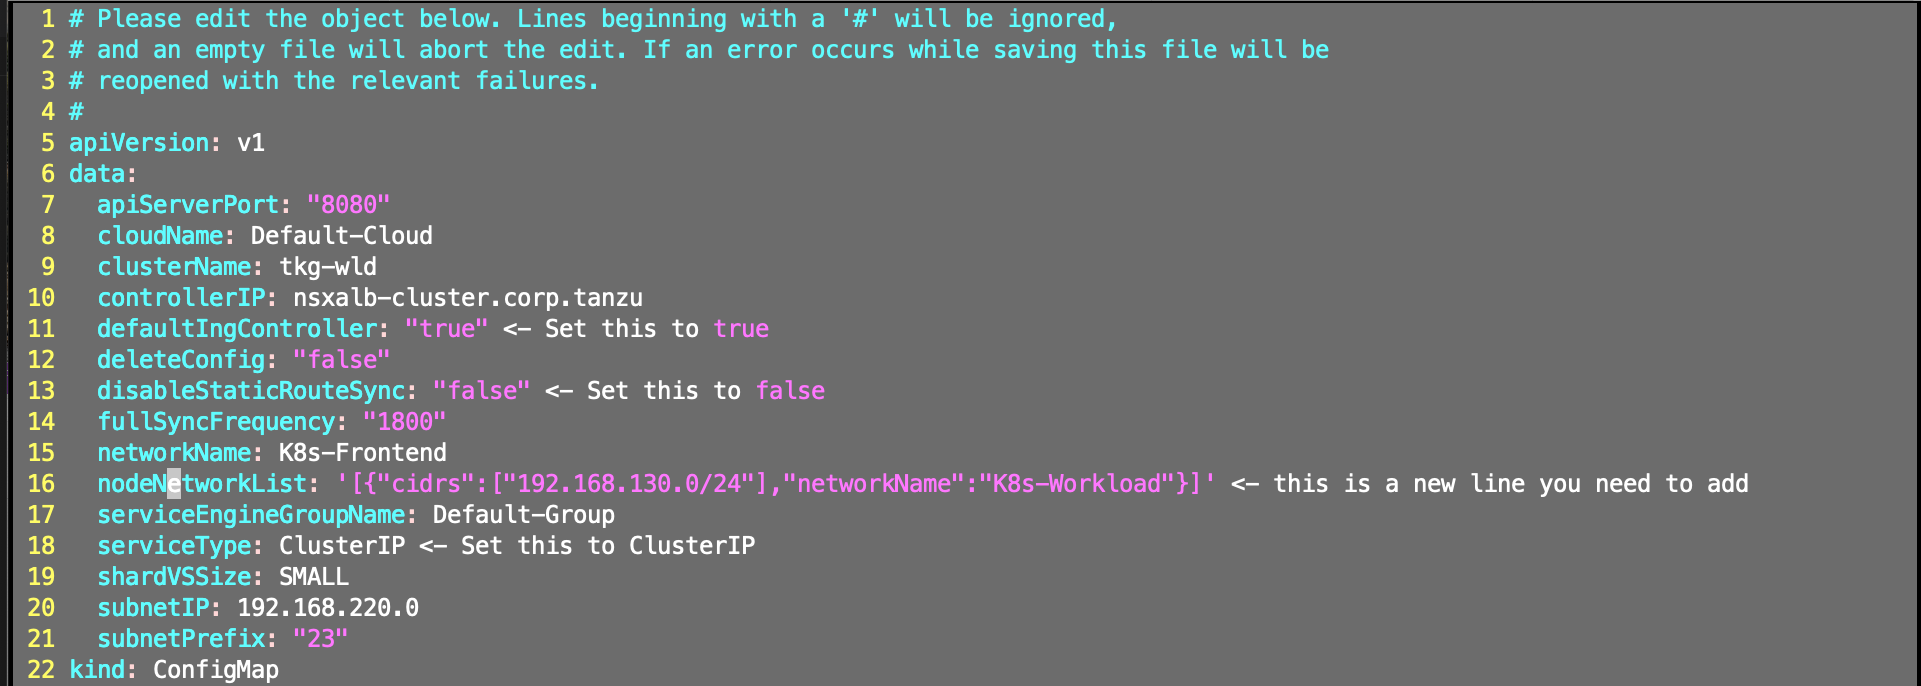
The CIDR and NodeNetworkList must match the Network you have created in AVI Controller. CIDR = TKG worker node subnet and networkName = port group shown in Avi Controller for the CIDR.
You then need to delete the AKO pod so it restarts and picks up the changes:
kubectl delete pods ako-0 -n avi-system

Create Ingress
You probably need to edit the yaml to use your domain name that you have defined at AVI Controller.
git clone https://github.com/vincenthanjs/kubernetes-apps-demo.git
cd kubernetes-apps-demo/demo-01-hello-kubernetes/
vi hello-kubernetes.yaml
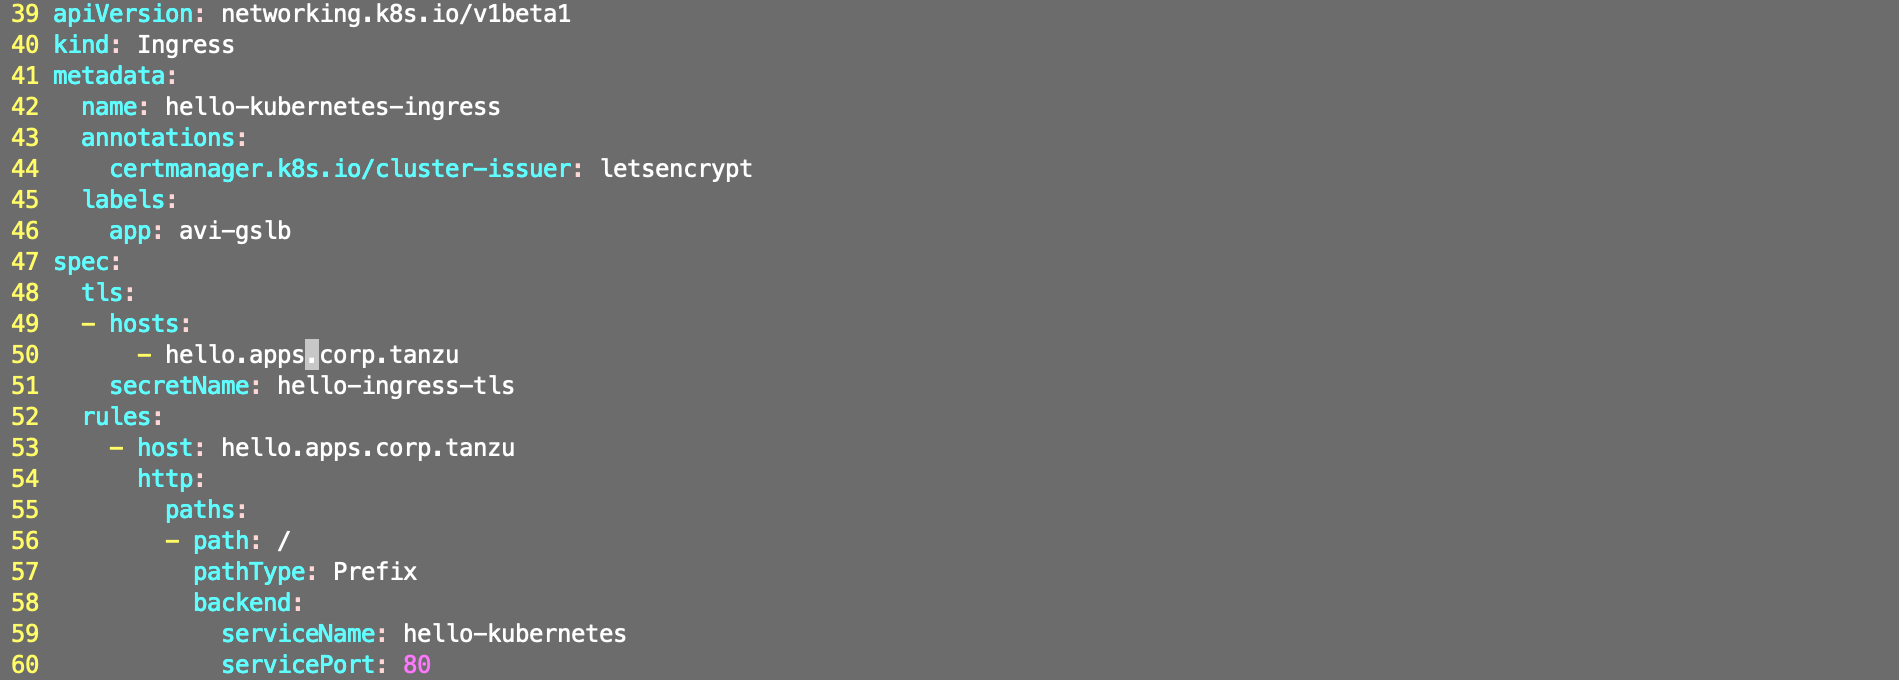
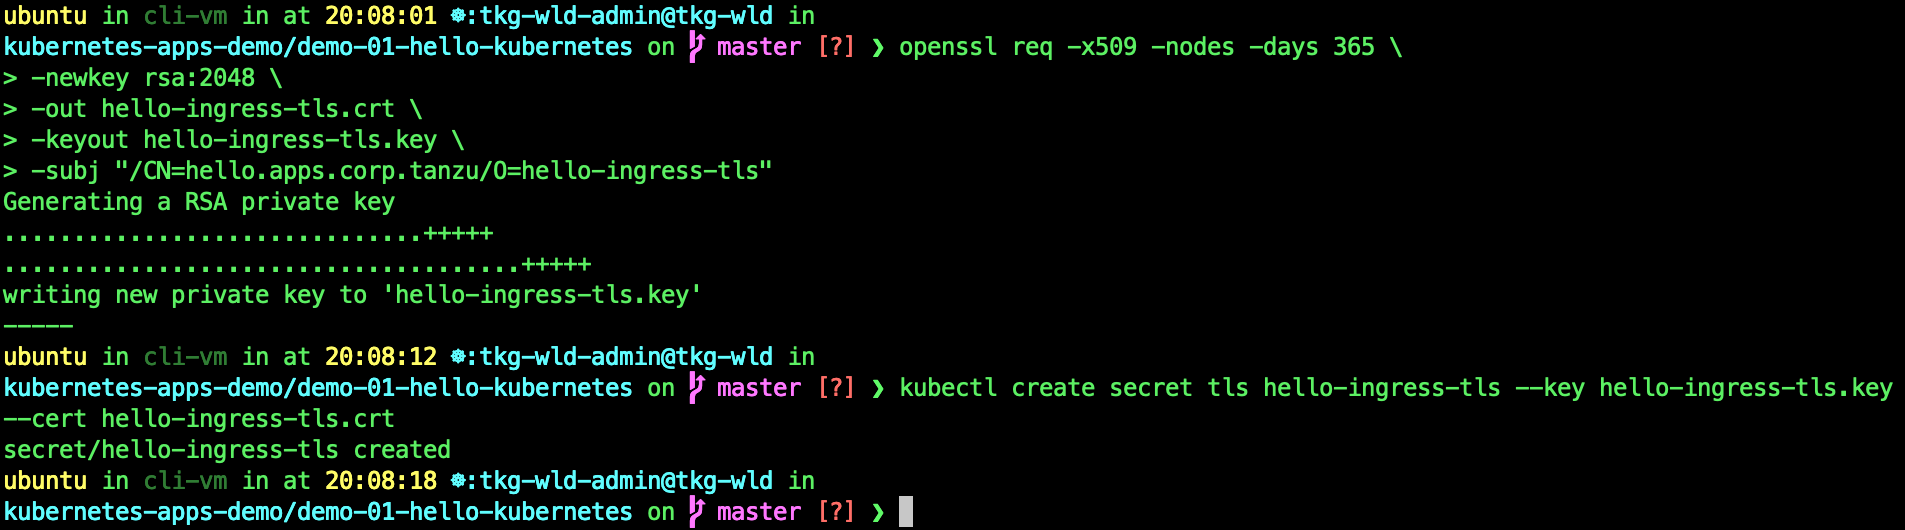
Since we going to create a secured Ingress which uses TLS secret, we have to create the secret.
openssl req -x509 -nodes -days 365 \
-newkey rsa:2048 \
-out hello-ingress-tls.crt \
-keyout hello-ingress-tls.key \
-subj "/CN=hello.apps.corp.tanzu/O=hello-ingress-tls"
kubectl create secret tls hello-ingress-tls --key hello-ingress-tls.key --cert hello-ingress-tls.crt
Deploy Ingress
kubectl apply -f hello-kubernetes.yaml
kubectl describe ingress hello-kubernetes-ingress

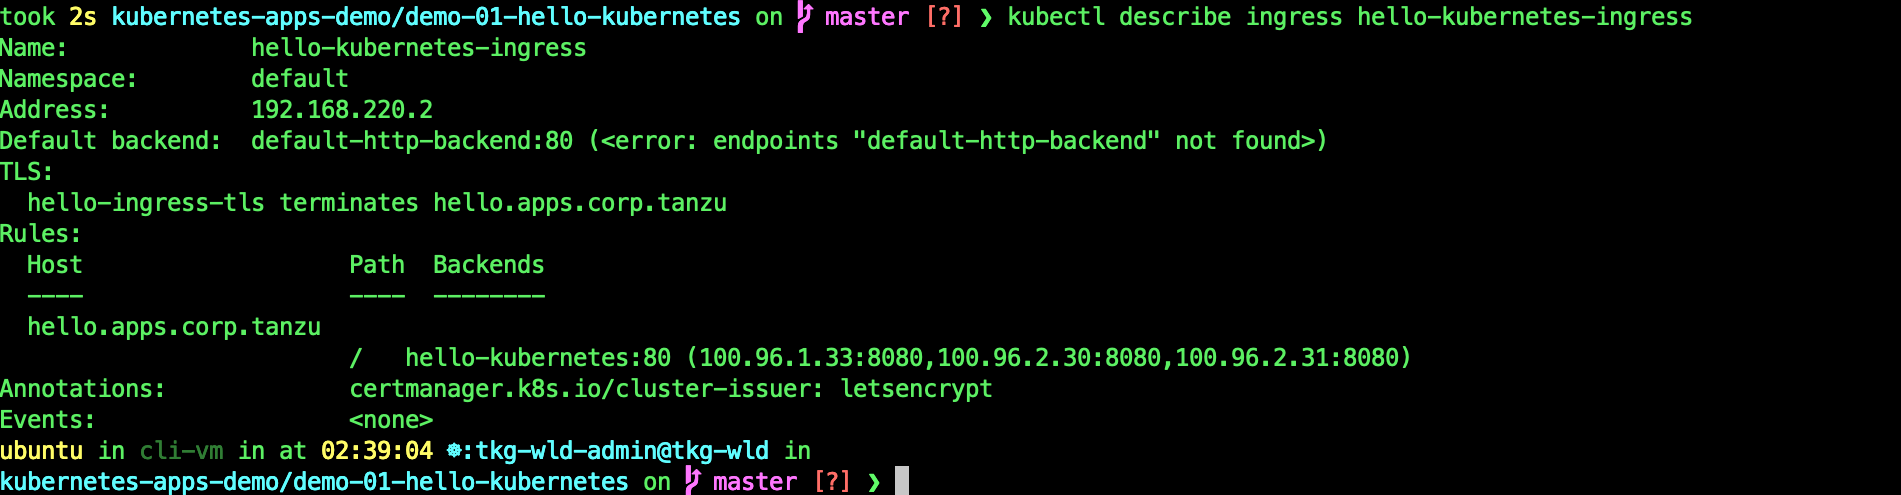
This shows that you have successfully created a secured Ingress on AVI.
*** If your deployment fails, it might got to do with Docker pull limits. Do the following.
docker login
kubectl create secret generic regcred \
--from-file=.dockerconfigjson=/home/ubuntu/.docker/config.json \
--type=kubernetes.io/dockerconfigjson
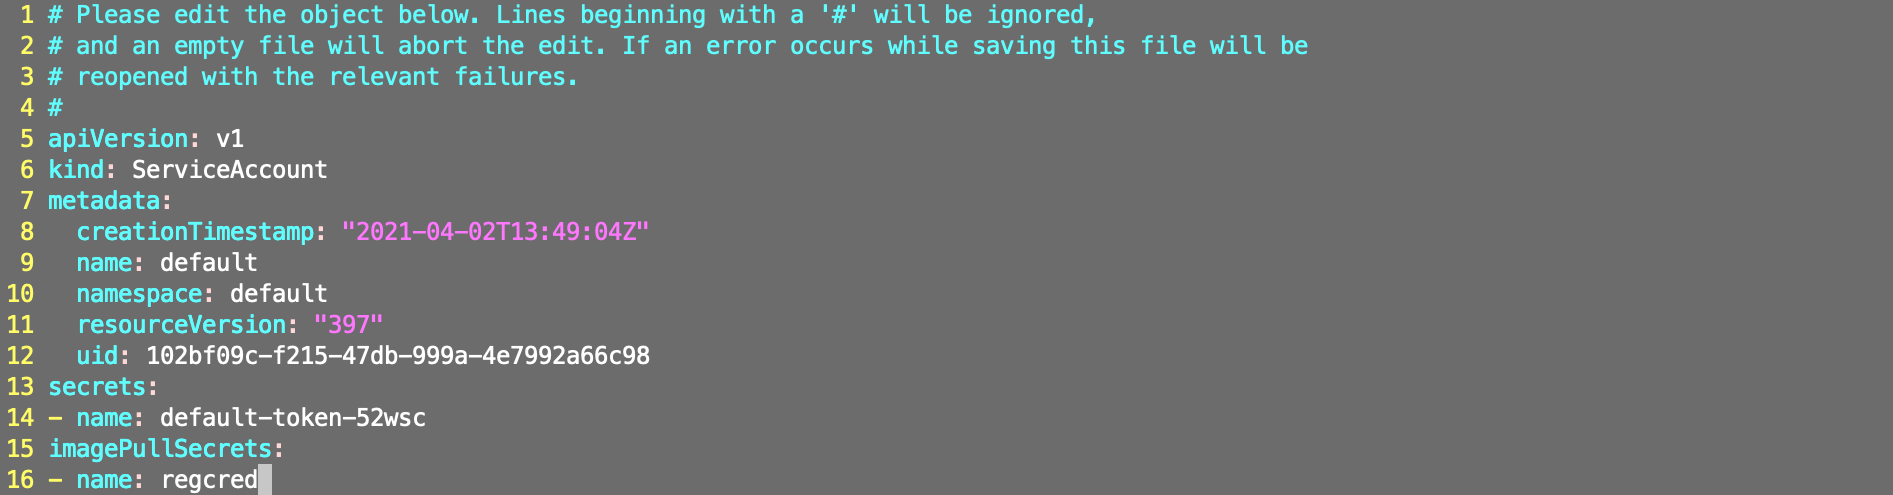
kubectl edit sa default
##Enter this line
imagePullSecrets:
- name: regcred

Enable AKO on 2nd TKG WLD.
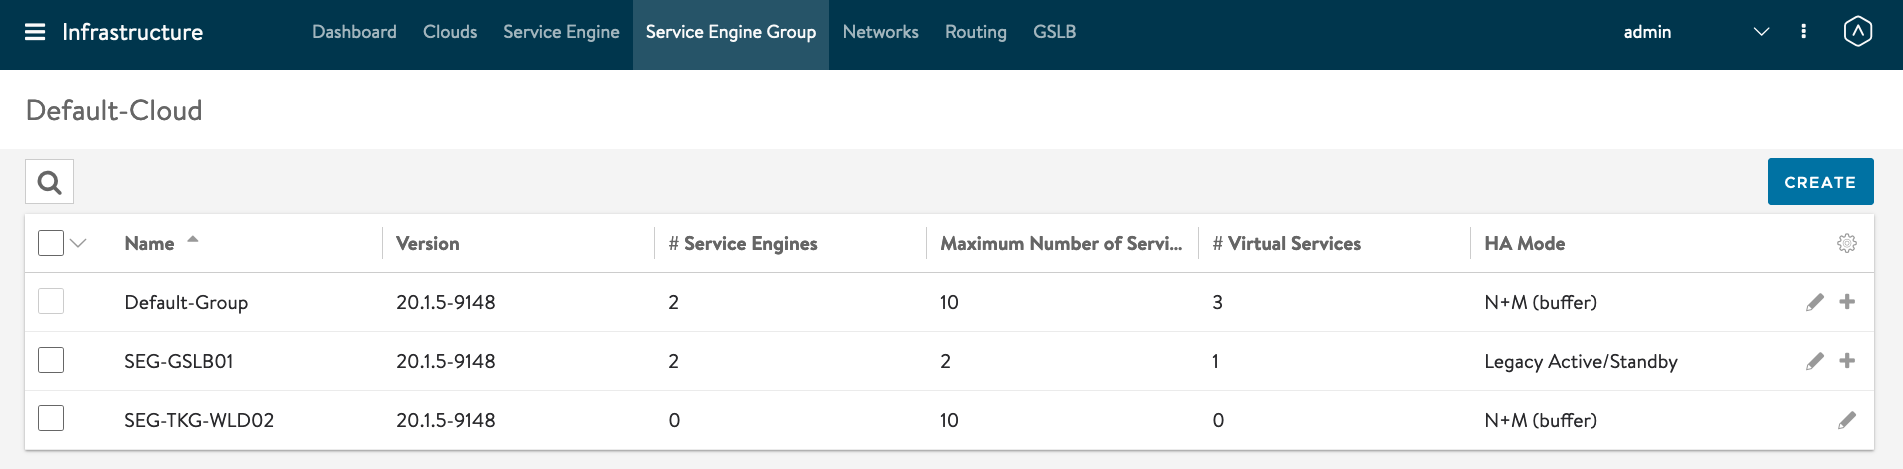
Now, we need to enable AKO on the 2nd TKG WLD cluster. Before we can do that, we need to create a second AVI SE Service Group.
AVI Controller -> Infrastructure -> Service Engine Group
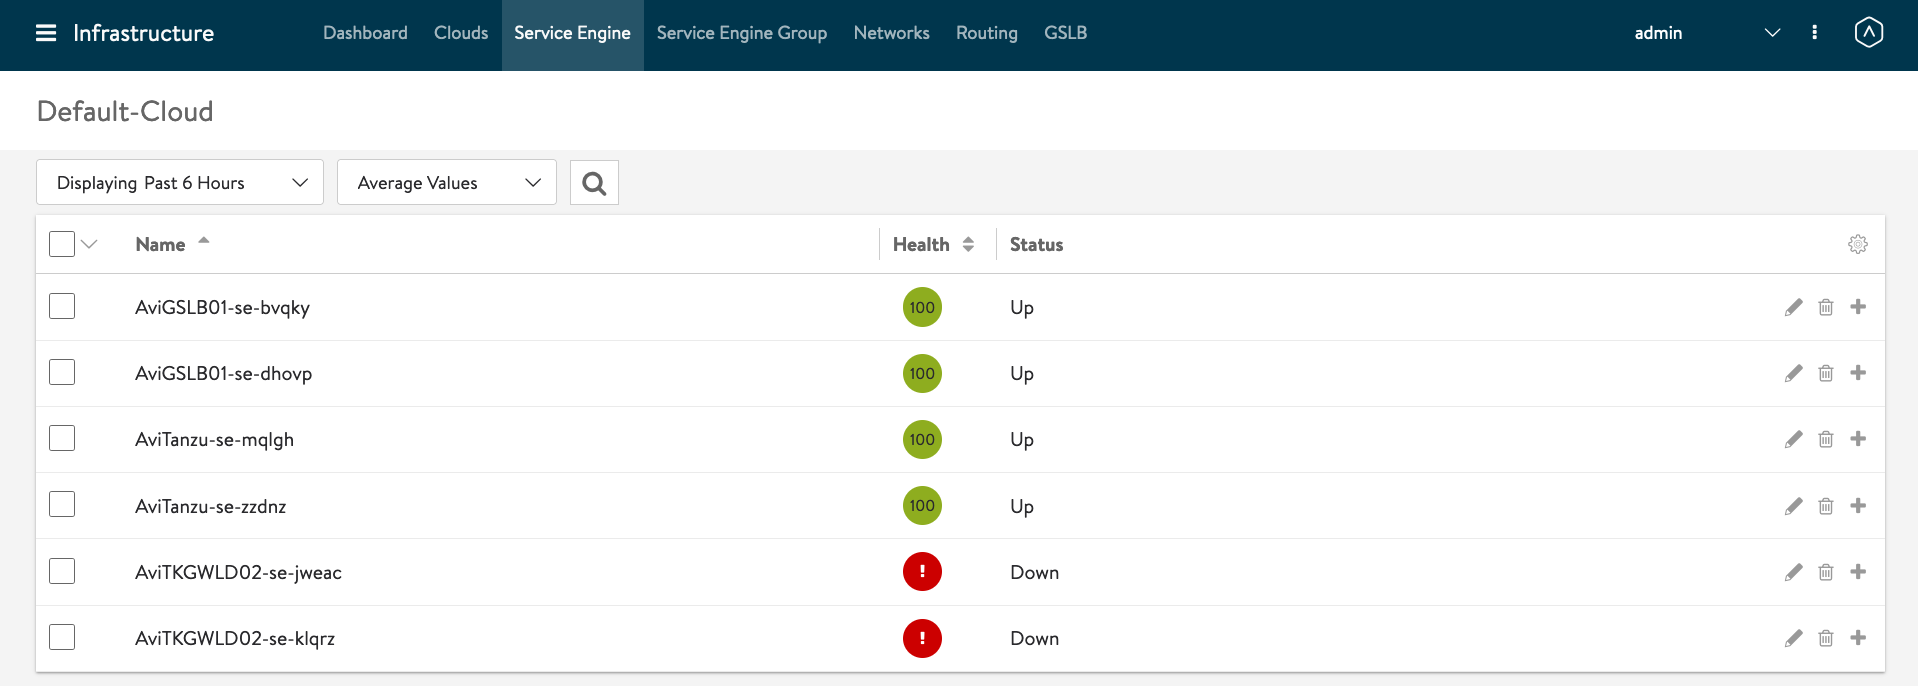
Service Enginer Group Name: SEG-TKG-WLD02 Service Engine Name Prefix: AviTKGWLD02
Repeat the above steps to modify AKO on the TKG WLD02.
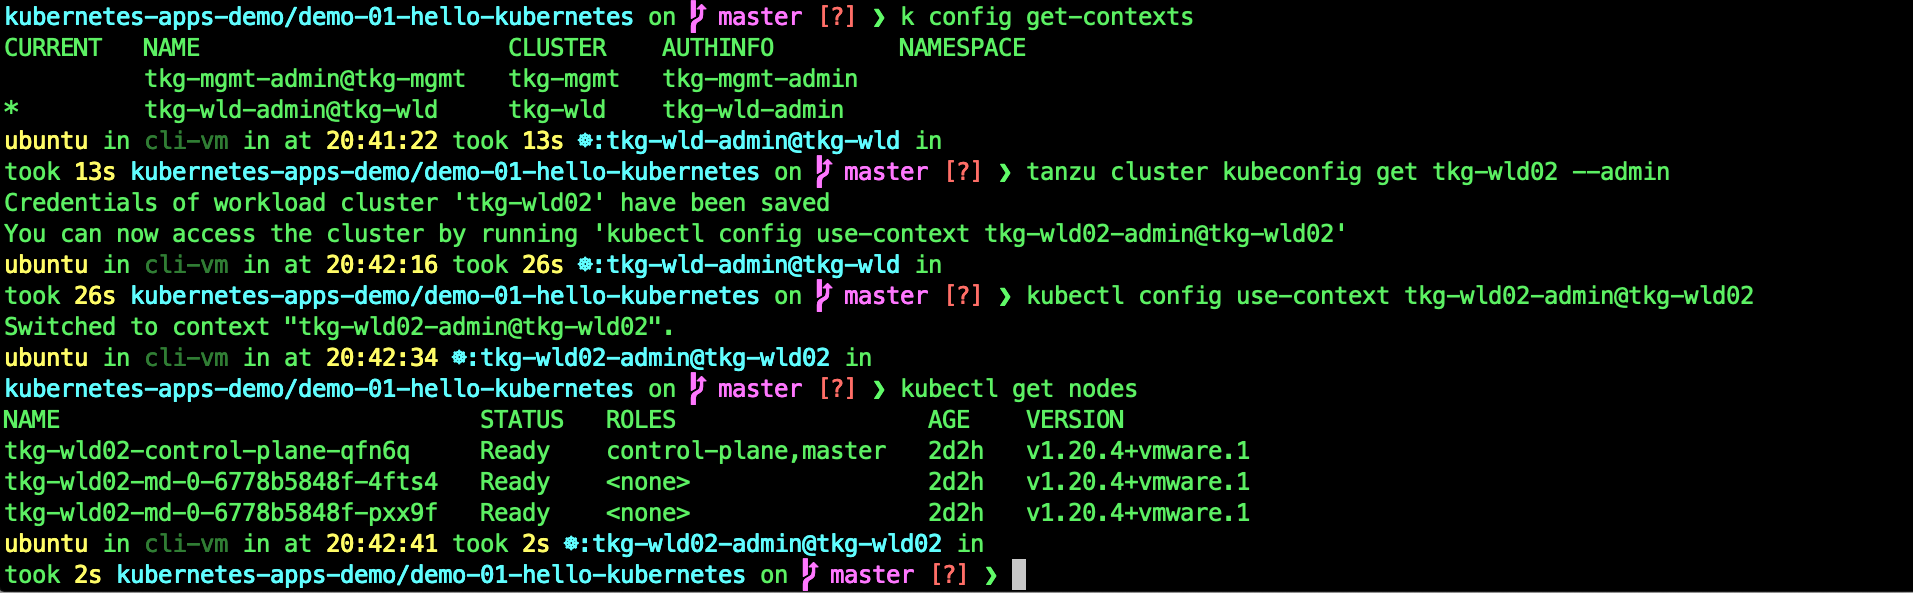
tanzu cluster kubeconfig get tkg-wld02 --admin
kubectl config use-context tkg-wld02-admin@tkg-wld02
kubectl get nodes
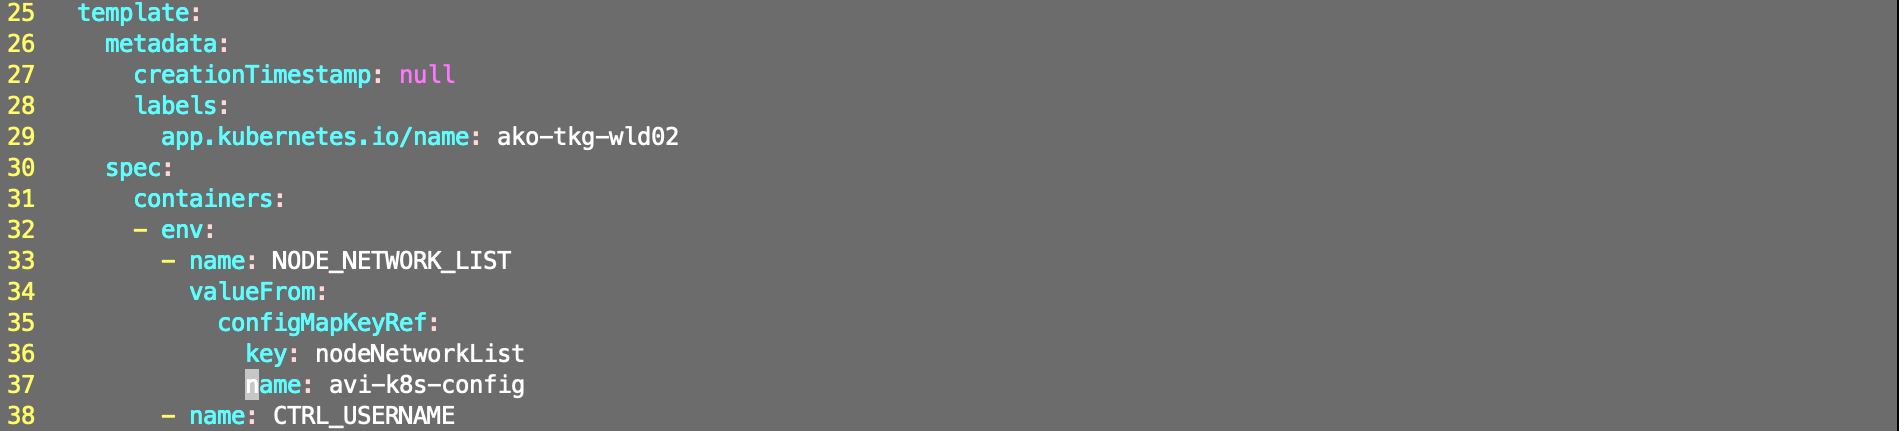
Modify the statefulset in the guest cluster for AKO to insert an additional environment variable:
kubectl edit statefulset ako -n avi-system
Insert the following section under env:
- name: NODE_NETWORK_LIST
valueFrom:
configMapKeyRef:
key: nodeNetworkList
name: avi-k8s-config
Edit the configmap.
kubectl edit configmap avi-k8s-config -n avi-system
5 apiVersion: v1
6 data:
7 apiServerPort: "8080"
8 cloudName: Default-Cloud
9 clusterName: tkg-wld02
10 controllerIP: nsxalb-cluster.corp.tanzu
11 defaultIngController: "true" <- Set this to true
12 deleteConfig: "false"
13 disableStaticRouteSync: "false" <- Set this to false
14 fullSyncFrequency: "1800"
15 networkName: K8s-Frontend
16 nodeNetworkList: '[{"cidrs":["192.168.130.0/24"],"networkName":"K8s-Workload"}]' <- This is a new line you need to add.
17 serviceEngineGroupName: SEG-TKG-WLD02 <- Change this to the Service Engine group you just created
18 serviceType: ClusterIP <- Change to ClusterIP.
19 shardVSSize: SMALL
20 subnetIP: 192.168.220.0
21 subnetPrefix: "23"
The CIDR and NodeNetworkList must match the Network you have created in AVI Controller. CIDR = TKG worker node subnet and networkName = port group shown in Avi Controller for the CIDR.
You then need to delete the AKO pod so it restarts and picks up the changes:
kubectl delete pods ako-0 -n avi-system
Create Ingress
Since we already have the certs created, we just need to create the secrets on the 2nd TKG WLD cluster.
cd kubernetes-apps-demo/demo-01-hello-kubernetes/
kubectl create secret tls hello-ingress-tls --key hello-ingress-tls.key --cert hello-ingress-tls.crt

Create the regcred for the default service account.
docker login
kubectl create secret generic regcred \
--from-file=.dockerconfigjson=/home/ubuntu/.docker/config.json \
--type=kubernetes.io/dockerconfigjson
kubectl edit sa default
##Enter this line
imagePullSecrets:
- name: regcred
Deploy Ingress
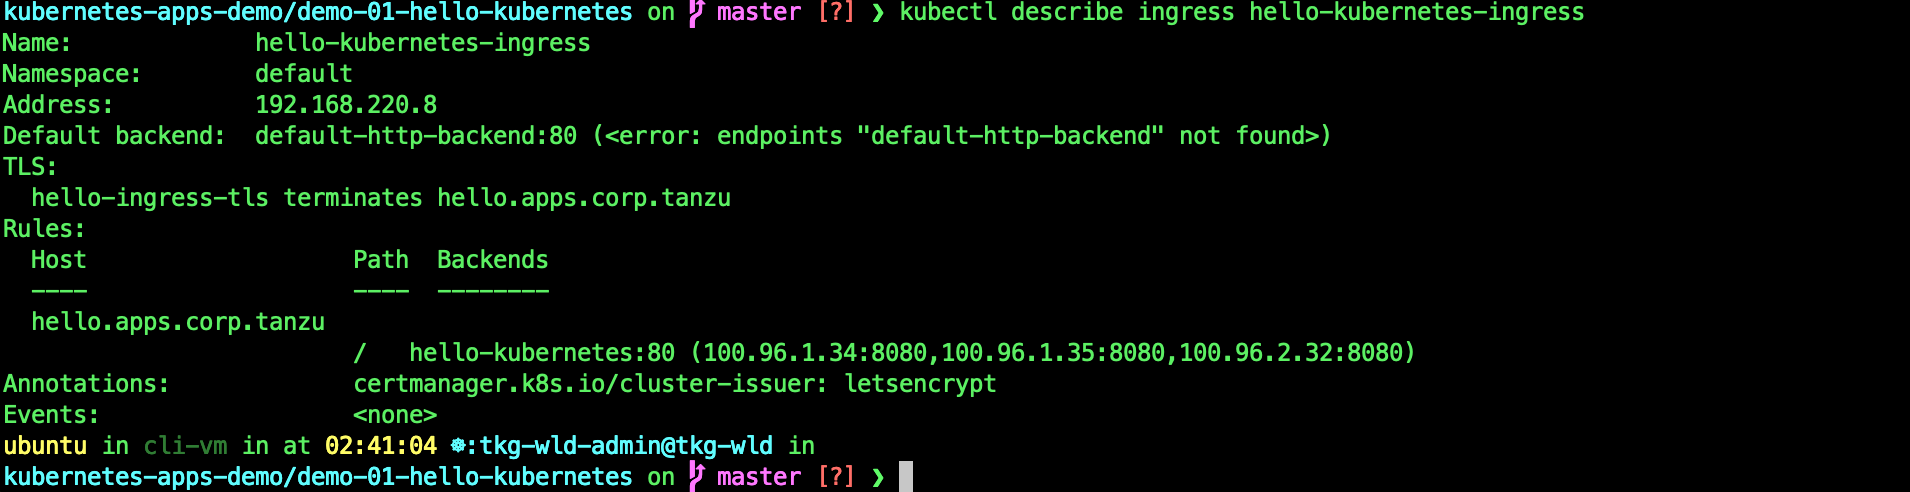
kubectl apply -f hello-kubernetes.yaml
kubectl describe ingress hello-kubernetes-ingress
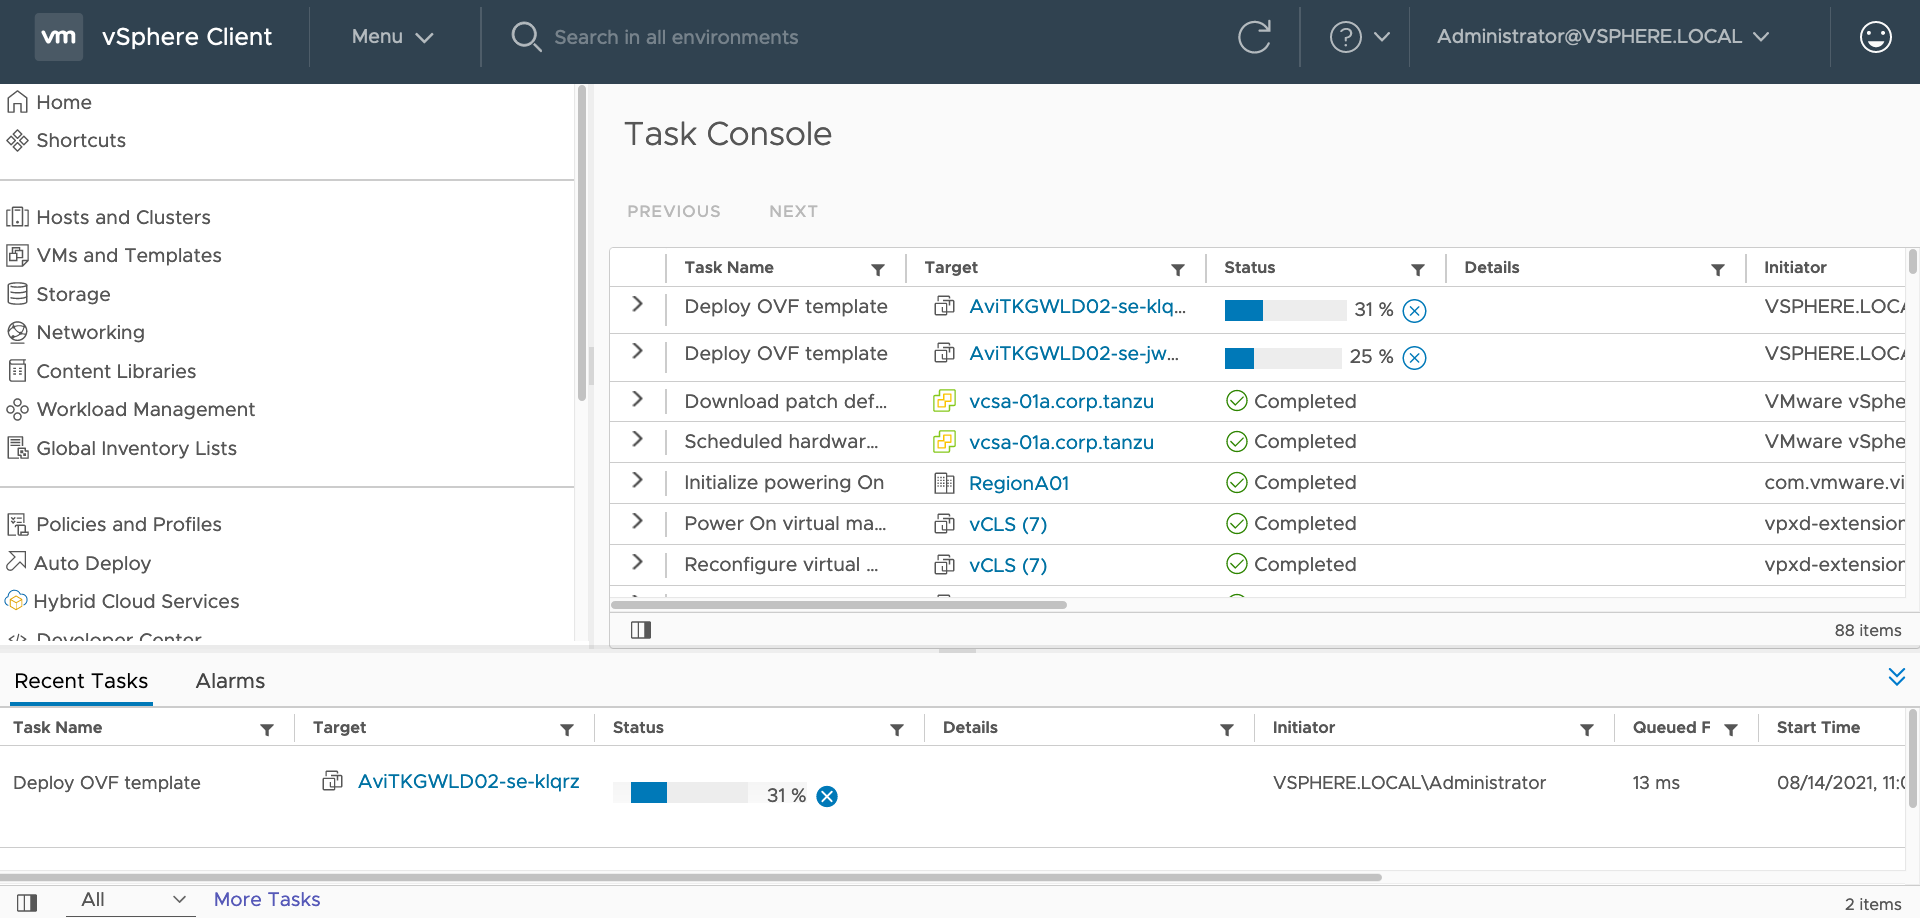
Its going to take awhile for this ingress to be working because AVI Controller will need to create the SE.
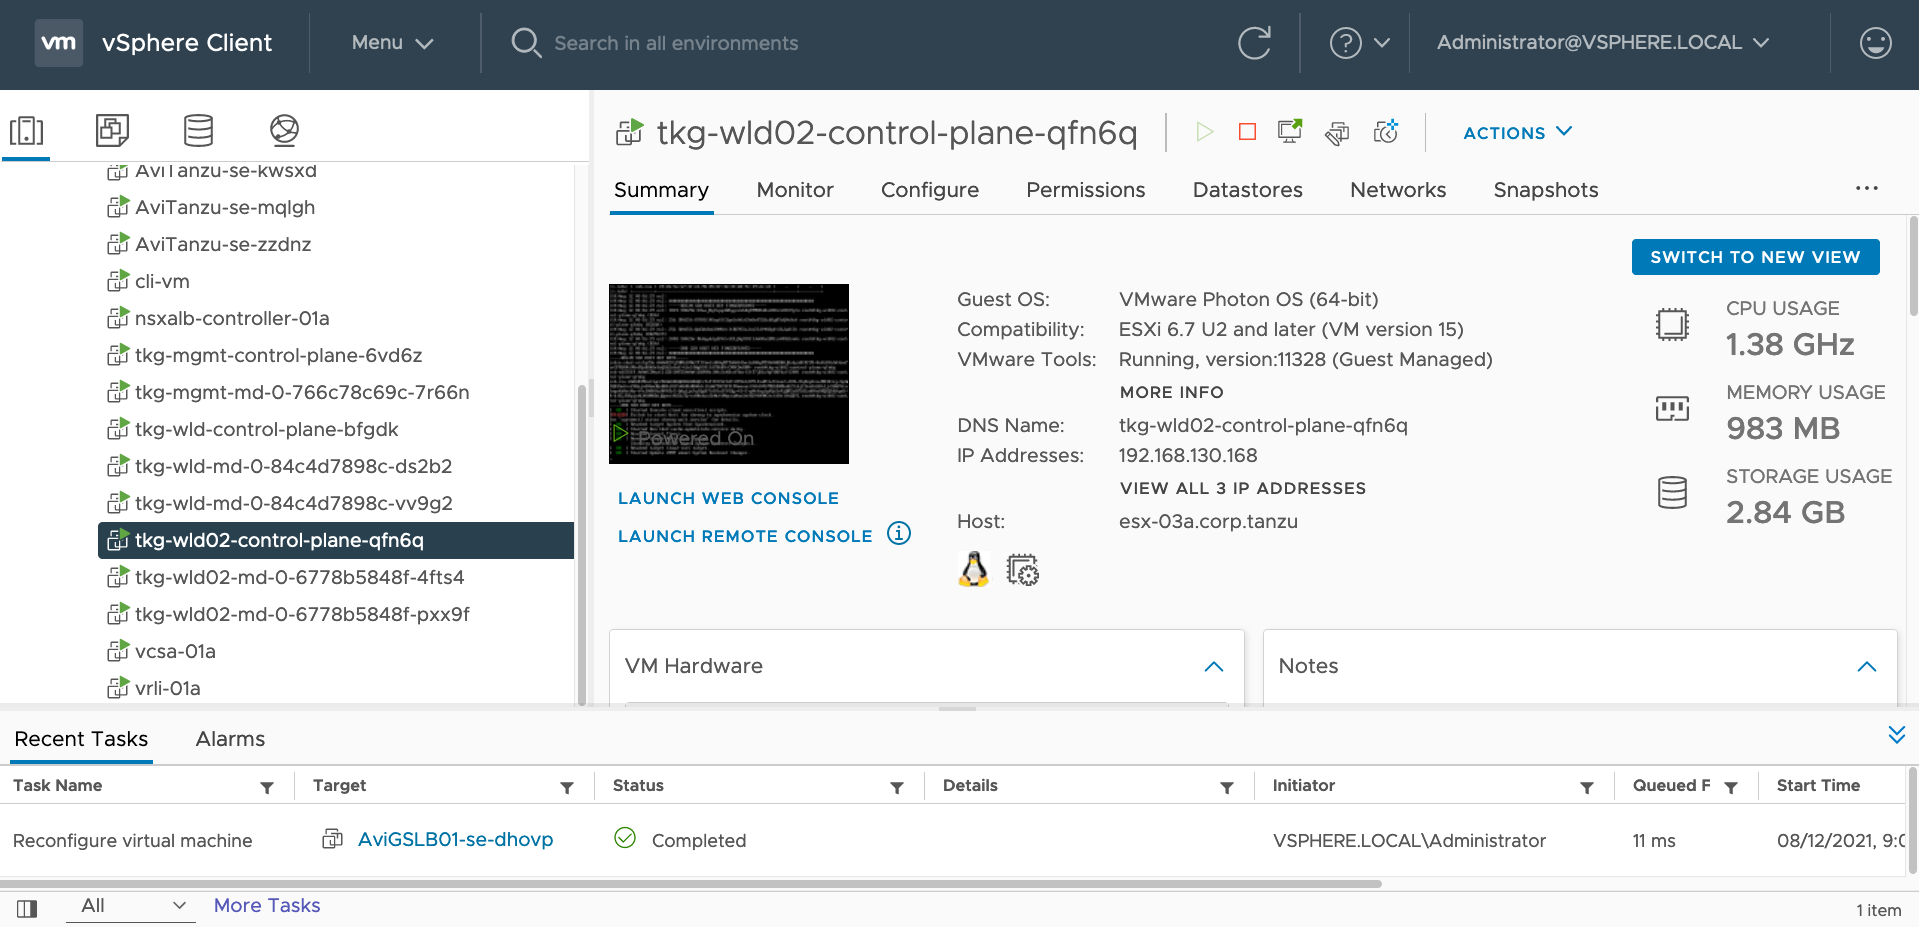
You can see at vCenter, the AVI SEs are deploying.
This shows that you have successfully created a secured Ingress on AVI on the TKG WLD02 cluster.
Some Observations and Why AMKO?
When you have reach this step, I think its a good time to reflect what you have achieve so far. Its also a good time to understand the problem AMKO is trying to solve.
Now, you have two TKG WLD Clusters and each cluster have its own Ingress Controller which were being realized on AVI SE VMs. The developers or Apps team are able to deploy their applications with a FQDN but the VIP you get from the Ingress creation still need to be added to a DNS Server.
A common practise is to use wildcard DNS to handle all these DNS resolution but when you have multiple TKG clusters and domain names to manage, this wildcard DNS solution becomes a problem - manageability, scalability and performance wise.
This is where AMKO comes into the picture to address this issue. You create a DNS delegation from your DNS server to AVI SE DNS Server. AMKO will be in charge of take the FQDN and VIP mapping and configure it automatically for you on the AVI GSLB DNS Server.
AMKO Installation
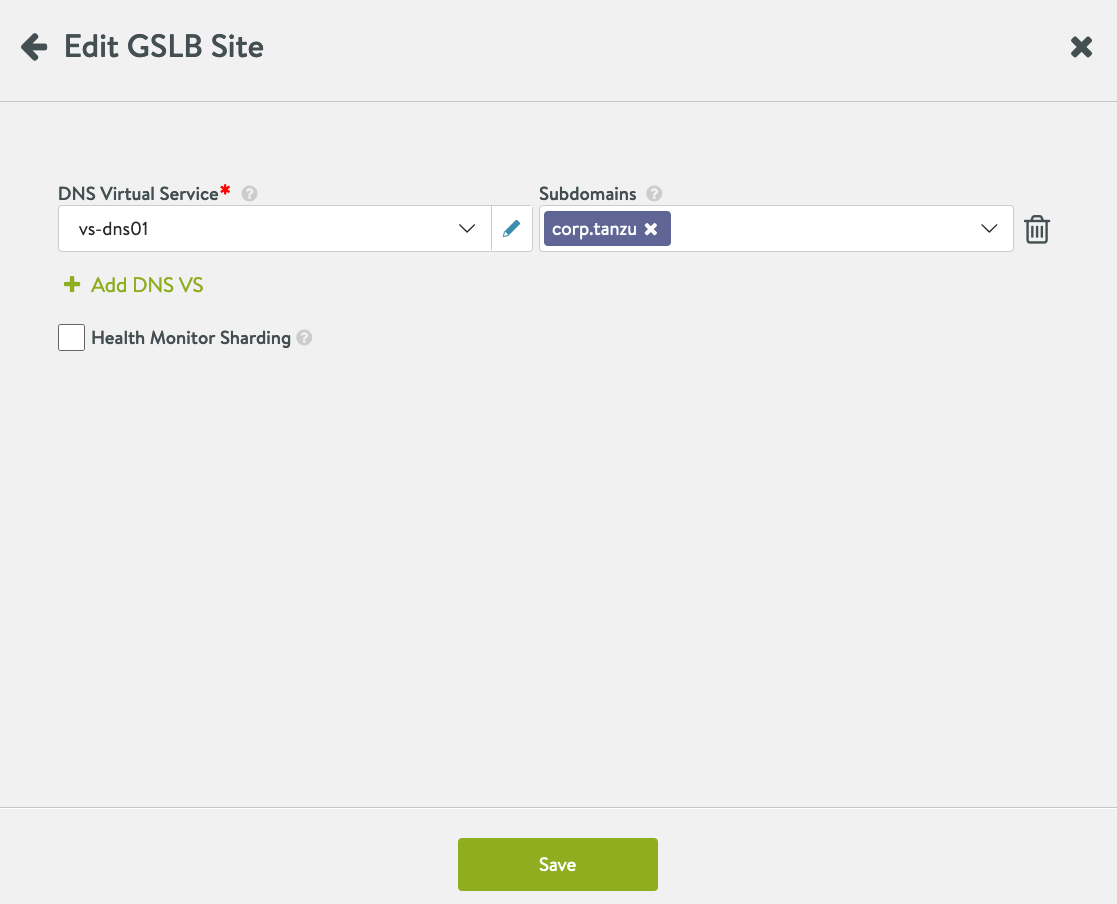
Enable GSLB Services on AVI Controller. Infrastructure -> GSLB -> Click on the Pencil
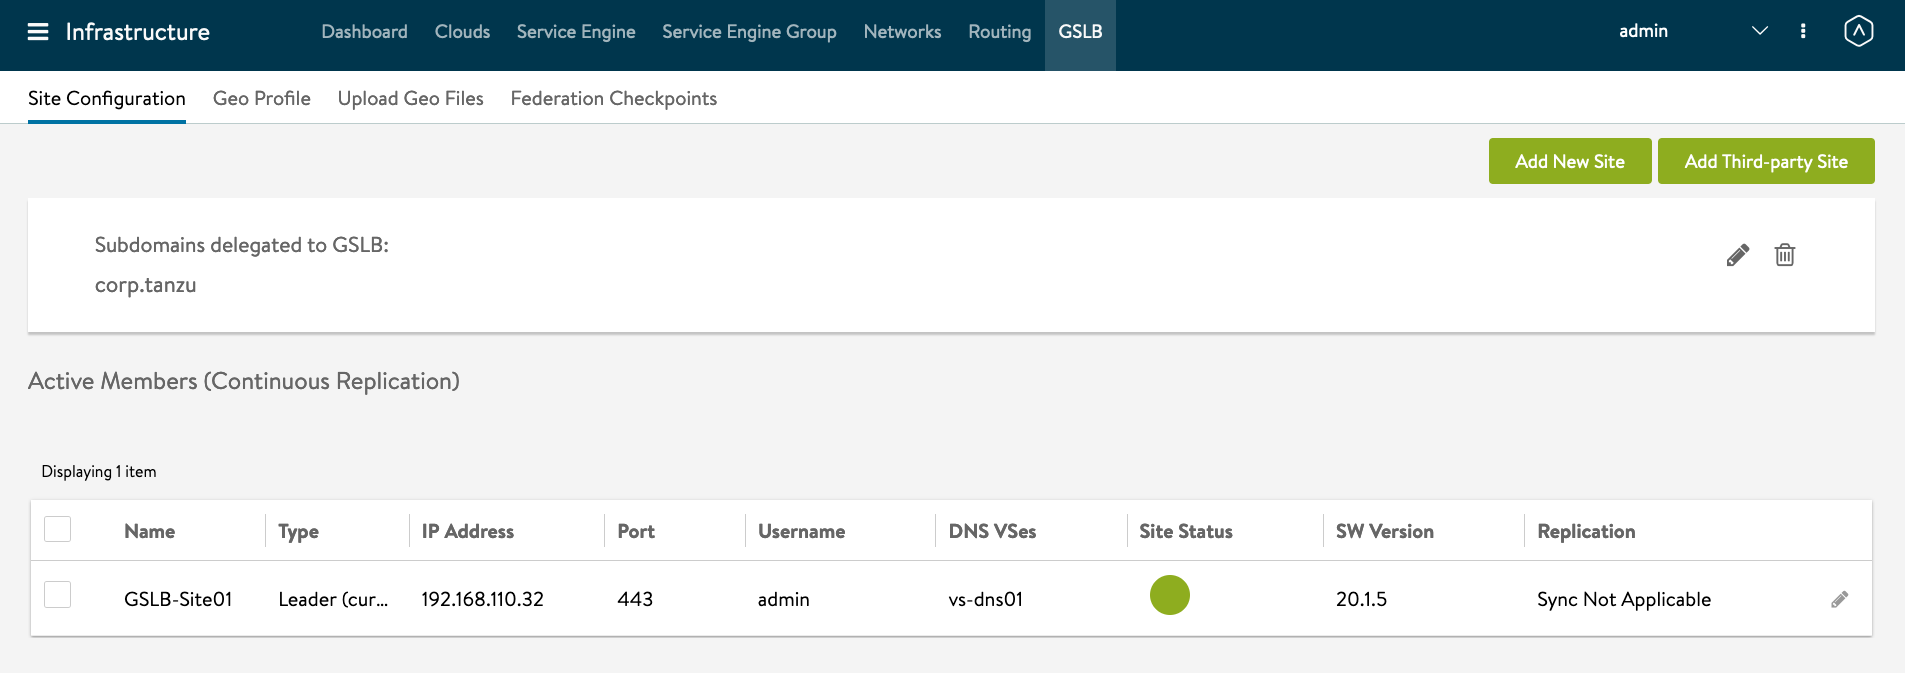
Name: GSLB-Site01 GSLB Subdomain: corp.tanzu

Select Subdomains.
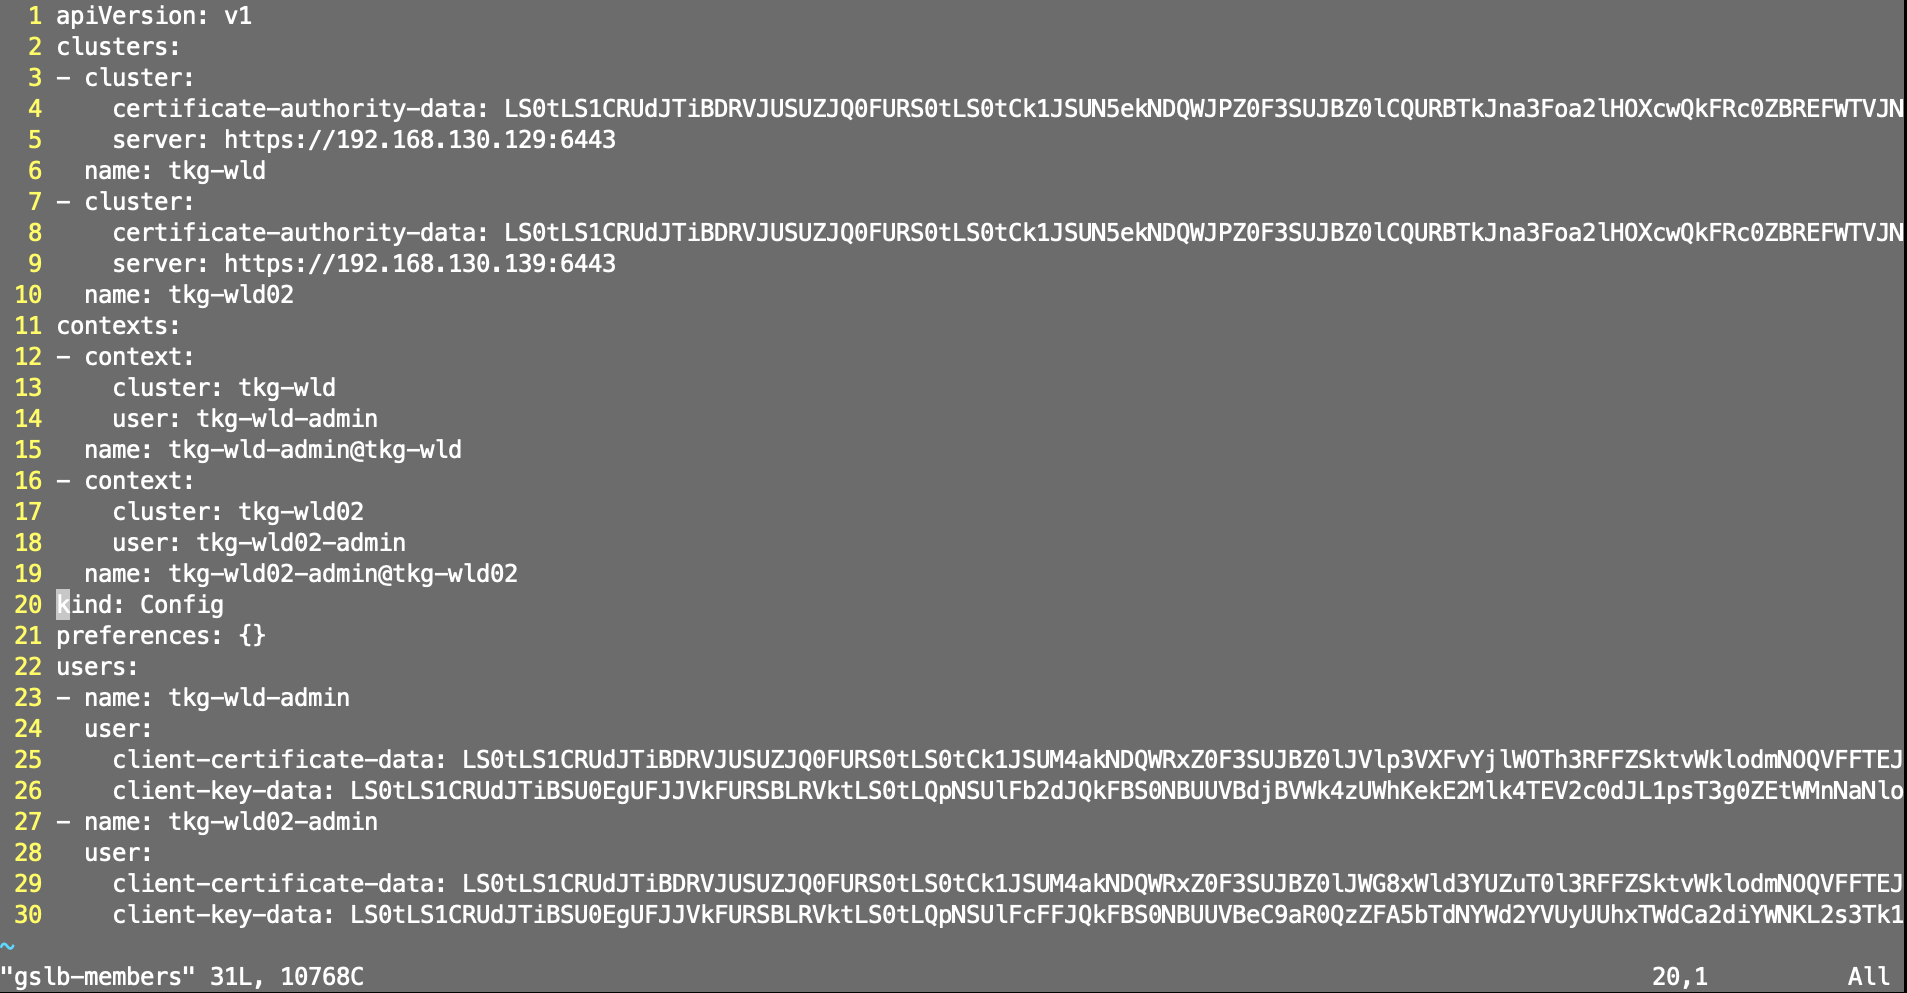
We need to create gslb-members file which is basically kubeconfig files of the TKG clusters combined. We will use the tkg wld kubernetes admin accounts.
mkdir amko
cd amko
kubectl config get-contexts

kubectl config view -oyaml --raw > gslb-members
We need to delete the tkg-mgmt context in the gslb-members.
If you are not using the kubernetes admin accounts, you can download the template from here. https://github.com/avinetworks/avi-helm-charts/blob/master/docs/AMKO/kubeconfig.md
To verify the contexts are working.
kubectl --kubeconfig gslb-members config get-contexts

kubectl config use-context tkg-wld-admin@tkg-wld
kubectl create secret generic gslb-config-secret --from-file gslb-members -n avi-system
kubectl get secrets -n avi-system


Helm repo
helm repo add amko https://projects.registry.vmware.com/chartrepo/ako
helm search repo

helm show values amko/amko --version 1.4.2 > values.yaml
vi values.yaml

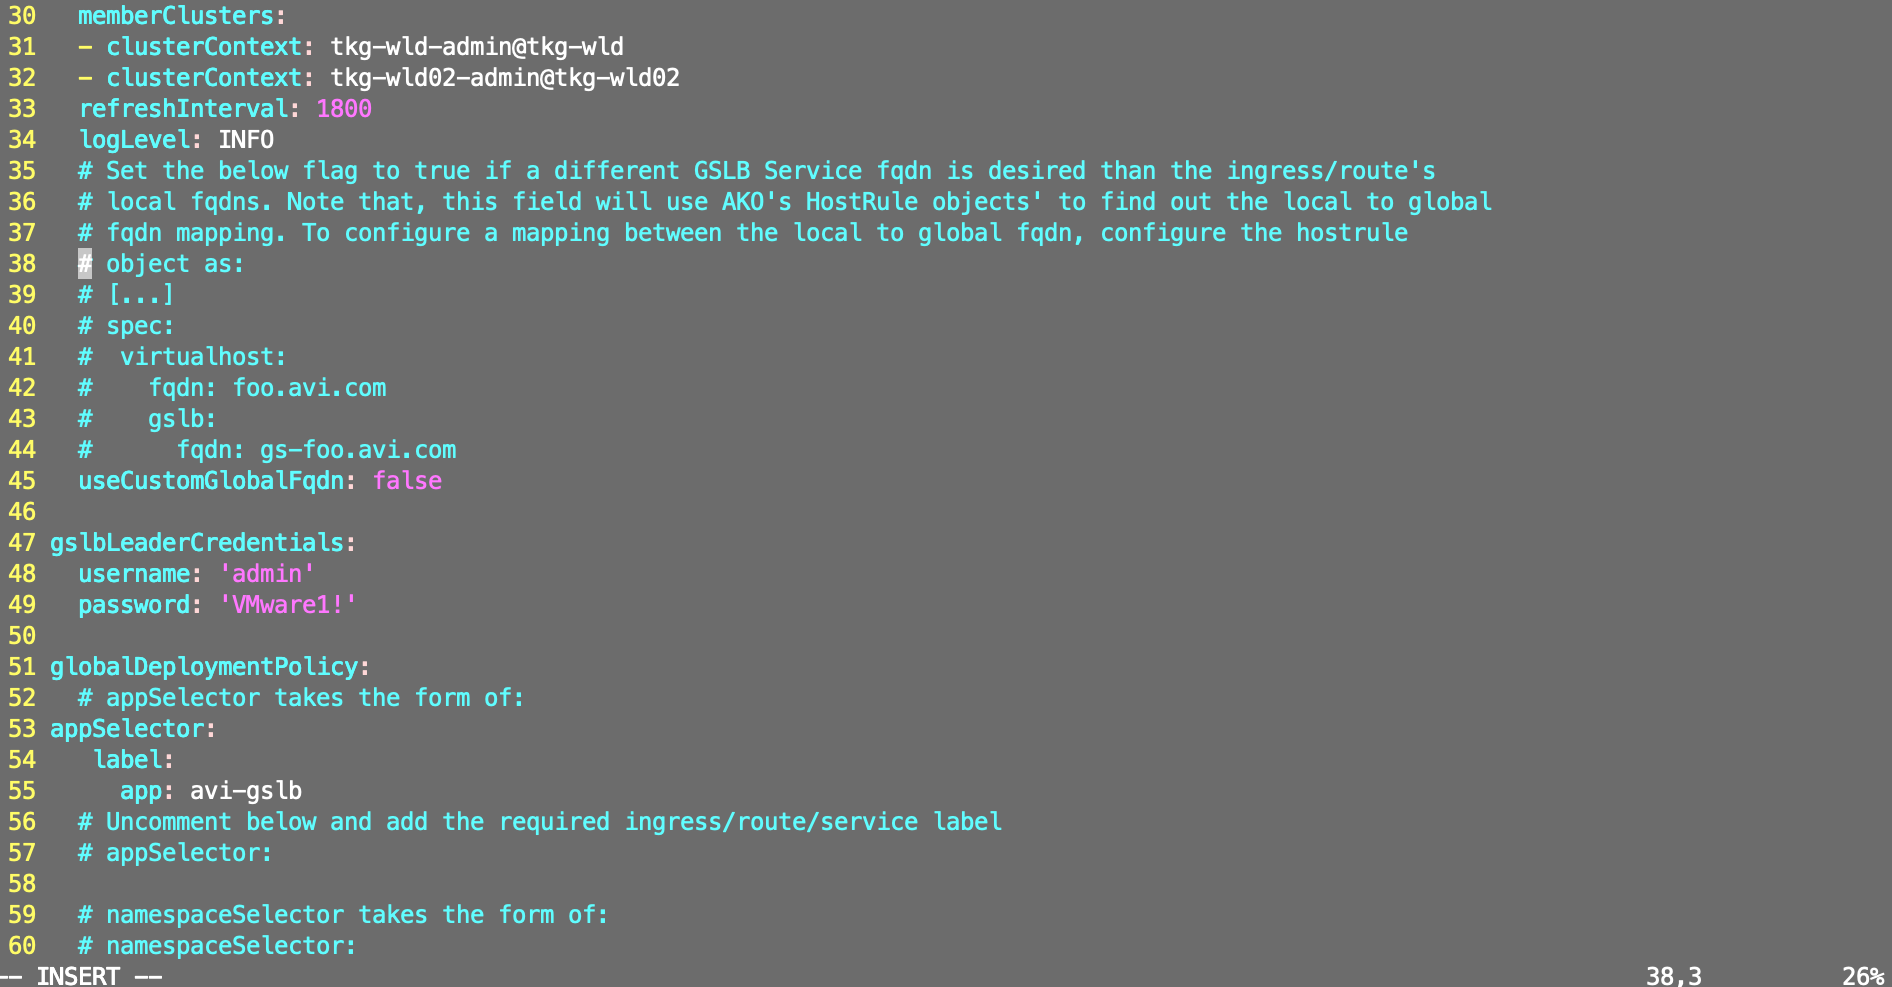
You will need to edit - memberClusters: - tkg-wld-admin@tkg-wld - tkg-wld02-admin@tkg-wld02 - gslbLeaderController: ‘192.168.110.32’ - controllerVersion: 20.1.5 - gslbLeaderCredentials: username: ‘admin’ password: ‘VMware1!’ - appSelector: label: app: avi-gslb - matchClusters: - cluster: tkg-wld-admin@tkg-wld - cluster: tkg-wld02-admin@tkg-wld02 - federation - currentCluster: ‘tkg-wld-admin@tkg-wld’ - currentClusterIsLeader: true
cat values.yaml
# Default values for amko.
# This is a YAML-formatted file.
# Declare variables to be passed into your templates.
replicaCount: 1
image:
repository: projects.registry.vmware.com/ako/amko
pullPolicy: IfNotPresent
# Configs related to AMKO Federator
federation:
# image repository
image:
repository: projects.registry.vmware.com/ako/amko-federator
pullPolicy: IfNotPresent
# cluster context where AMKO is going to be deployed
currentCluster: ''
# Set to true if AMKO on this cluster is the leader
currentClusterIsLeader: false
# member clusters to federate the GSLBConfig and GDP objects on, if the
# current cluster context is part of this list, the federator will ignore it
memberClusters:
- tkg-wld-admin@tkg-wld
- tkg-wld02-admin@tkg-wld02
configs:
gslbLeaderController: '192.168.110.32'
controllerVersion: 20.1.5
memberClusters:
- clusterContext: tkg-wld-admin@tkg-wld
- clusterContext: tkg-wld02-admin@tkg-wld02
refreshInterval: 1800
logLevel: INFO
# Set the below flag to true if a different GSLB Service fqdn is desired than the ingress/route's
# local fqdns. Note that, this field will use AKO's HostRule objects' to find out the local to global
# fqdn mapping. To configure a mapping between the local to global fqdn, configure the hostrule
# object as:
# [...]
# spec:
# virtualhost:
# fqdn: foo.avi.com
# gslb:
# fqdn: gs-foo.avi.com
useCustomGlobalFqdn: false
gslbLeaderCredentials:
username: 'admin'
password: 'VMware1!'
globalDeploymentPolicy:
# appSelector takes the form of:
appSelector:
label:
app: avi-gslb
# Uncomment below and add the required ingress/route/service label
# appSelector:
# namespaceSelector takes the form of:
# namespaceSelector:
# label:
# ns: gslb <example label key-value for namespace>
# Uncomment below and add the reuqired namespace label
# namespaceSelector:
# list of all clusters that the GDP object will be applied to, can take any/all values
# from .configs.memberClusters
matchClusters:
- cluster: tkg-wld-admin@tkg-wld
- cluster: tkg-wld02-admin@tkg-wld02
# list of all clusters and their traffic weights, if unspecified, default weights will be
# given (optional). Uncomment below to add the required trafficSplit.
# trafficSplit:
# - cluster: "cluster1-admin"
# weight: 8
# - cluster: "cluster2-admin"
# weight: 2
# Uncomment below to specify a ttl value in seconds. By default, the value is inherited from
# Avi's DNS VS.
# ttl: 10
# Uncomment below to specify custom health monitor refs. By default, HTTP/HTTPS path based health
# monitors are applied on the GSs.
# healthMonitorRefs:
# - hmref1
# - hmref2
# Uncomment below to specify a Site Persistence profile ref. By default, Site Persistence is disabled.
# Also, note that, Site Persistence is only applicable on secure ingresses/routes and ignored
# for all other cases. Follow https://avinetworks.com/docs/20.1/gslb-site-cookie-persistence/ to create
# a Site persistence profile.
# sitePersistenceRef: gap-1
# Uncomment below to specify gslb service pool algorithm settings for all gslb services. Applicable
# values for lbAlgorithm:
# 1. GSLB_ALGORITHM_CONSISTENT_HASH (needs a hashMask field to be set too)
# 2. GSLB_ALGORITHM_GEO (needs geoFallback settings to be used for this field)
# 3. GSLB_ALGORITHM_ROUND_ROBIN (default)
# 4. GSLB_ALGORITHM_TOPOLOGY
#
# poolAlgorithmSettings:
# lbAlgorithm:
# hashMask: # required only for lbAlgorithm == GSLB_ALGORITHM_CONSISTENT_HASH
# geoFallback: # fallback settings required only for lbAlgorithm == GSLB_ALGORITHM_GEO
# lbAlgorithm: # can only have either GSLB_ALGORITHM_ROUND_ROBIN or GSLB_ALGORITHM_CONSISTENT_HASH
# hashMask: # required only for fallback lbAlgorithm as GSLB_ALGORITHM_CONSISTENT_HASH
serviceAccount:
# Specifies whether a service account should be created
create: true
# Annotations to add to the service account
annotations: {}
# The name of the service account to use.
# If not set and create is true, a name is generated using the fullname template
name:
resources:
limits:
cpu: 250m
memory: 300Mi
requests:
cpu: 100m
memory: 200Mi
service:
type: ClusterIP
port: 80
rbac:
# creates the pod security policy if set to true
pspEnable: false
persistentVolumeClaim: ''
mountPath: /log
logFile: amko.log
federatorLogFile: amko-federator.log
helm install amko/amko --generate-name --version 1.4.2 -f values.yaml --set configs.gslbLeaderController=192.168.110.32 --namespace=avi-system
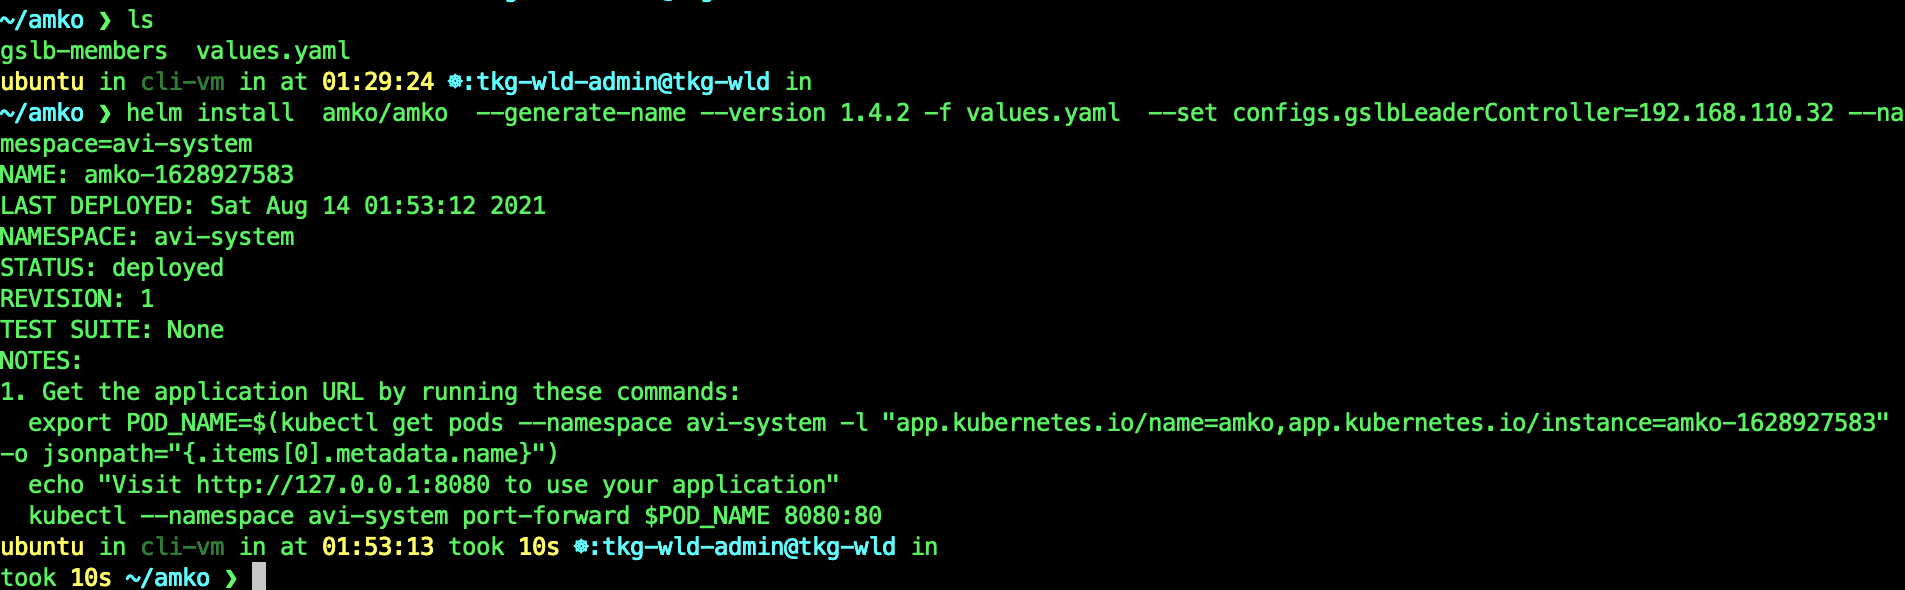
kubectl get pods -n avi-system
YES! You have successfully installed AMKO!

Check for any errors in the amko logs.
k logs amko-0 -n avi-system -c amko
If you see this error: no VS UUID annoations

When you describe the ingress, you see that there are no annotations. In AMKO 1.4.x, they started to use annotations. Since the AKO in TKG-m is 1.3, it does not add the annotations to the Ingress. So either, we upgrade the AKO to 1.4.x or we can configure AMKO to use Virtual Service(VIP).

kubectl edit gdp global-gdp -n avi-system
matchClusters:
- cluster: tkg-wld-admin@tkg-wld
syncVipOnly: true <- add this
- cluster: tkg-wld02-admin@tkg-wld02
syncVipOnly: true <- add this
kubectl delete pods amko-0 -n avi-system

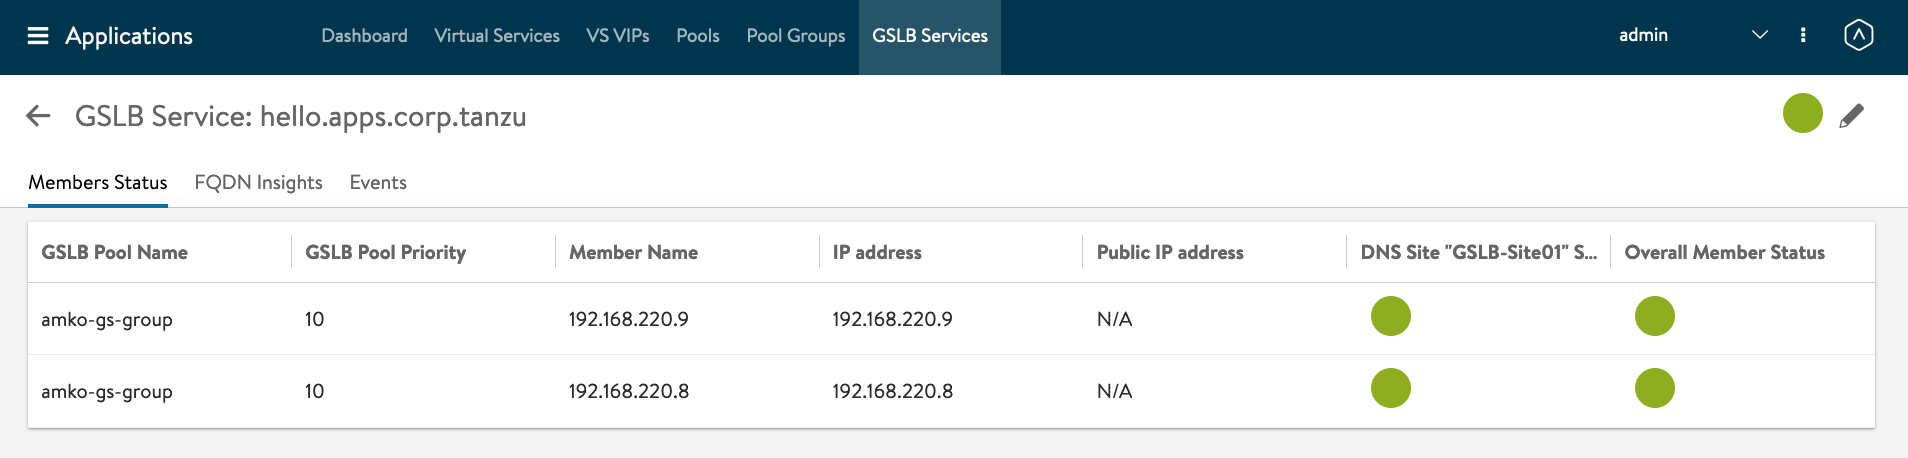
AVI Controller -> Applications -> GSLB Services. If AMKO is working correctly, you will see the GSLB Services being updated.

Click on the Name - hello.apps.corp.tanzu. You will see two members with the VIP IP Addresses.
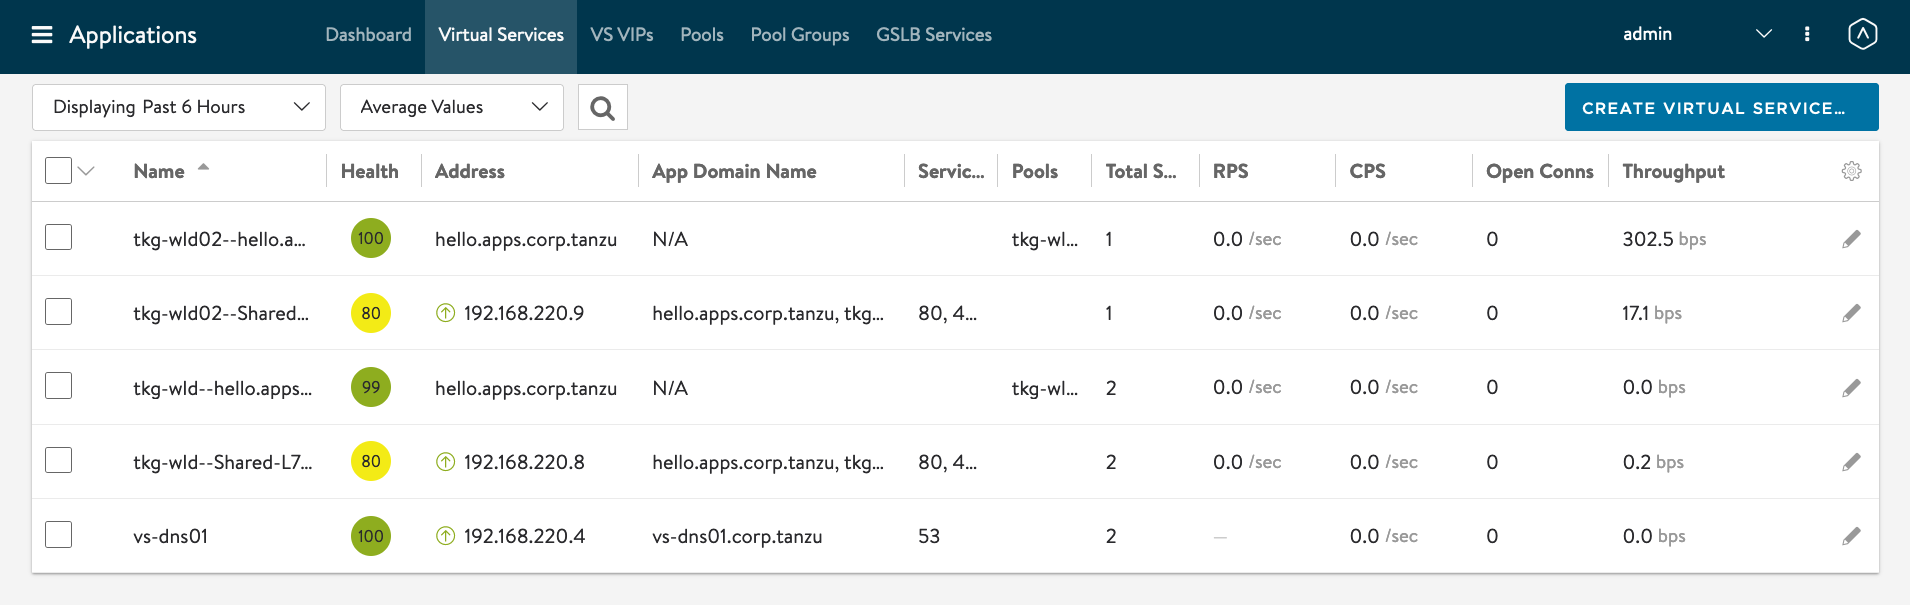
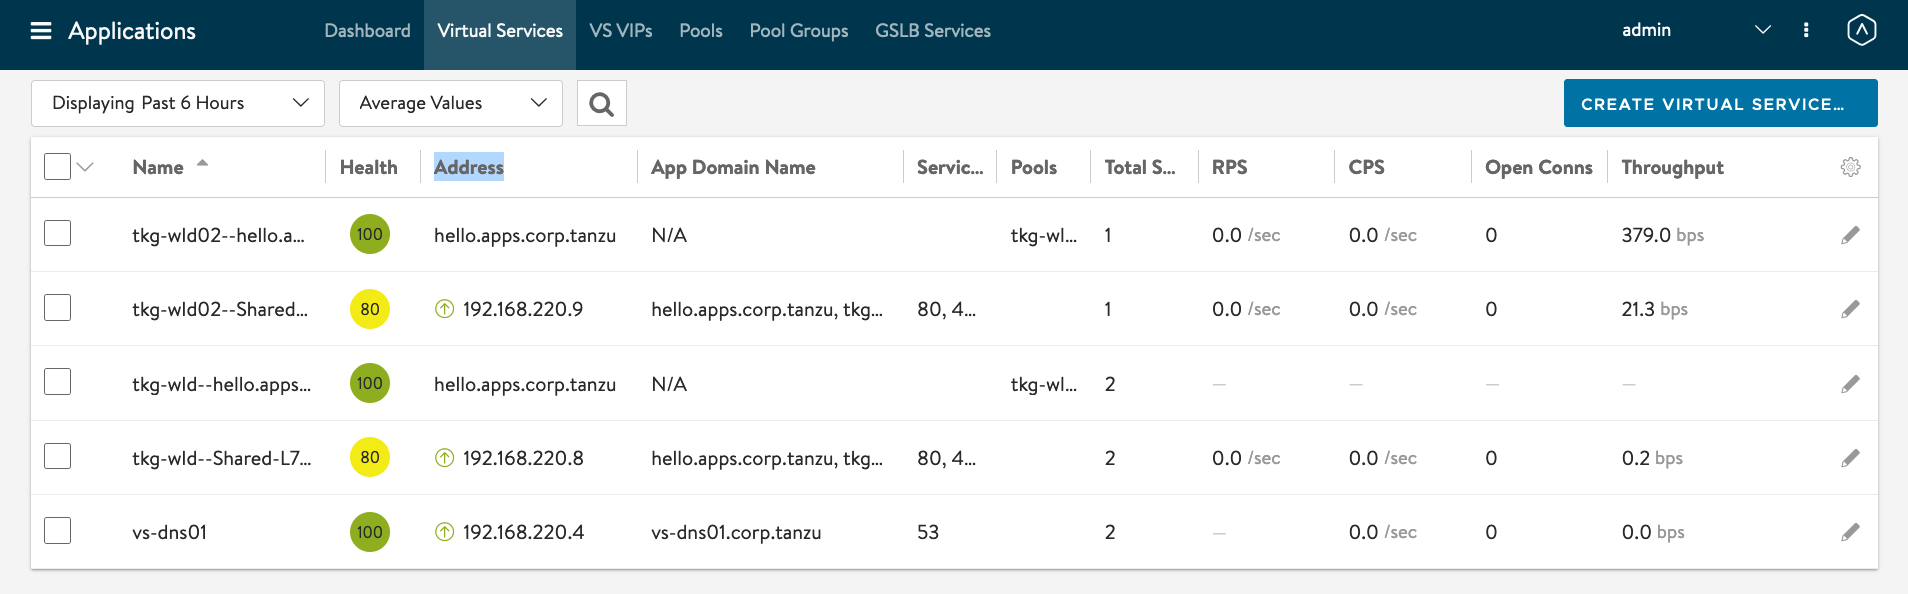
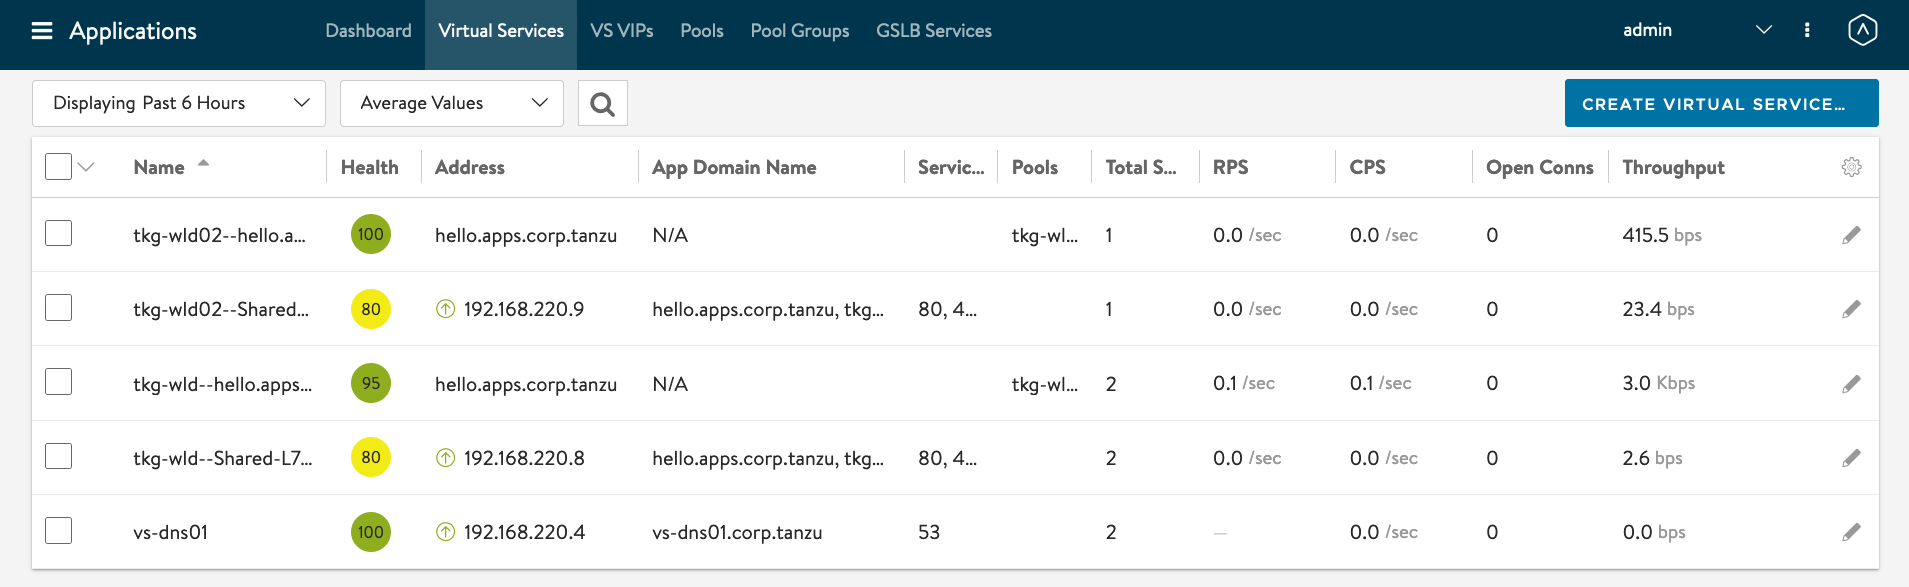
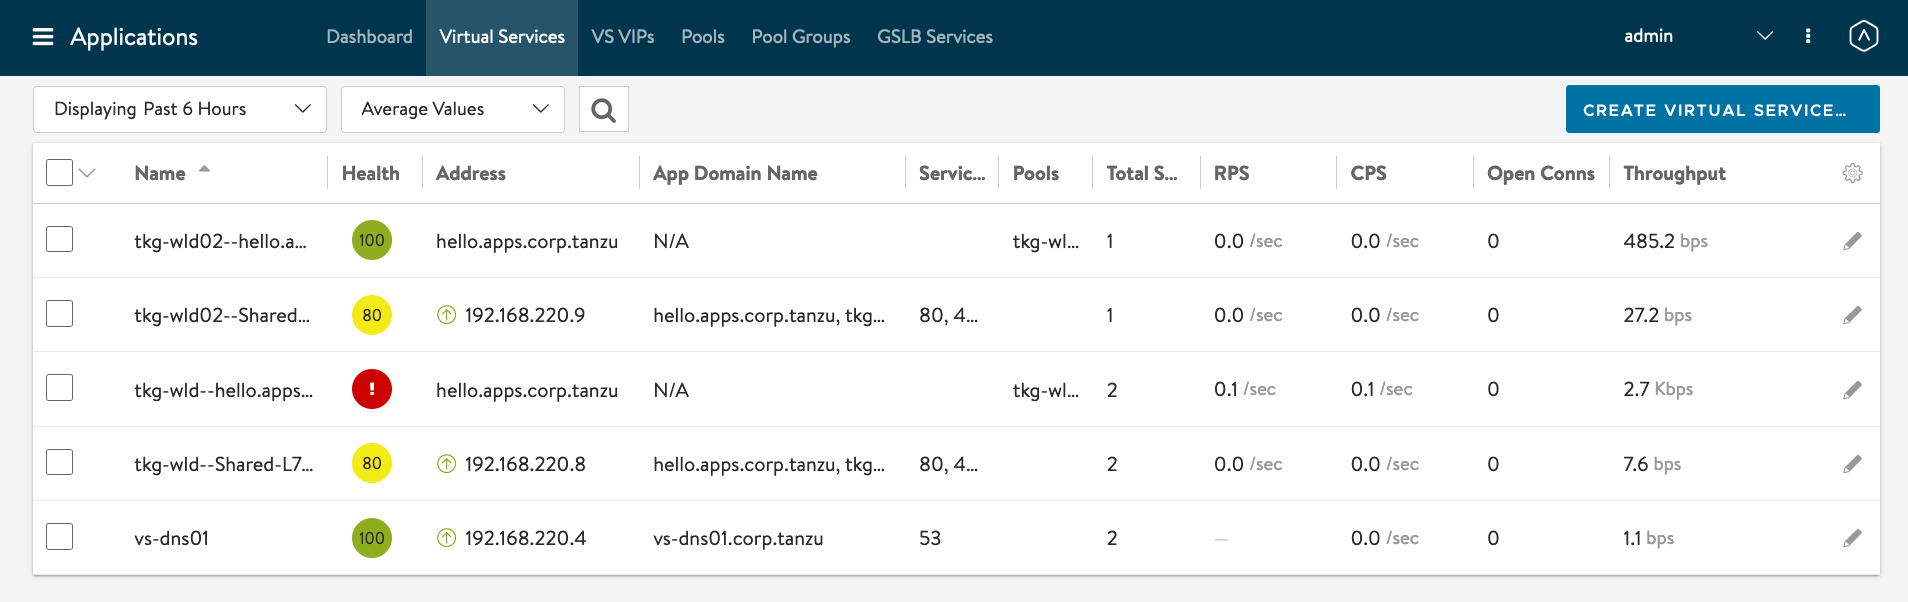
#Testing 1 - AMKO in Action Let find out the IP address of the DNS Server. AVI Controller -> Applications -> Virtual Services -> Click on vs-dns01.
Hover your mouse over the Virtual Service: vs-dns01
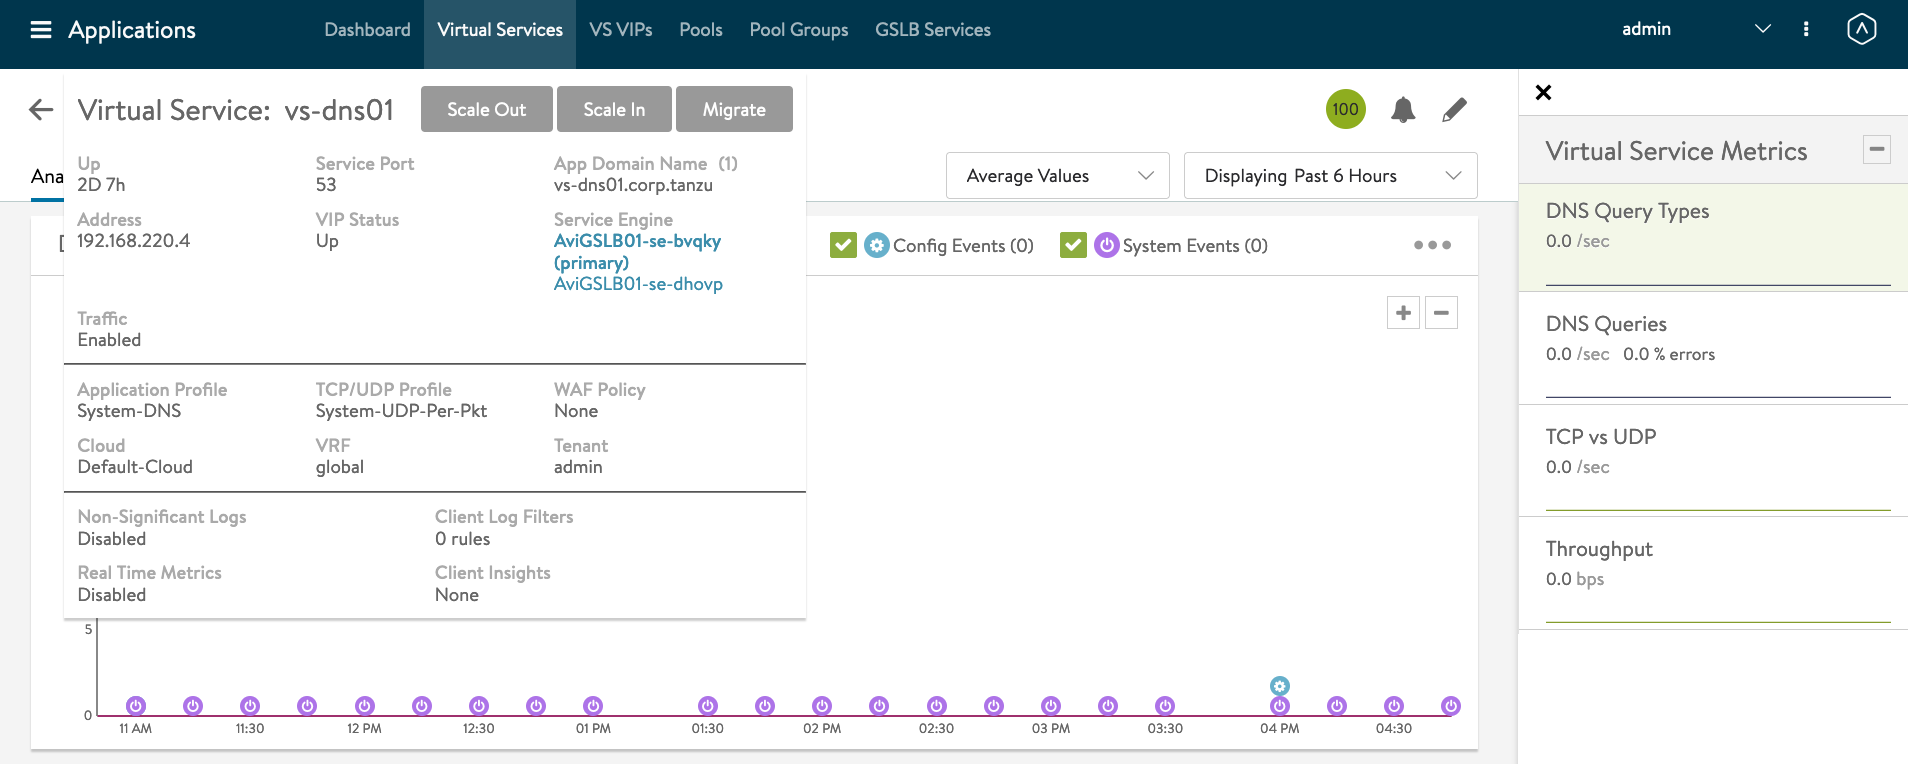
IP Address of GSLB DNS : 192.168.220.4.
while true; do dig +short hello.apps.corp.tanzu @192.168.220.4; sleep 1; done

If you are seeing the VIPs of the Ingresses replied in round robin fashion, its working correctly.
Now lets, lets scale one of the deployments replicas to zero and see what happen to the DNS responses.
kubectl scale deployment/hello-kubernetes --replicas=0

Now look at the DNS Responses.
while true; do dig +short hello.apps.corp.tanzu @192.168.220.4; sleep 1; done
You can see now, the DNS server only replying one VIP. AMKO remove the 192.168.220.8 VIP from the DNS Server as the Ingress has no available Pods.

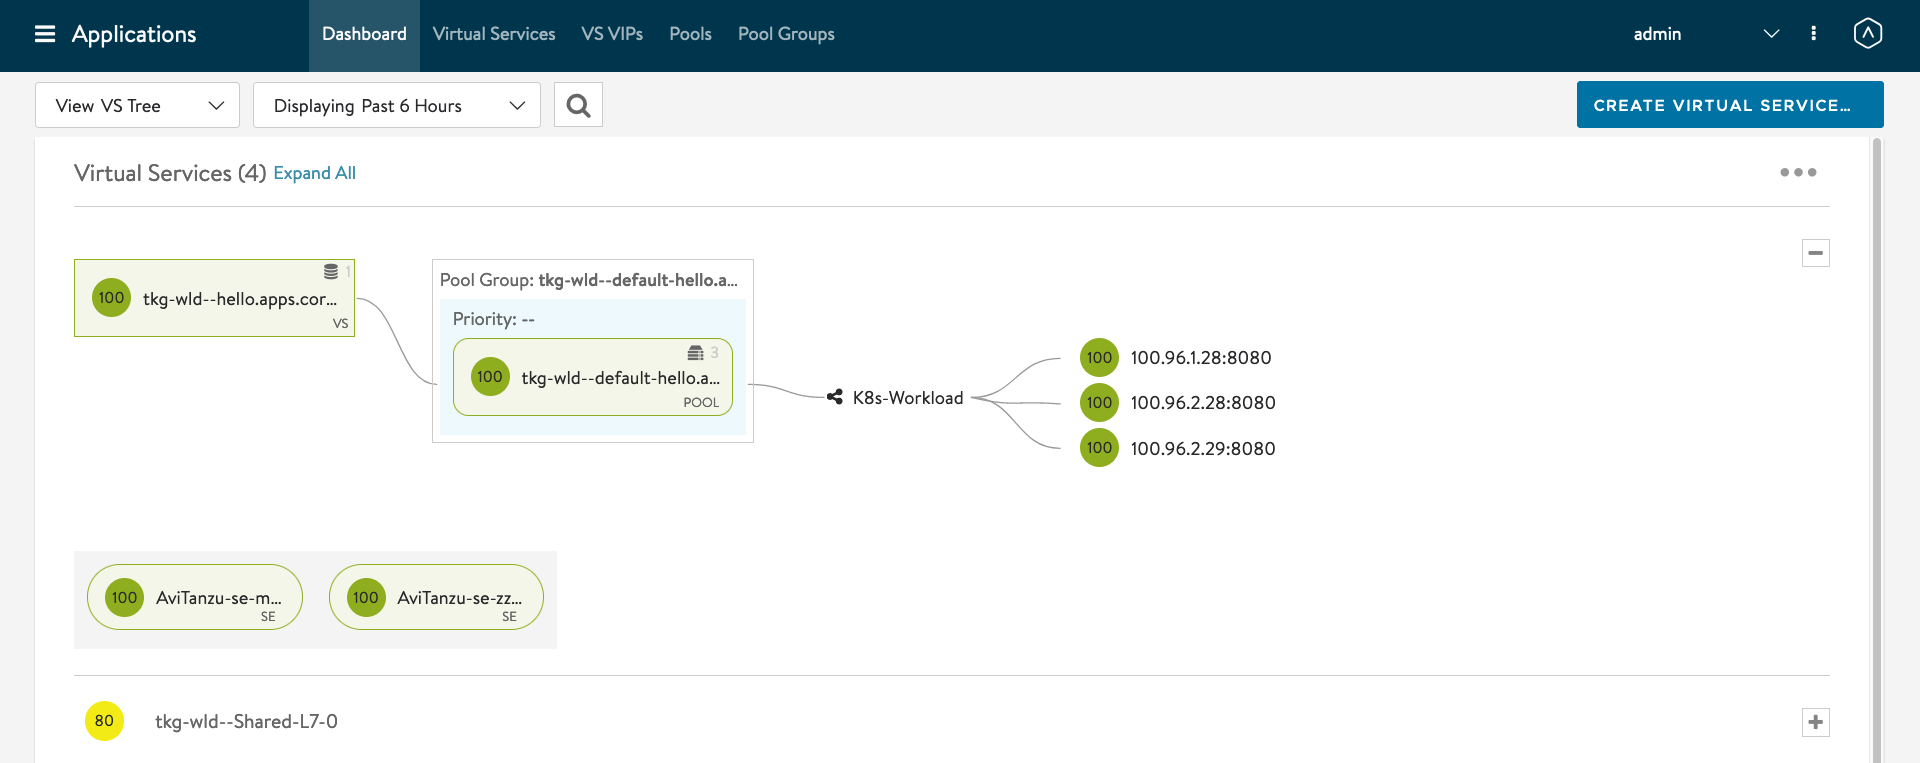
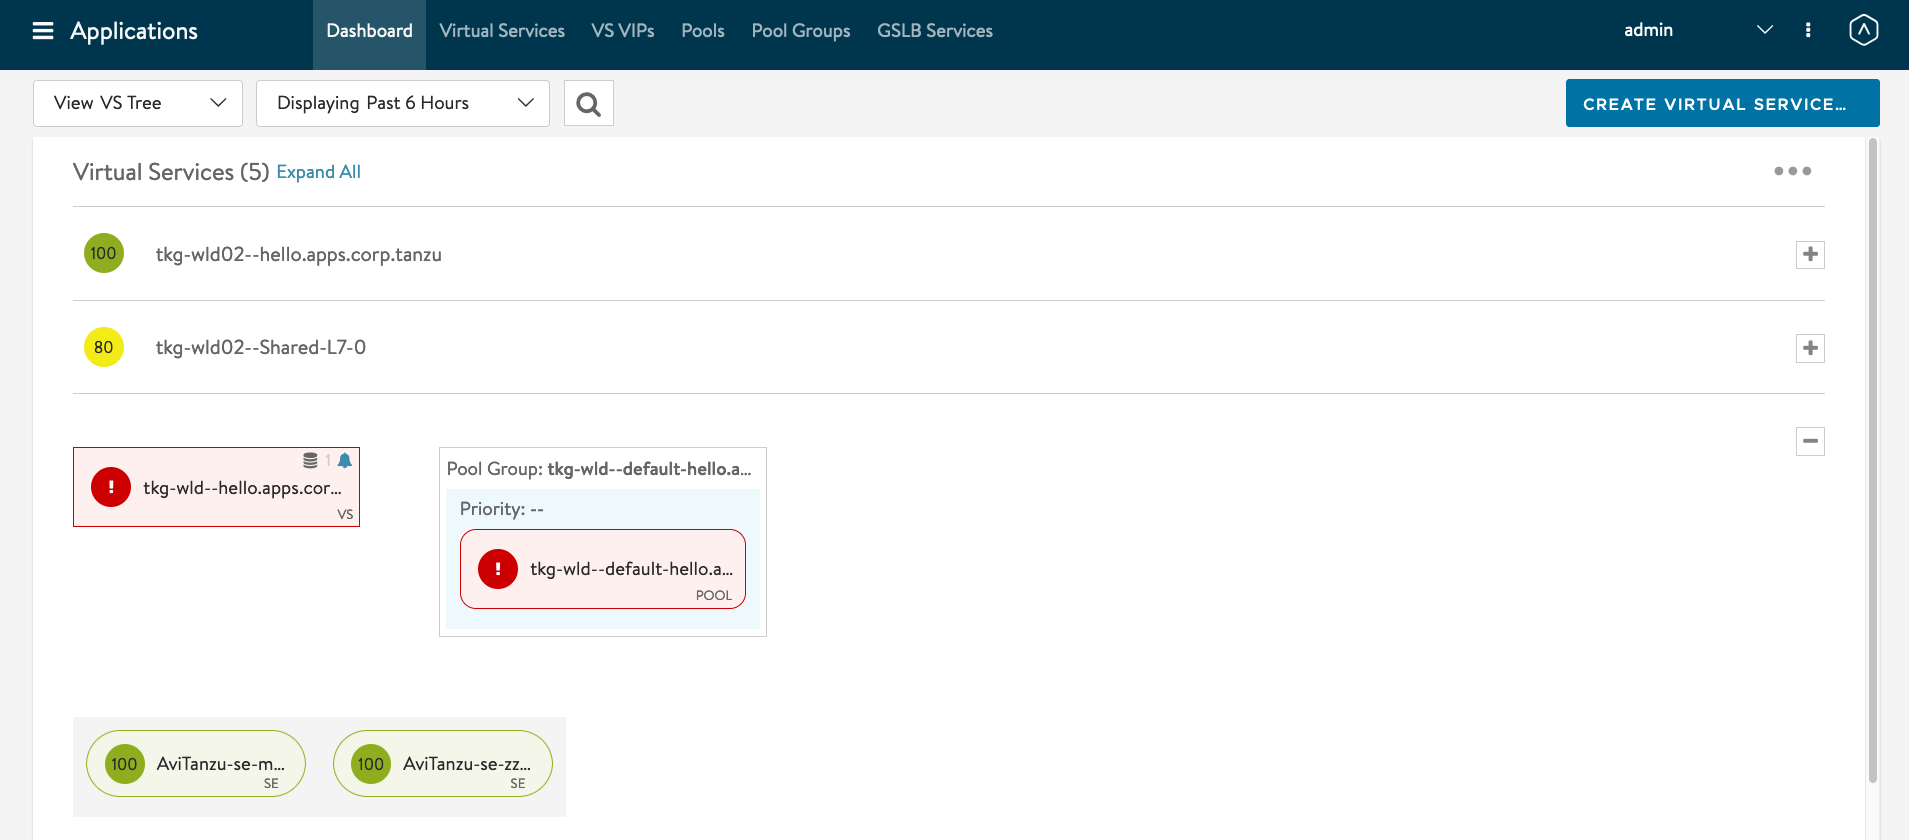
You can also see the status of the Ingress at AVI Controller dashboard. I personally prefer the VS Tree view.
You can now scale the deployment back and see the VIP getting added to the GSLB DNS AVI Service.
kubectl scale deployment/hello-kubernetes --replicas=3
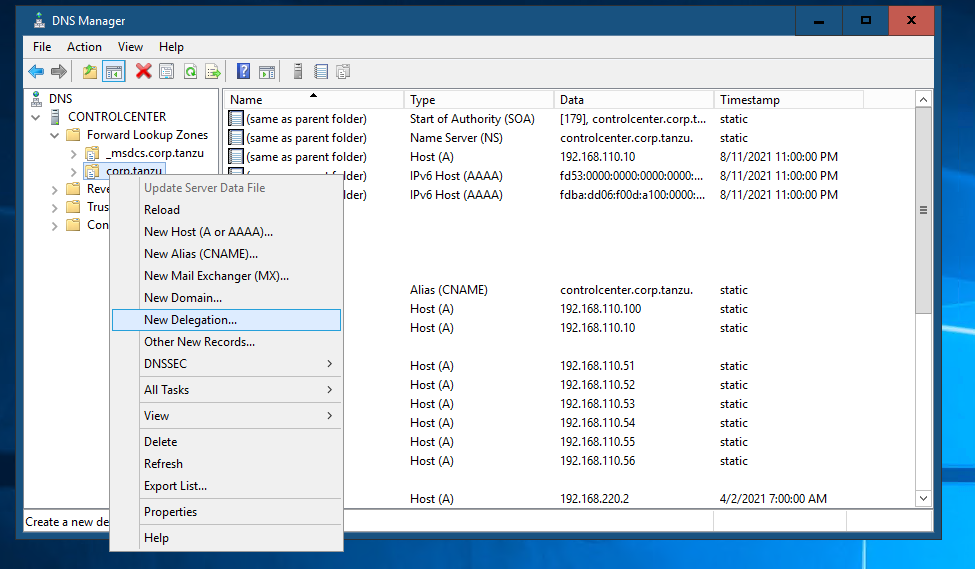
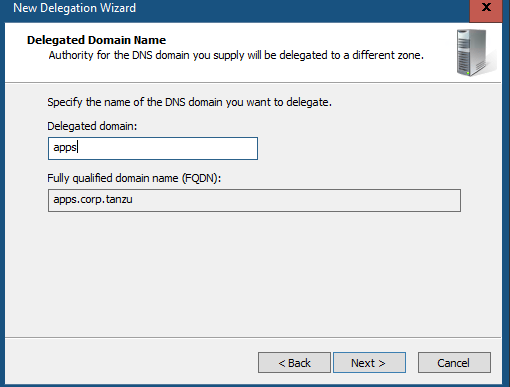
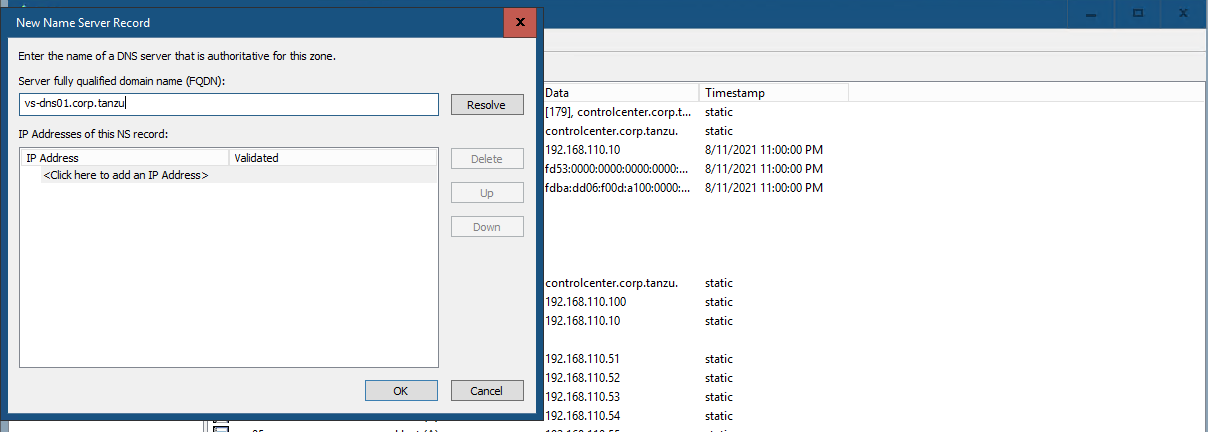
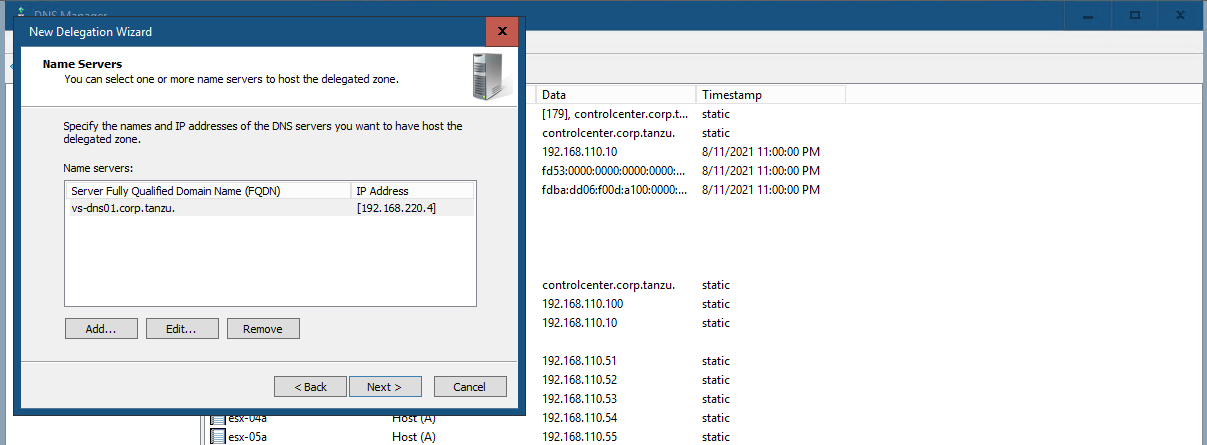
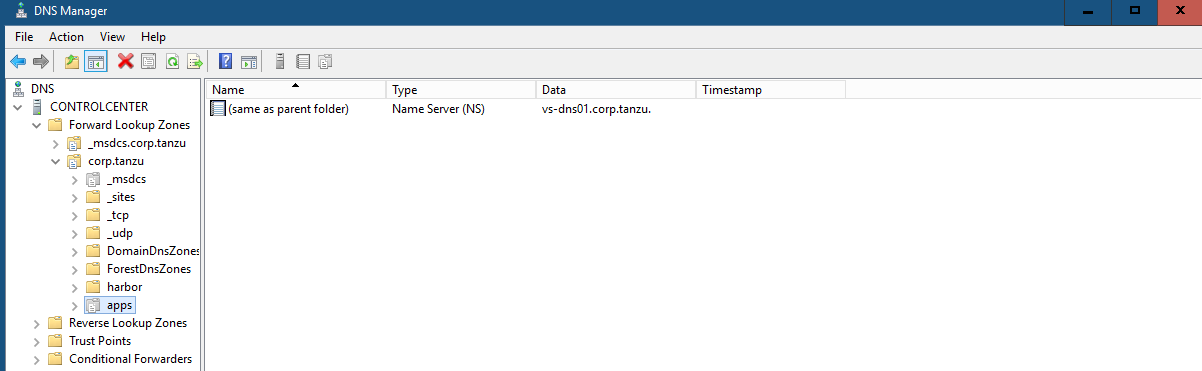
#Testing 2 - Client DNS with DNS Delegation In Test 1, we use dig directly to the AVI DNS SE. Now lets configure a DNS Delegation in Windows AD. You can do at InfoBlox DNS Server as well.
Lets try dig without DNS Server.
while true; do dig +short hello.apps.corp.tanzu; sleep 1; done

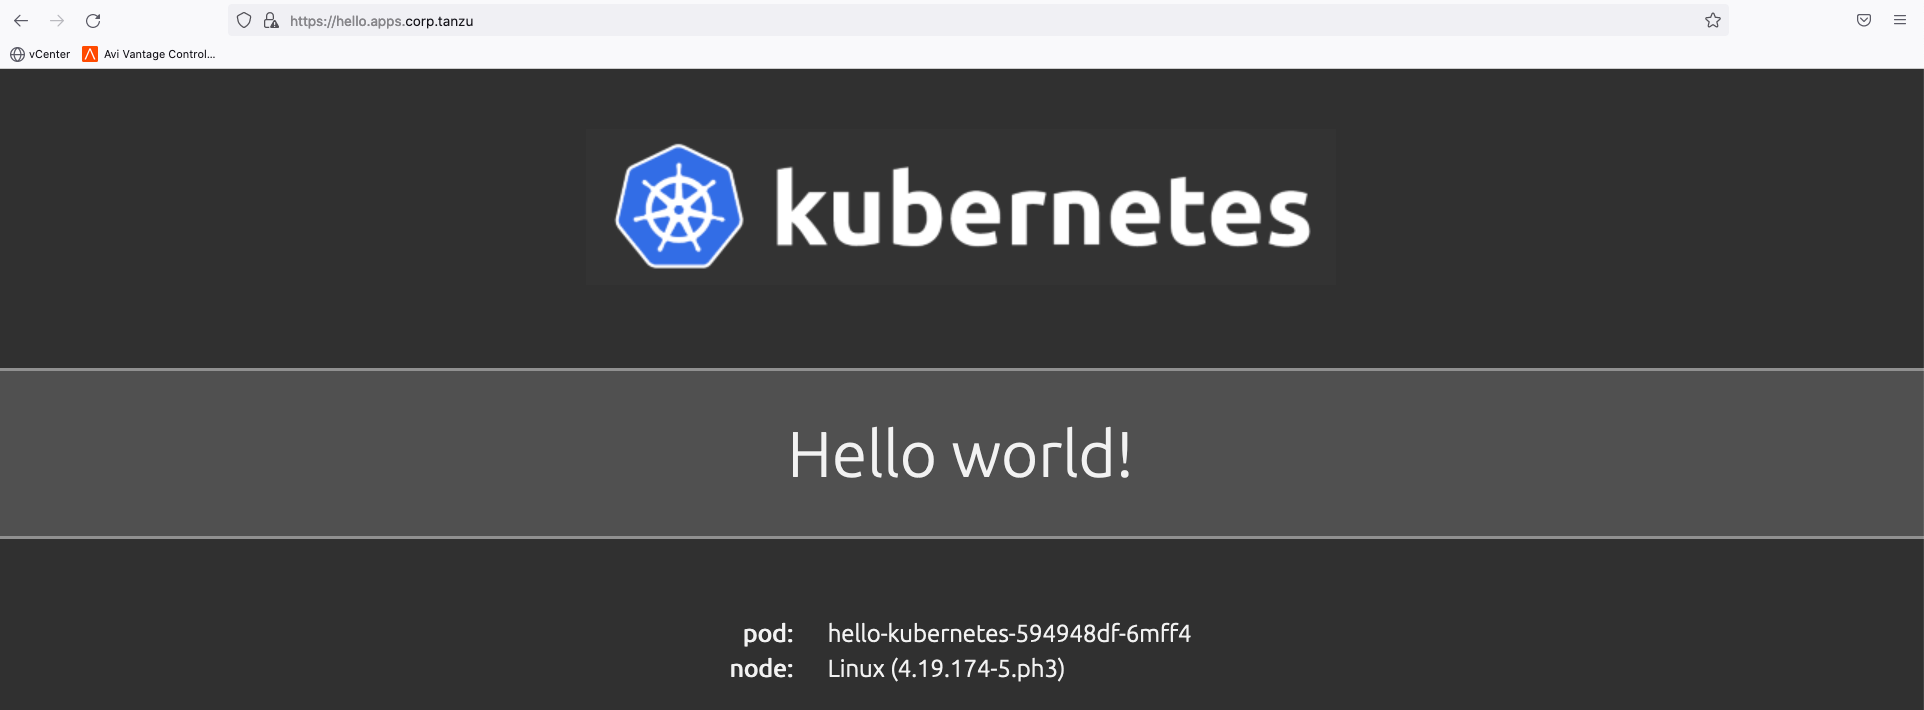
Lets try from the browser.
To uninstall AMKO
helm uninstall $(helm list -n avi-system -q | grep amko)
Alright! Congrats! If you follow my blog to configure till this point and successfully complete the configuration, great work! Feel free to ping me if you have any issues or just to chat. :)
Thanks for reading!