Tanzu vSphere 7 with Kubernetes on NSX-T 3.0 VDS Install Part 1: Overview
Tanzu vSphere 7 with Kubernetes on NSX-T 3.0 VDS Installation
Part 1: Overview, Design, Network Topology, Hardware Used
Part 2: ESXi, vCenter, VDS Config and NSX-T Manager
Part 3: NSX-T Edges, Segments, Tier-0 Routing
Part 4: Supervisor Cluster, Content Library, TKG Clusters
Lets start with the Why:
There are going to be a lot of people going to blog about vSphere 7 with Kubernetes and you probably thinking why do I want to do it. So, for my blog, hopefully I will provide a little more details on the following
Networking Requirements. I’m sure many VMware colleagues, Customers, Partners are going to evaluate and not everybody are familiar with Networking and therefore hopefully this blog will allow you to have a meaningful discussion with your networking counter part or probably just for yourself to understand what are the networking components or routing required. For example, how many physical NICs would be required? If this a POC environment, can I do with a Single NIC? Answer is Yes and there are some intricacies to do it and I will explain what is required in order to do that.
vCenter or NSX-T Managers VM placement. Generally, for production design, we recommend to place vCenter and NSX-T Managers in a separate management cluster. This is recommended for VMware Validated Design(VVD) and VMware Cloud Foundation(VCF) which is based on VVD. Just to share some background here, during the Project Pacific Beta (Project Pacific is the project name for vSphere with Kubernetes before GA), there is a requirement to have vCenter to be placed within the clusters that its managing which is going to be quite a different design from VVD. Therefore, in this installation, I would also like to test this out with this GA version where you can run the Compute vCenter outside the cluster that its managing.
No NVDS, vSphere VDS only design. For many who have used NSX-T prior to 3.0, you have to create NVDS for you to utilize NSX-T. The NVDS requirement poses some challenges, for example, additional NIC cards and therefore additional network ports, assignment and allocation of vmnic uplinks configuration. In NSX-T 3.0 and vSphere 7.0, there is support of VDS for NSX-T. I would also utilize this installation to test out this feature as well. This will definitely simplify the set up and the physical NIC requirement moving forward.
Components:
- Compute – vSphere 7.x (vCenter Server + ESXi) and Enterprise Plus license
- Storage – VSAN or NFS or other vSphere Datastores
- Networking & Security – NSX-T 3.x
Software Download:
Here is the complete list of software that needs to be downloaded to deploy Tanzu vSphere 7 with Kubernetes on NSX-T 3.0.
| Software | Download URL | | ——– | ——– | | ESXi | VMware-VMvisor-Installer-7.0.0-15843807.x86_64.iso(350.29MB) | | vCenter | VMware-VCSA-all-7.0.0-15952498.iso (6.42GB) | | NSX-T | nsx-unified-appliance-3.0.0.0.0.15946739.ova (11.03GB) |
Lab Environment:
For my Lab, I will be mainly using three physical hosts as the compute cluster. This cluster will house the Supervisor Cluster VMs, Tanzu Kubernetes Grids(TKG) Clusters as well as the NSX-T Edge VMs.
I will also have another vSphere 6.7 cluster which is managed by a management vCenter. This management cluster will house the vSphere 7.0 vCenter (aka compute vCenter) as well as the NSX-T Manager cluster.
Management Cluster – Compute/Storage
| VM | CPU | MEM | DISK |
|---|---|---|---|
| Compute Cluster vCenter (based on Small) | 4 | 20GB | 48GB |
| NSX-T Manager x 3 | 6 | 24GB | 300GB |
Compute Cluster – Compute/Storage
| VM | CPU | MEM | DISK |
|---|---|---|---|
| NSX-T Edge VMs (mininum Large) x 2 | 8 | 32GB | 200GB |
| Supervisor Cluster VMs (based on Tiny) | 2 | 8GB | 22GB |
| Guest Clusters (based on x-small) x 3 | 2 | 2GB | 16GB |
Networking
Defined within Workload Management which will be realized in NSX-T.
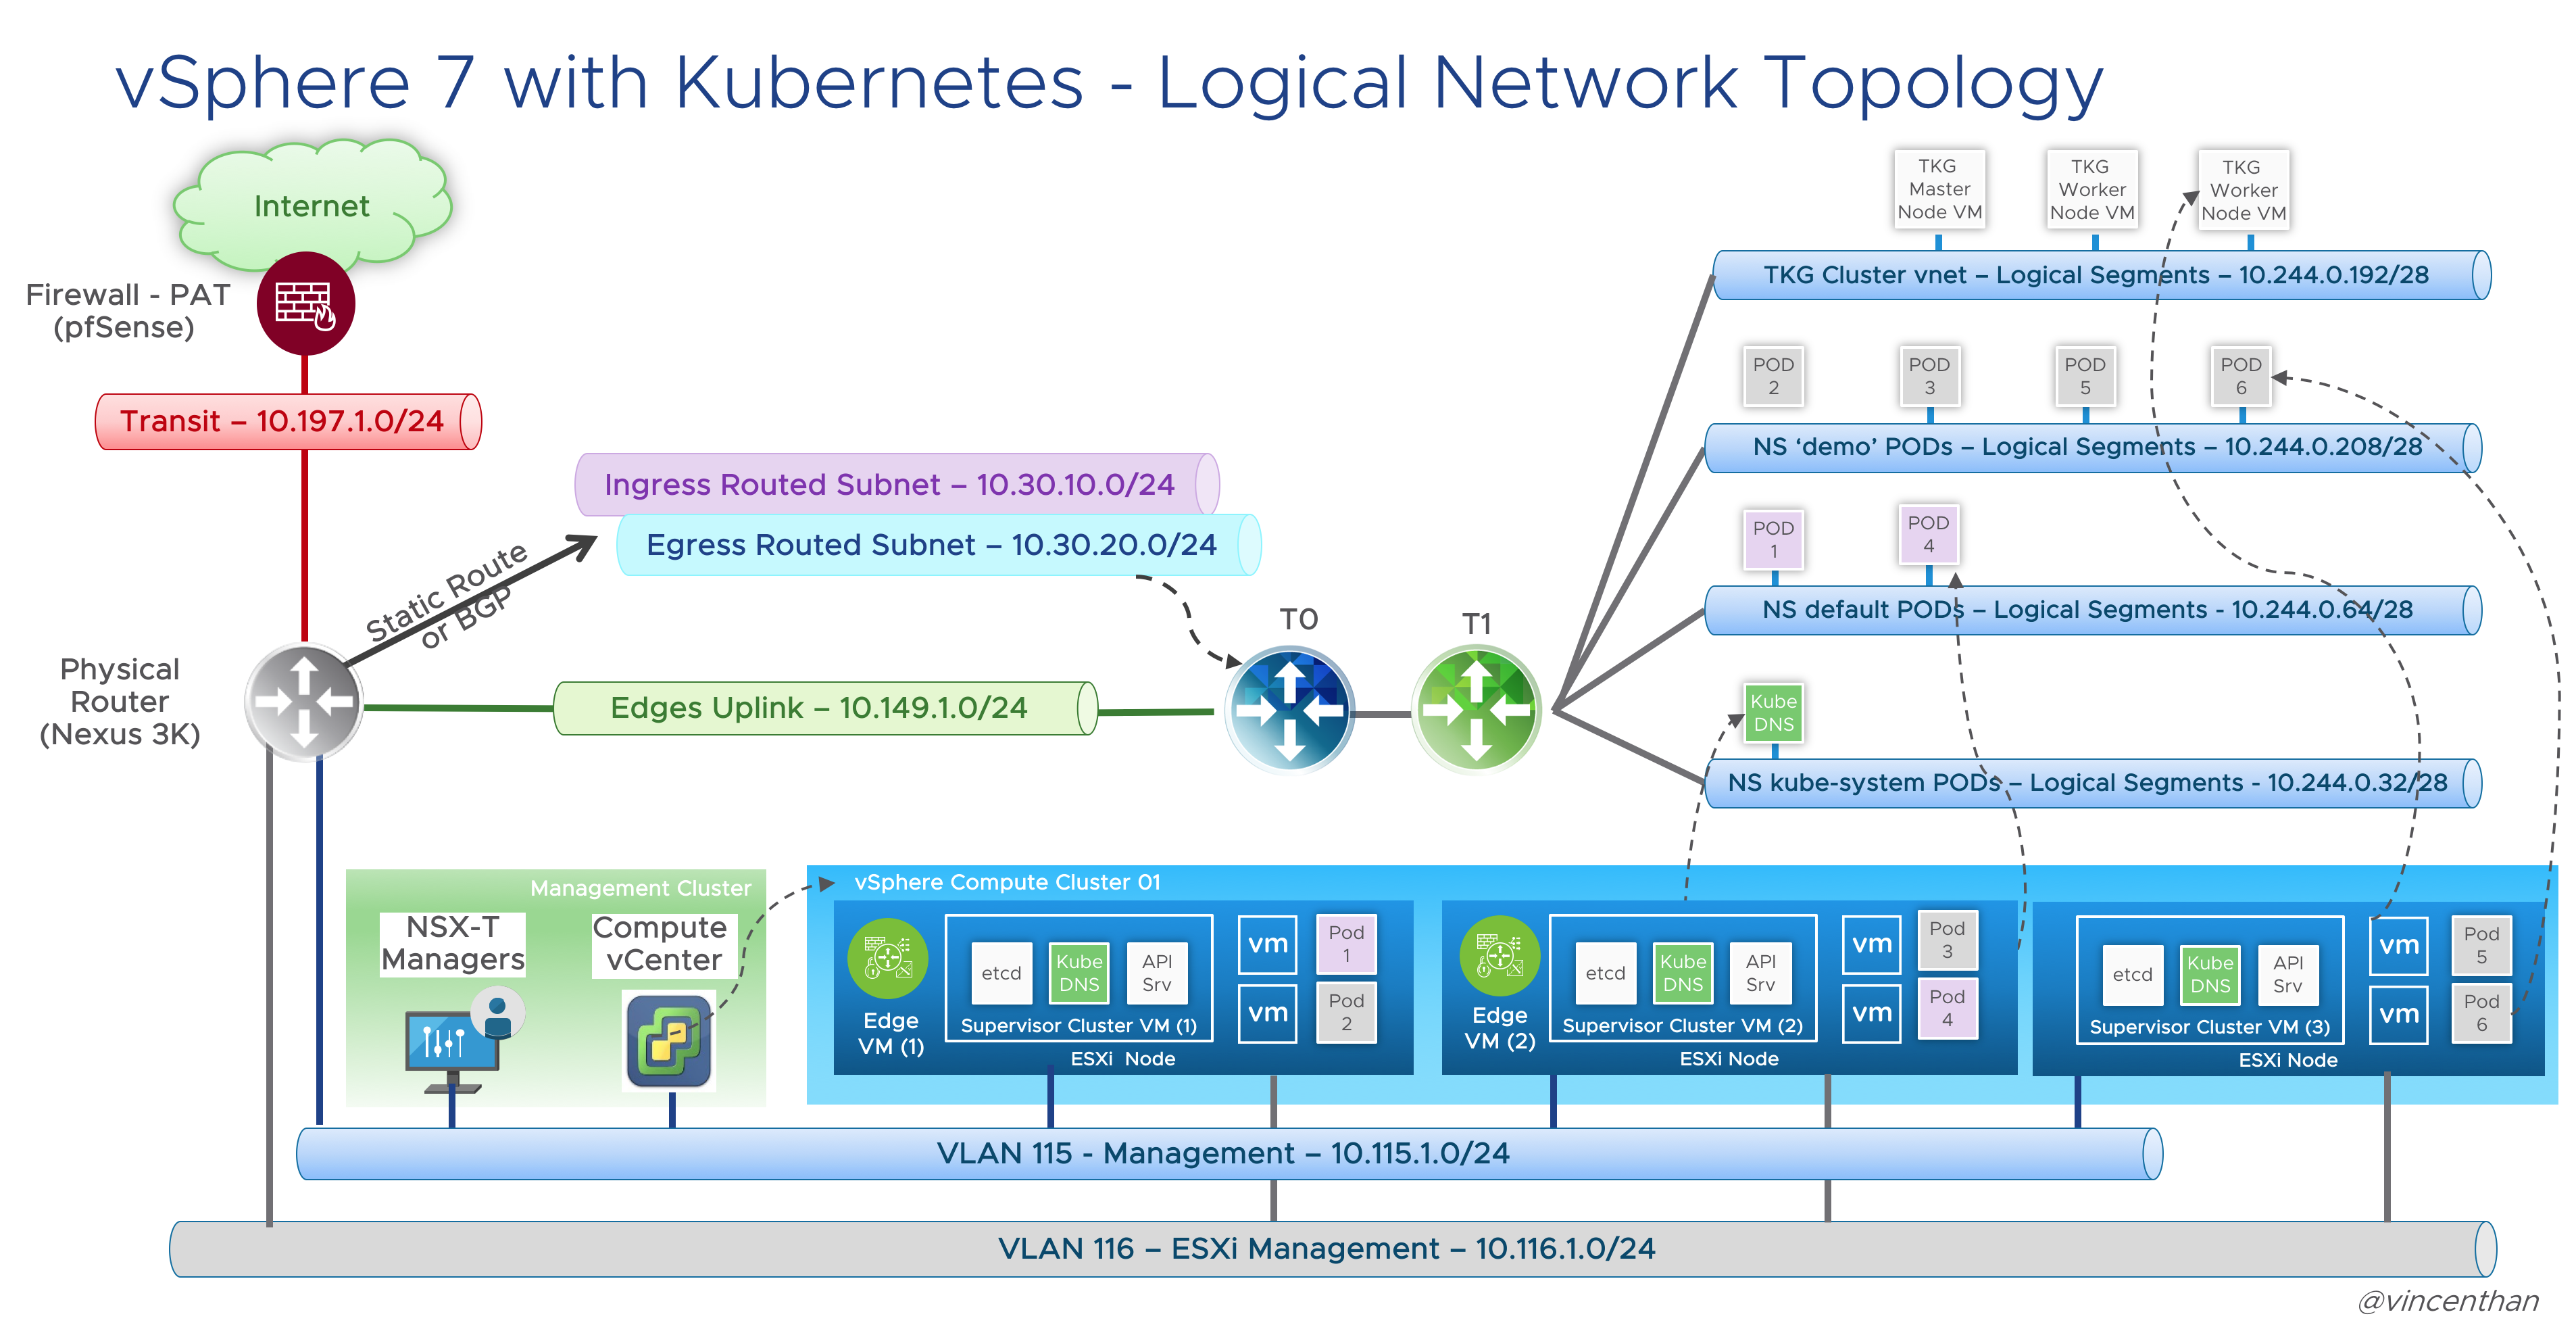
- Pod CIDR (Default – 10.244.0.0/21) – This network is used for the Kubernetes Pods. It will be further segment into /28 segments per namespace or per TKG cluster. This is an internal address pool which does not need to be routed from the physical router.
- Services CIDR (Default 10.96.0.0/24) – This network pool will be used when you create a Kubernetes service. This is an internal address pool which does not need to be routed from the physical router.
- Ingress CIDR (10.30.10.0/24) – This network pool will provide addresses for when load-balancing services are required as part of an application deployment. For example, one NSX-T Load Balancer VIP will be assigned for Control Plane IP Address for the Supervisor Cluster.
- Egress CIDR (10.30.20.0/24) – This network pool will be used when the Pods require to communicate outside the NSX-T environment, such as accessing to the Internet. For example, one IP will be assigned to the T0 router as a source NAT(SNAT) source address when the Pods access the Internet.** Both the Ingress and Egress CIDR Networks need to be routed on the physical router next-hop to the T0.
Here is a logical network diagram of my planned Tanzu vSphere 7 with Kubernetes on NSX-T 3.0 deployment:
Defined within your physical or virtual network infrastructure
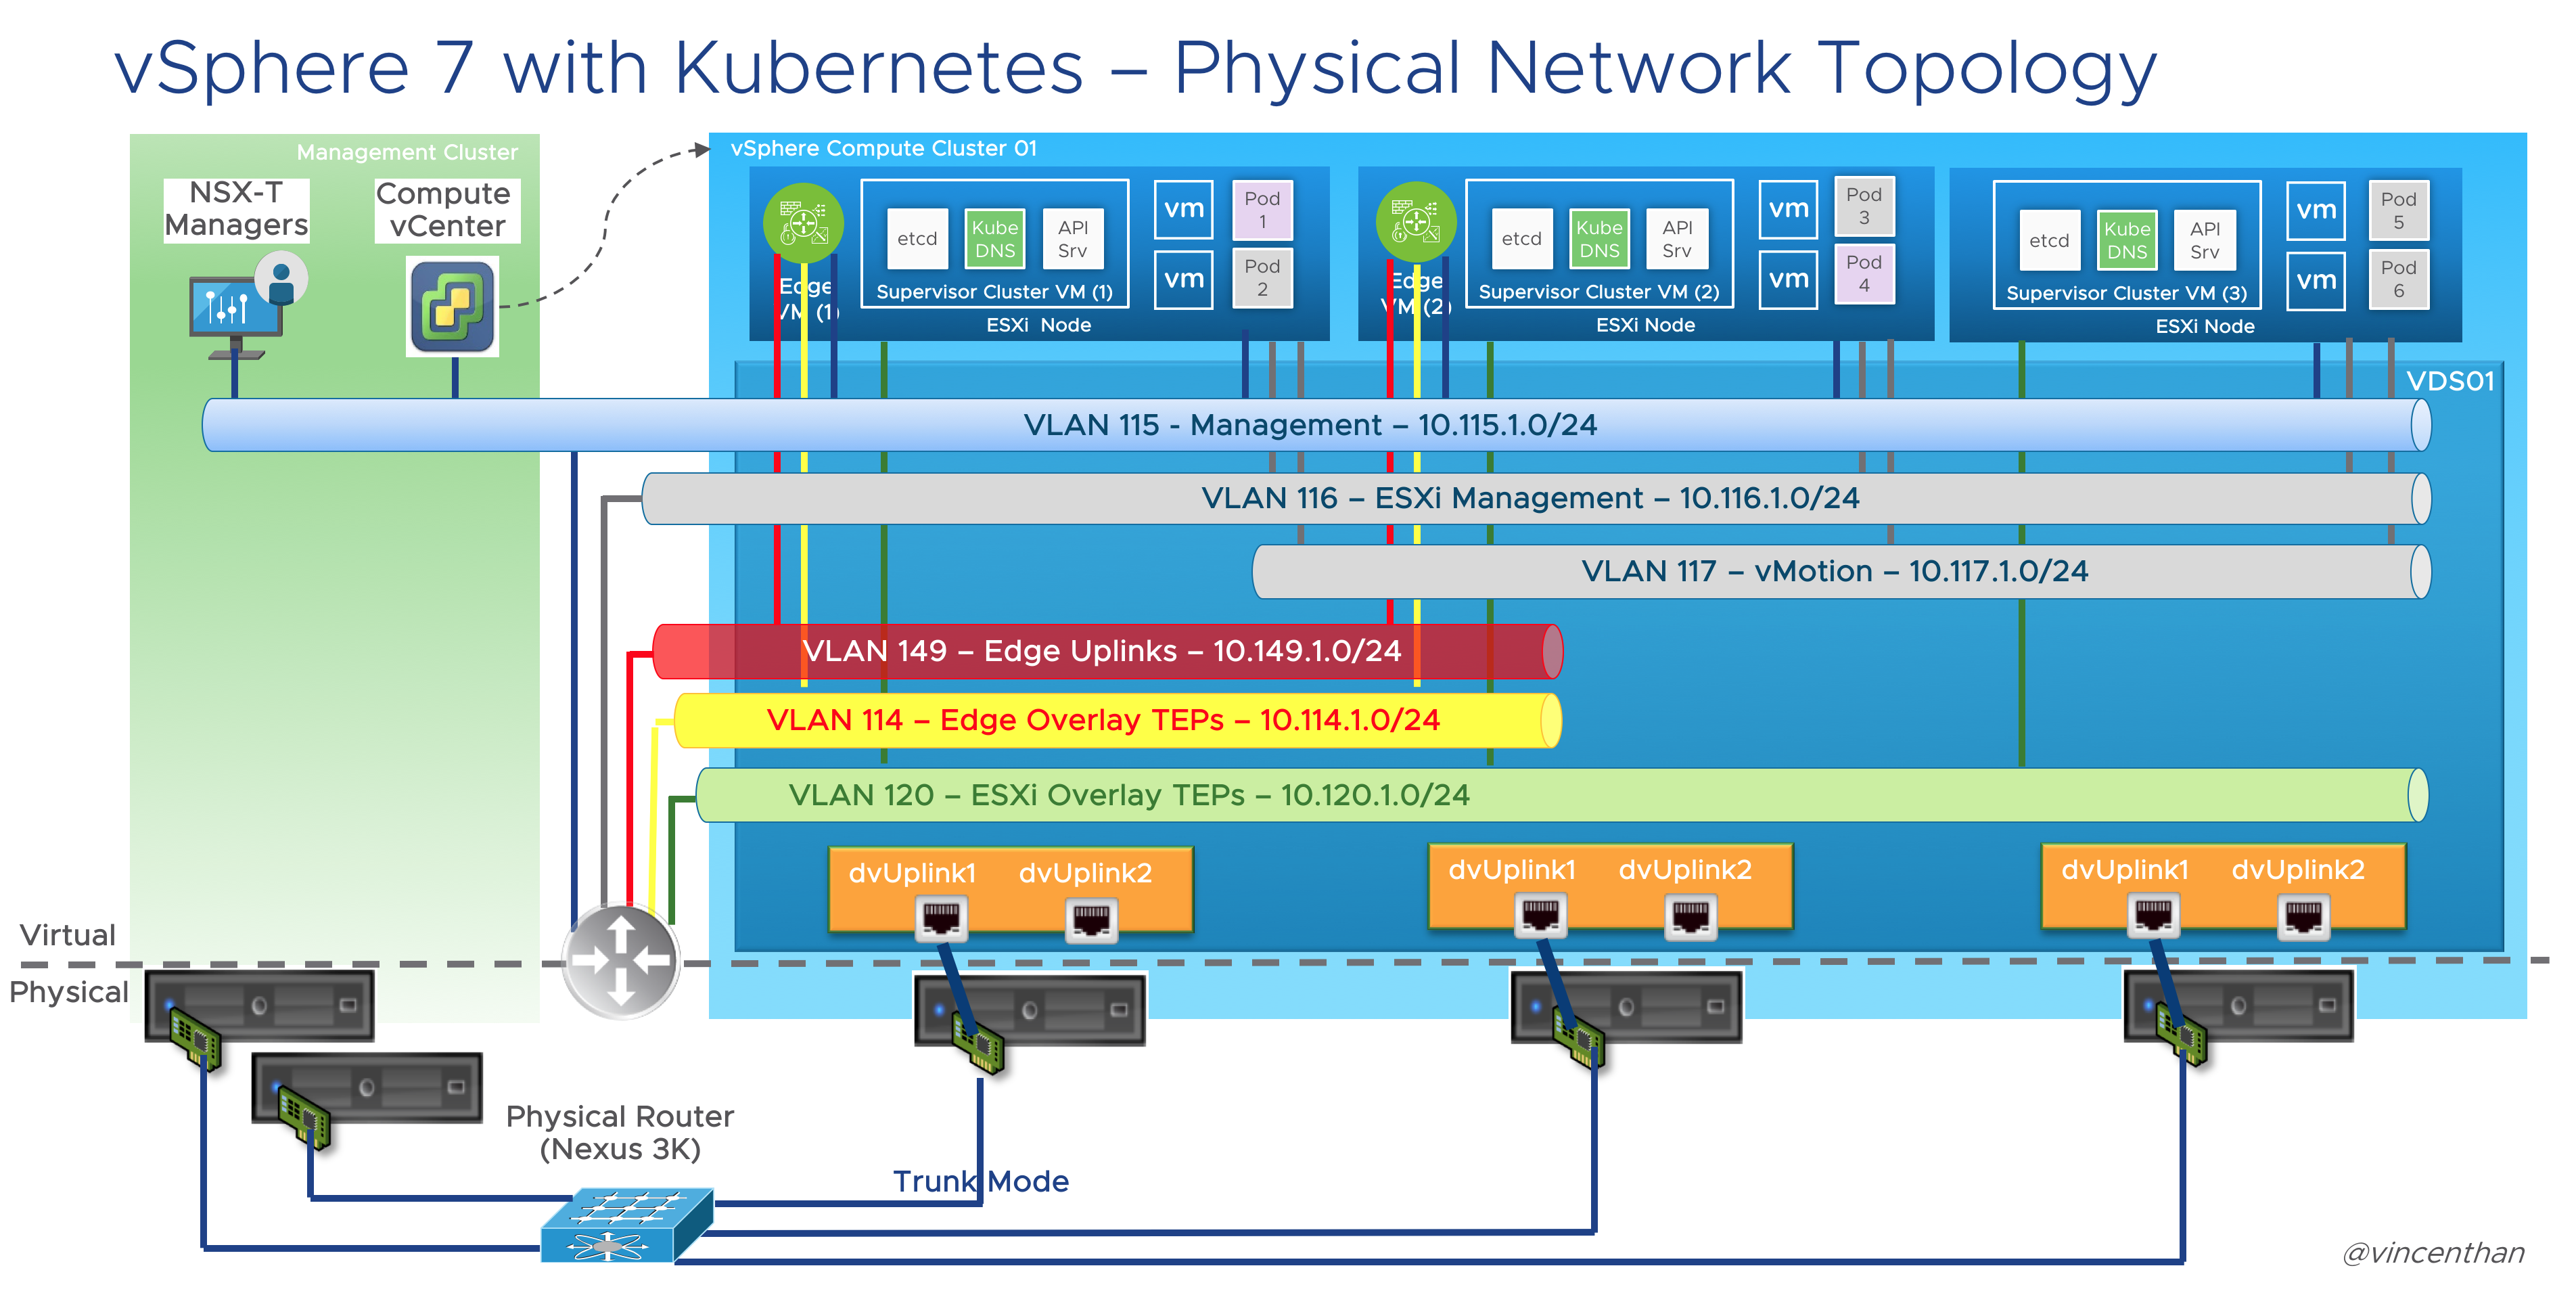
- Management Network (VLAN 115 – 10.115.1.0/24) – This is where the management VMs will reside such as the NSX-T Manager and vCenters.
- ESXi Management Network (VLAN 116 – 10.116.1.0/24) – This is where the ESXi vmkernel interfaces will reside. This is actually not really required for a Lab/POC set up but its my personal preference as this is usually the case where we design for customers’ environments.
- vMotion Network (VLAN 117 – 10.117.1.0/24) – This is where the ESXi vMotion vmkernel interfaces will reside.
- Transit Network (VLAN 197 – 10.197.1.0/24) – This network is required to route between our management network via the NSX-T T0 Router and our Kubernetes Cluster Management network as well as the Kubernetes Workload networks. You only need two IPs, one for the gateway which should exists by default and one for the uplink which will reside on the T0. Static routes will be used to reach the NSX-T networks. In a Production or non-lab environment, BGP would be used to peer the T0 to your physical network
- Internet Network – IP address that is a able to access to Internet. For my lab, I setup a pfsense router which will basically NAT the networks in NSX-T such as the Management, ESXi Management Network. I also added the whole Ingress/Egress range – 10.30.0.0/16 as SNAT and therefore my TKG Clusters will access to Internet as well.
- NSX-T Geneve Overlay Network for Edge VMs (VLAN 114 – 10.114.1.0/24) – This network will be used by the Geneve Overlay Tunnel endpoints interfaces running in the Edge VMs. You probably thinking why is there a need for a 2nd network specifically for Edge VMs. The reason is because we are using only 1 Physical NIC and therefore in order to “force” the Geneve TEP traffic egressing from the Edge VM to pass through the Physical NIC as the traffic would require routing when communicating with the ESXi hosts Geneve TEP interfaces.
- NSX-T Geneve Overlay Network for ESXi Hosts (VLAN 120- 10.120.1.0/24) – This network will be used by the Geneve Overlay Tunnel endpoints vmkernel interfaces on the ESXi Hosts aka vmk10.
Here is a physical network diagram of my planned Tanzu vSphere 7 with Kubernetes on NSX-T 3.0 deployment:
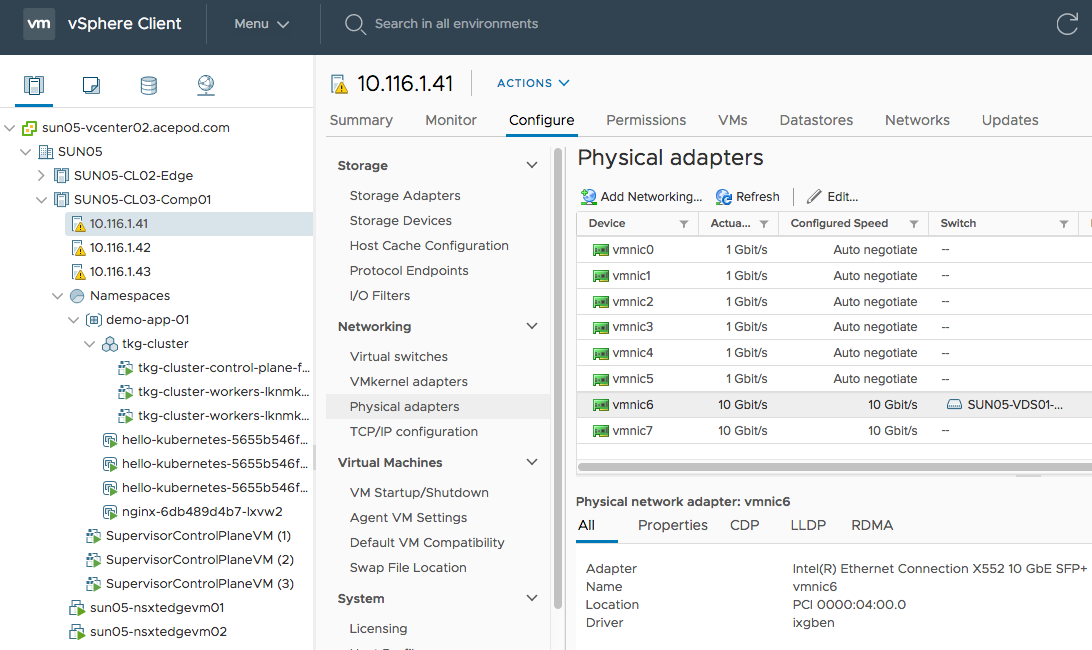
Hardware Used
- Supermicro E300-8D, Xeon D-1518 with 128GB RAM x 3 units
- Built-in Intel X552 10 GE Network Adapters
- Synology NAS with 2TB SSD
- Cisco Nexus 3064 (You can use any Layer 3 switch)
Now we are done describing the set up, lets start getting our hands dirty!